Read more of this content when you subscribe today. A monthly subscription costs just £3 (about $3.80 USD). You get access to my premium blog content, my Easter eggs page (with hours of clips to listen to!) and my monthly newsletter.
I have to admit something: I have never made proper puff pastry. If a recipe calls for it, I buy some or make rough puff pastry instead, and I tell myself that I have neither the time nor the space to go ‘full-puff’. The truth, I think, is that I don’t have the inclination, otherwise I would have got around to it by now. Modern puff pastry is made by rolling out a rectangle of dough, then sitting atop it a square of butter, thoroughly beaten flat with a rolling pin. The dough is folded around the butter, the dough and butter are then rolled out, rotated 90 degrees, folded, then rested and chilled. This single ‘turn’ is repeated six more times to produce a laminated pastry dough containing 729 layers of butter.
Rough puff pastry, on the other hand, is not made with a single layer of folded butter, instead very cold diced or grated butter is used, a non-continuous layer of butter means that those great sheets of crispy pastry are not made, hence rough puff, or flaky, pastry. The process of making it is similar to puff, except there are fewer turns, though it still needs to be rested in the fridge between them. My method (see below) is much easier than this, however.
The differences and semantics break down if we hit the historical cookbooks because at one point all ‘puff pastes’ were what we would call ‘rough puff’ today. There are many stories and theories regarding who invented puff pastry and when, and they are either apocryphal or impossible to confirm. When it comes to British cookery books, the earliest example I can find is the late Tudor classic The Good Houswifes Jewel by Thomas Dawson (1596). Here, a dough made from flour, water, egg yolks and some rubbed-in butter, is rolled out, peppered with diced butter, folded and rolled. More butter is added after each turn. This basic method seems to remain the same for the next two-and-a-half centuries: Sarah Harrison (1751), Elizabeth Raffald (1769) and Eliza Acton (1845) all have puff pastry recipes just like it.[1] The first time I find a puff pastry recipe that uses a single layer of bashed-out butter is in Alexis Soyer’s classic A Shilling Cookery for the People (1855 edition).
Sarah Harrison’s 1751 recipe for Puff Paste: it would be considered rough puff today.
I admit that my search was not a comprehensive one, but I think it’s safe to say that in recipes older than c.1850 if puff pastry is asked for, what we should be making is a rough puff.
If you like the blogs and podcast I produce and would to start a £3 monthly subscription, or would like to treat me to virtual coffee or pint: follow this link for more information.Thank you.
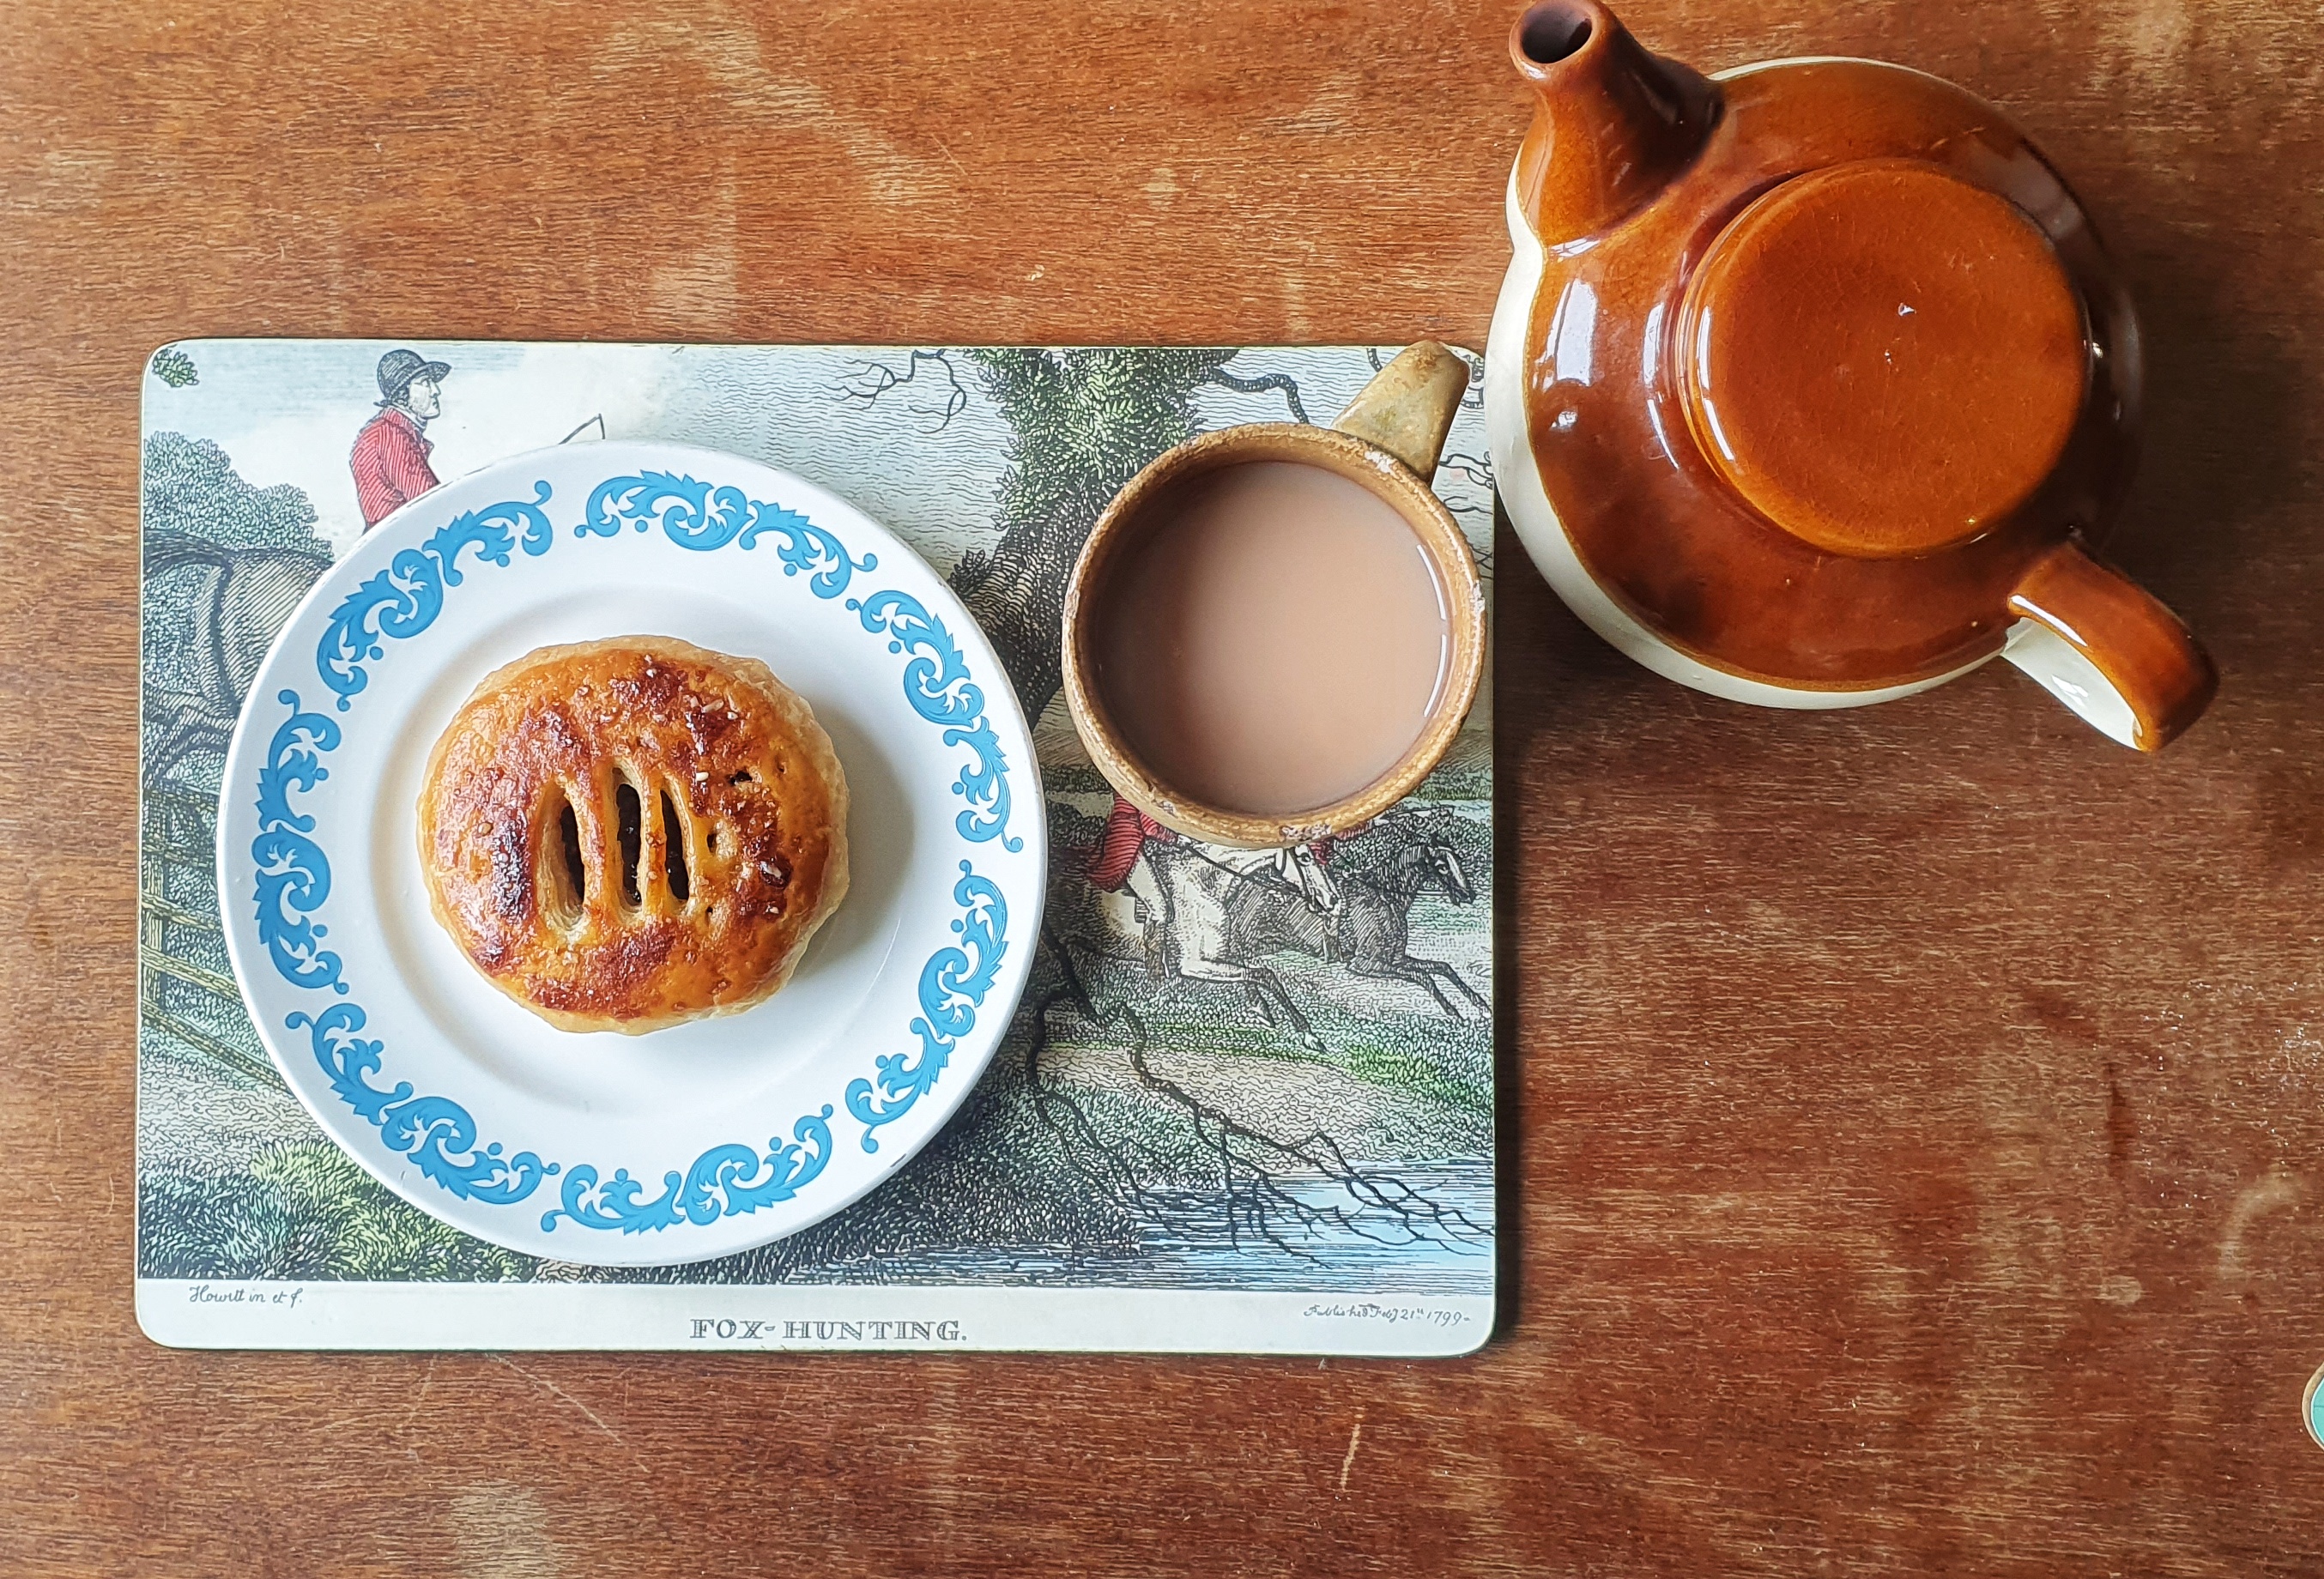
Recipe
My recipe is based on a Jane Grigson’s for Quick, Foolproof Puff or Flaky Pastry, from her book English Food,[2] which is, in turn, adapted from a recipe by New York pastry chef Nicholas Malgieri. I’m not sure if it is foolproof, but it is by far the easiest method I know. The reason for this is that the cubes of very cold butter are mixed into the dough. As you roll and fold, you can see the cubes of butter eventually turn into large, flat discs within the dough. Very satisfying. Mixing the butter into the dough itself also means that the butter is evenly distributed and doesn’t end up leaching out of the sides.
I have given instructions to make this dough by hand, but you can use a machine. However, you must mix the ingredients very slowly and add liquid in a steady stream, so the lumps of butter don’t turn into breadcrumbs.
This type of rough puff pastry doesn’t need to be rested between rolling and folding unless it is very hot where you are, then you may need to pop it in the fridge for 15 minutes or so between turns.
This pastry only needs two ‘turns’ before it is ready for rolling and use, however, if you want a pastry that is just flaky, then do a third turn before rolling it out for use.
250 g strong white flour, plus extra for dusting
½ tsp salt
250 g very cold, unsalted butter, cut into 1 cm dice (approx.)
Juice of half a lemon
Water (see recipe)
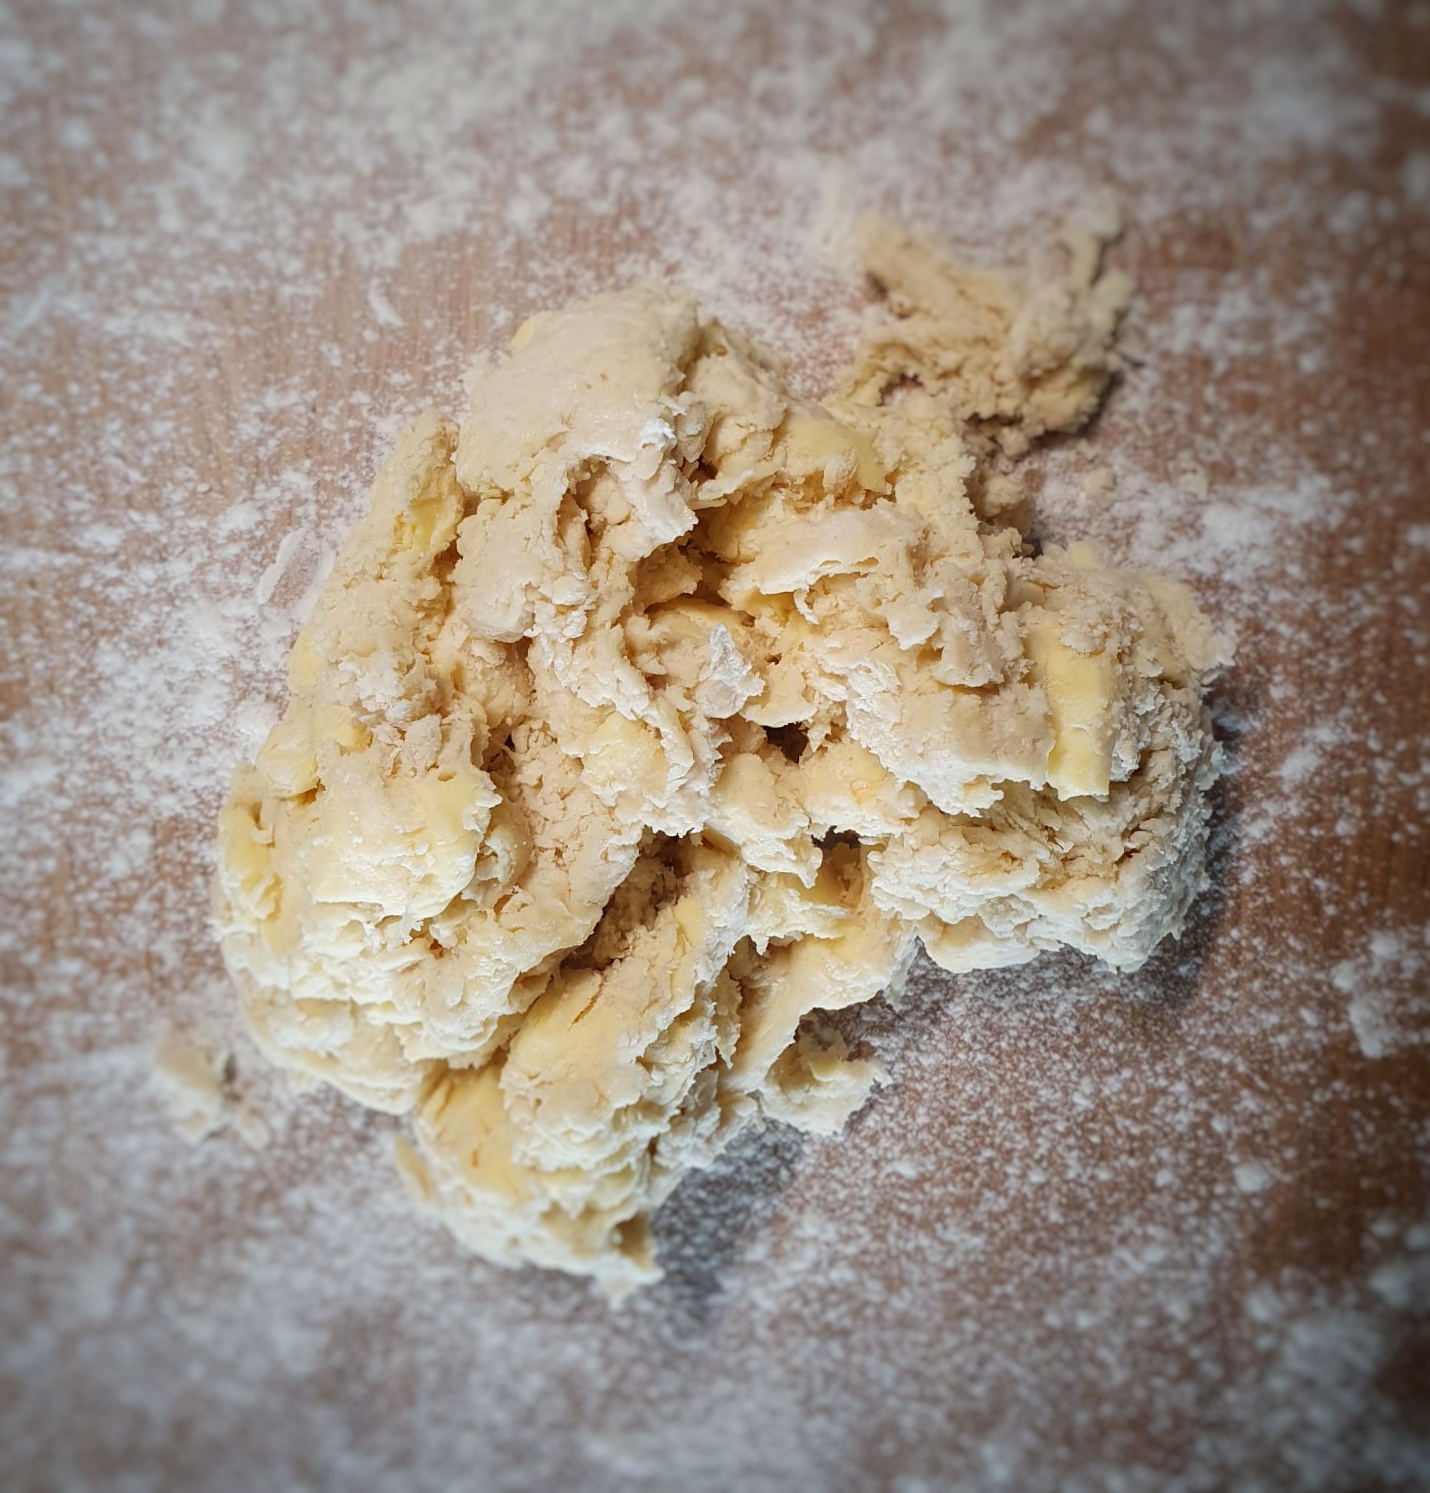
Mix the flour and salt and add the butter, squashing the pieces between your thumb and forefinger, without rubbing them in or breaking them up.
Next, place a jug on a weighing scale add the juice from the lemon and then top up to a weight of 125 grams.
Stir in most of the liquid to form a ball of dough, using the remainder to pour on any dry-looking patches of flour.
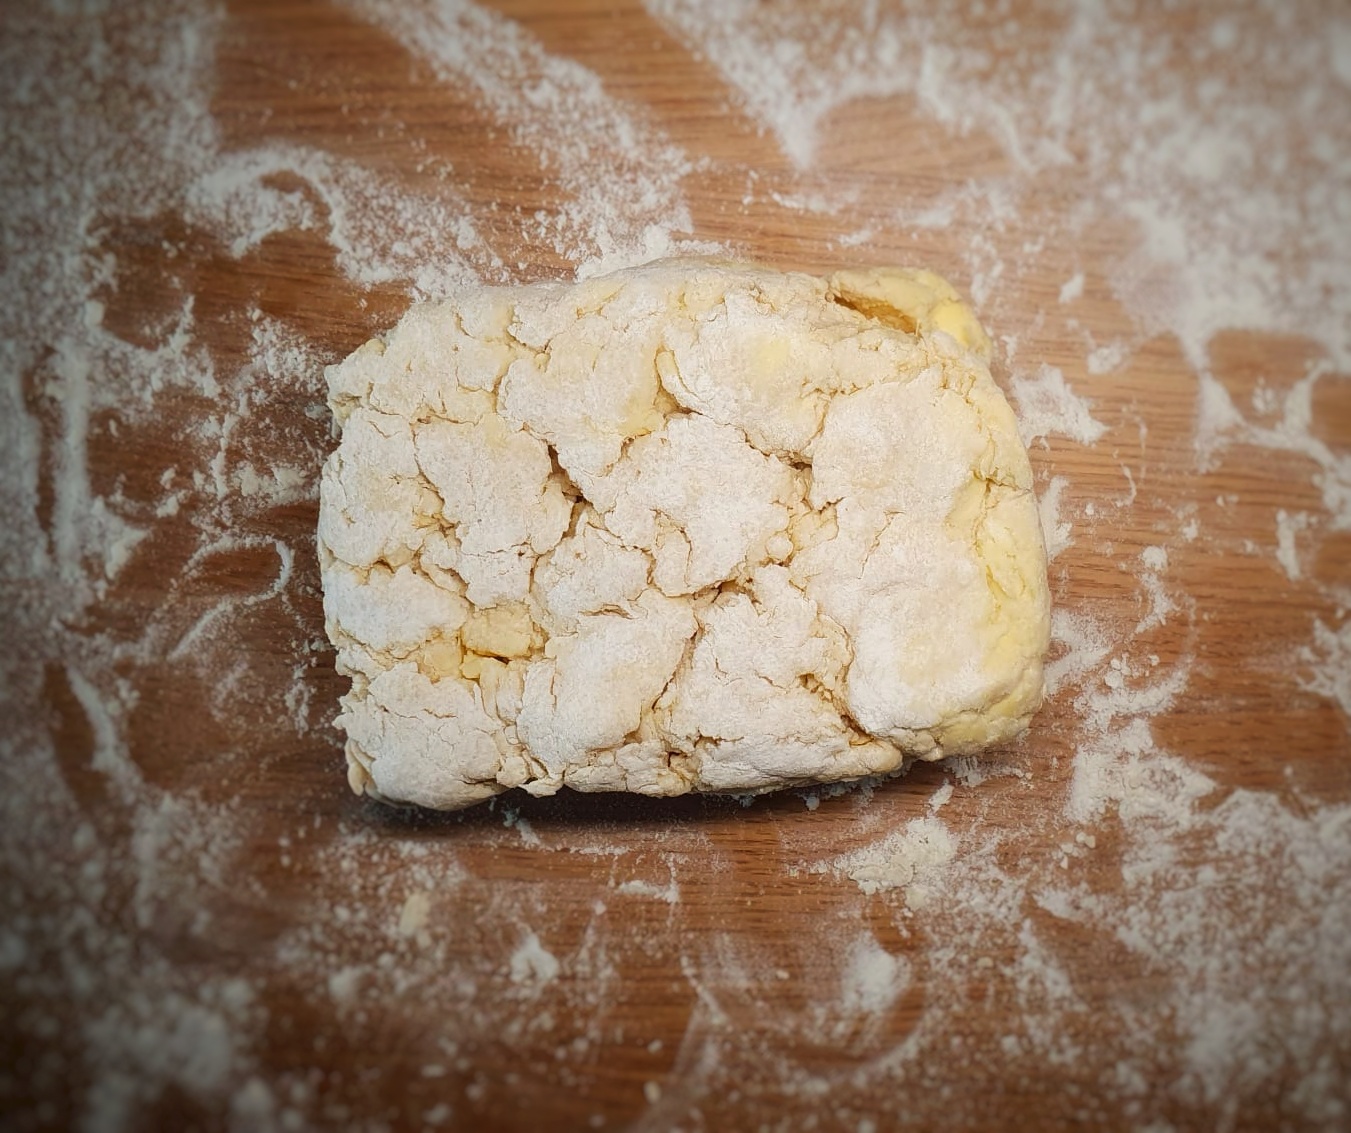
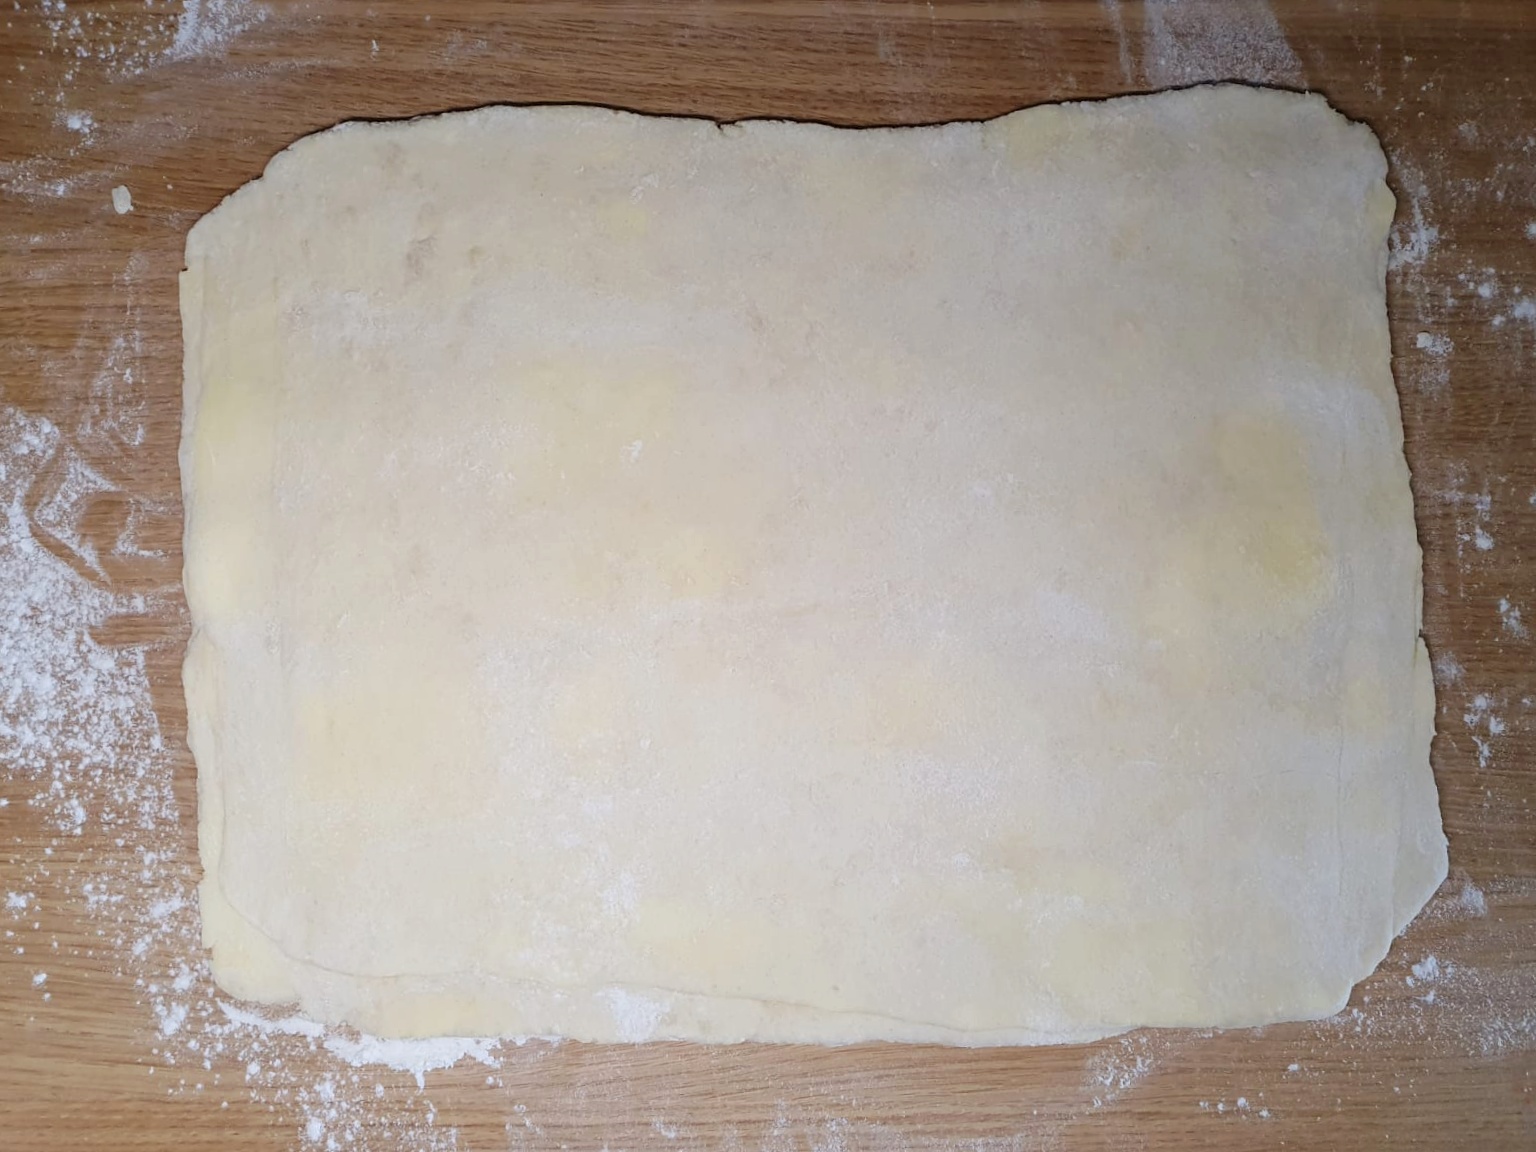
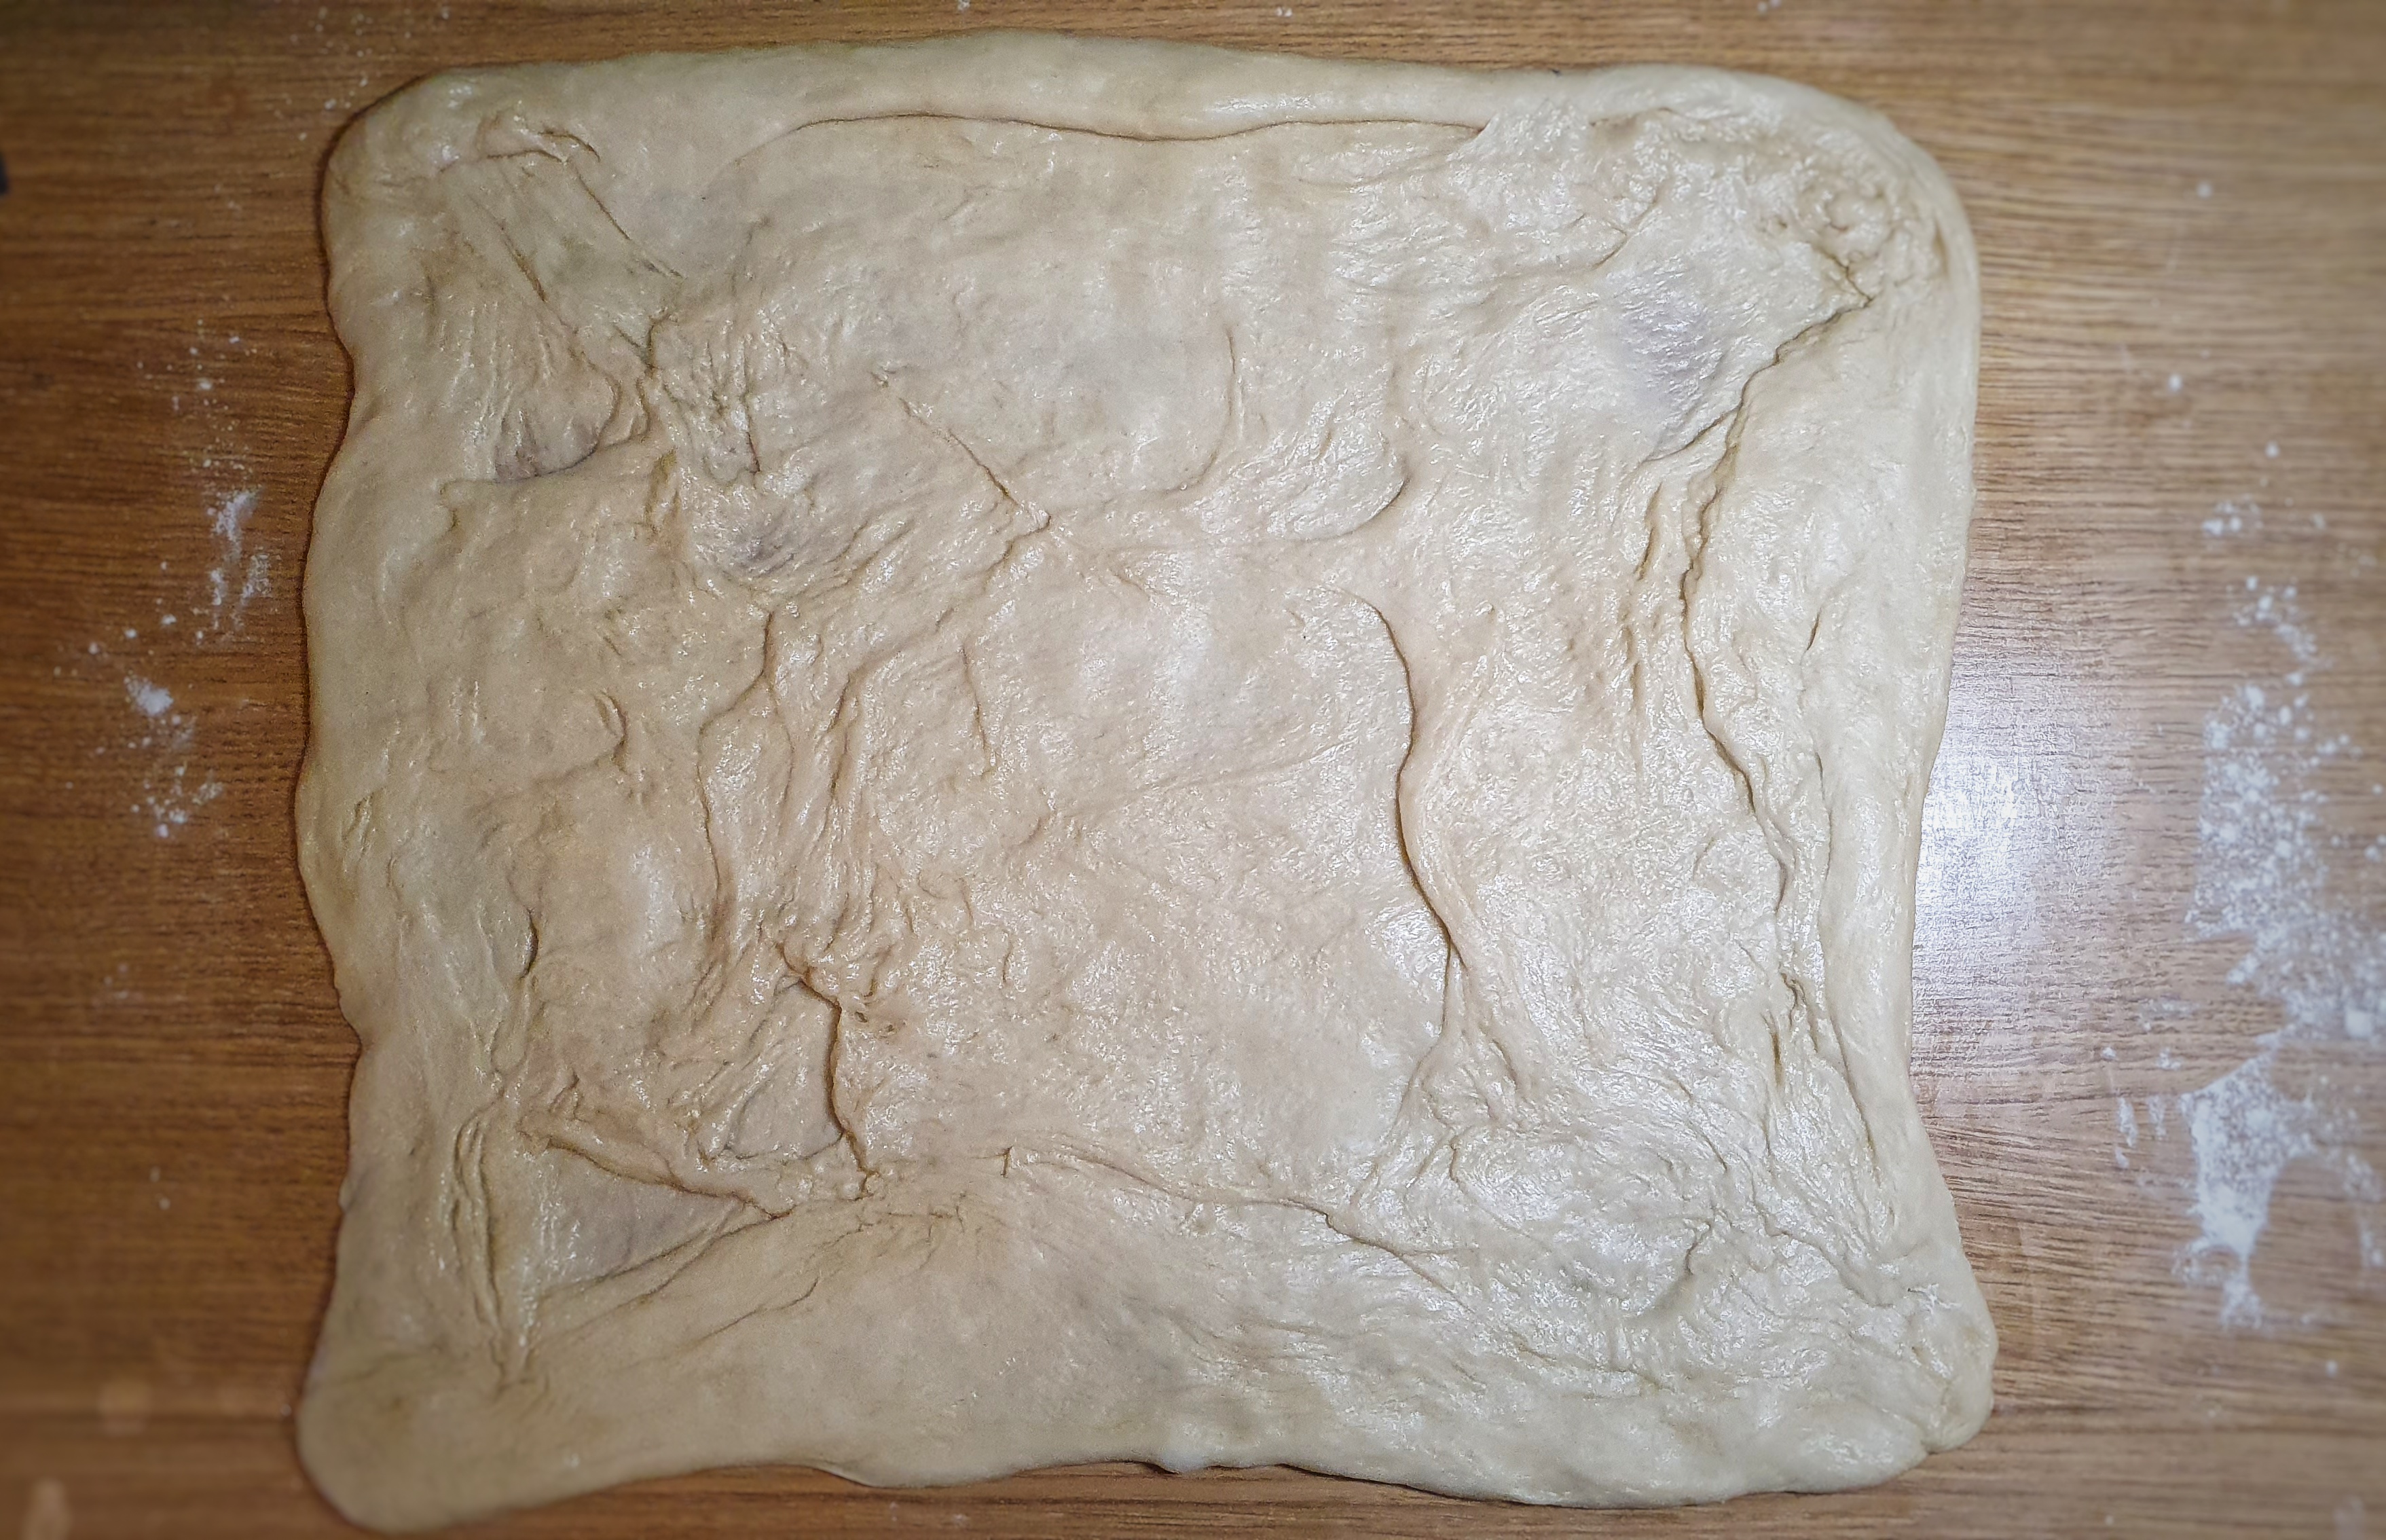
Bring the dough together into a single mass and place on a well-floured worktop. It will look a right mess, but do not worry, it will neaten up in the rolling and folding stage.
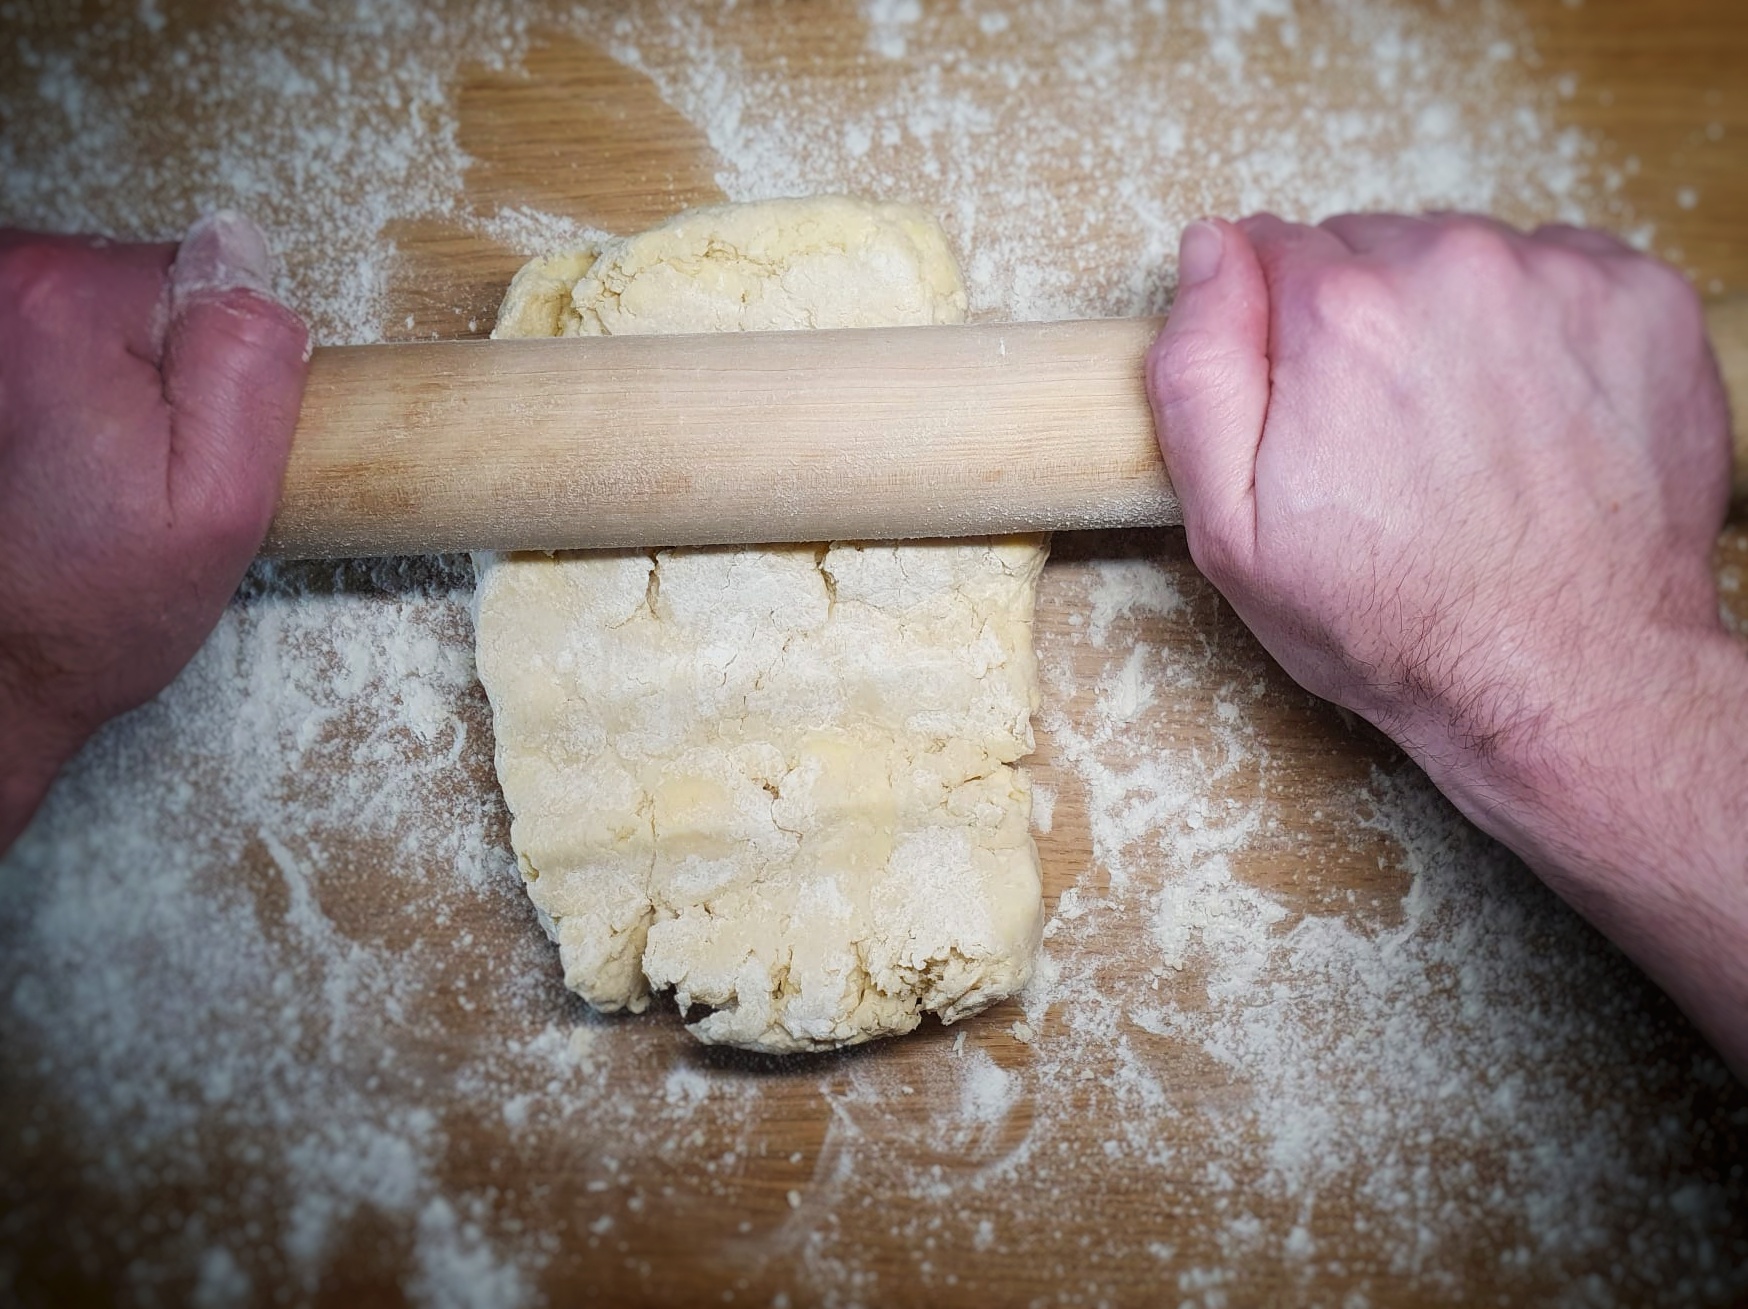
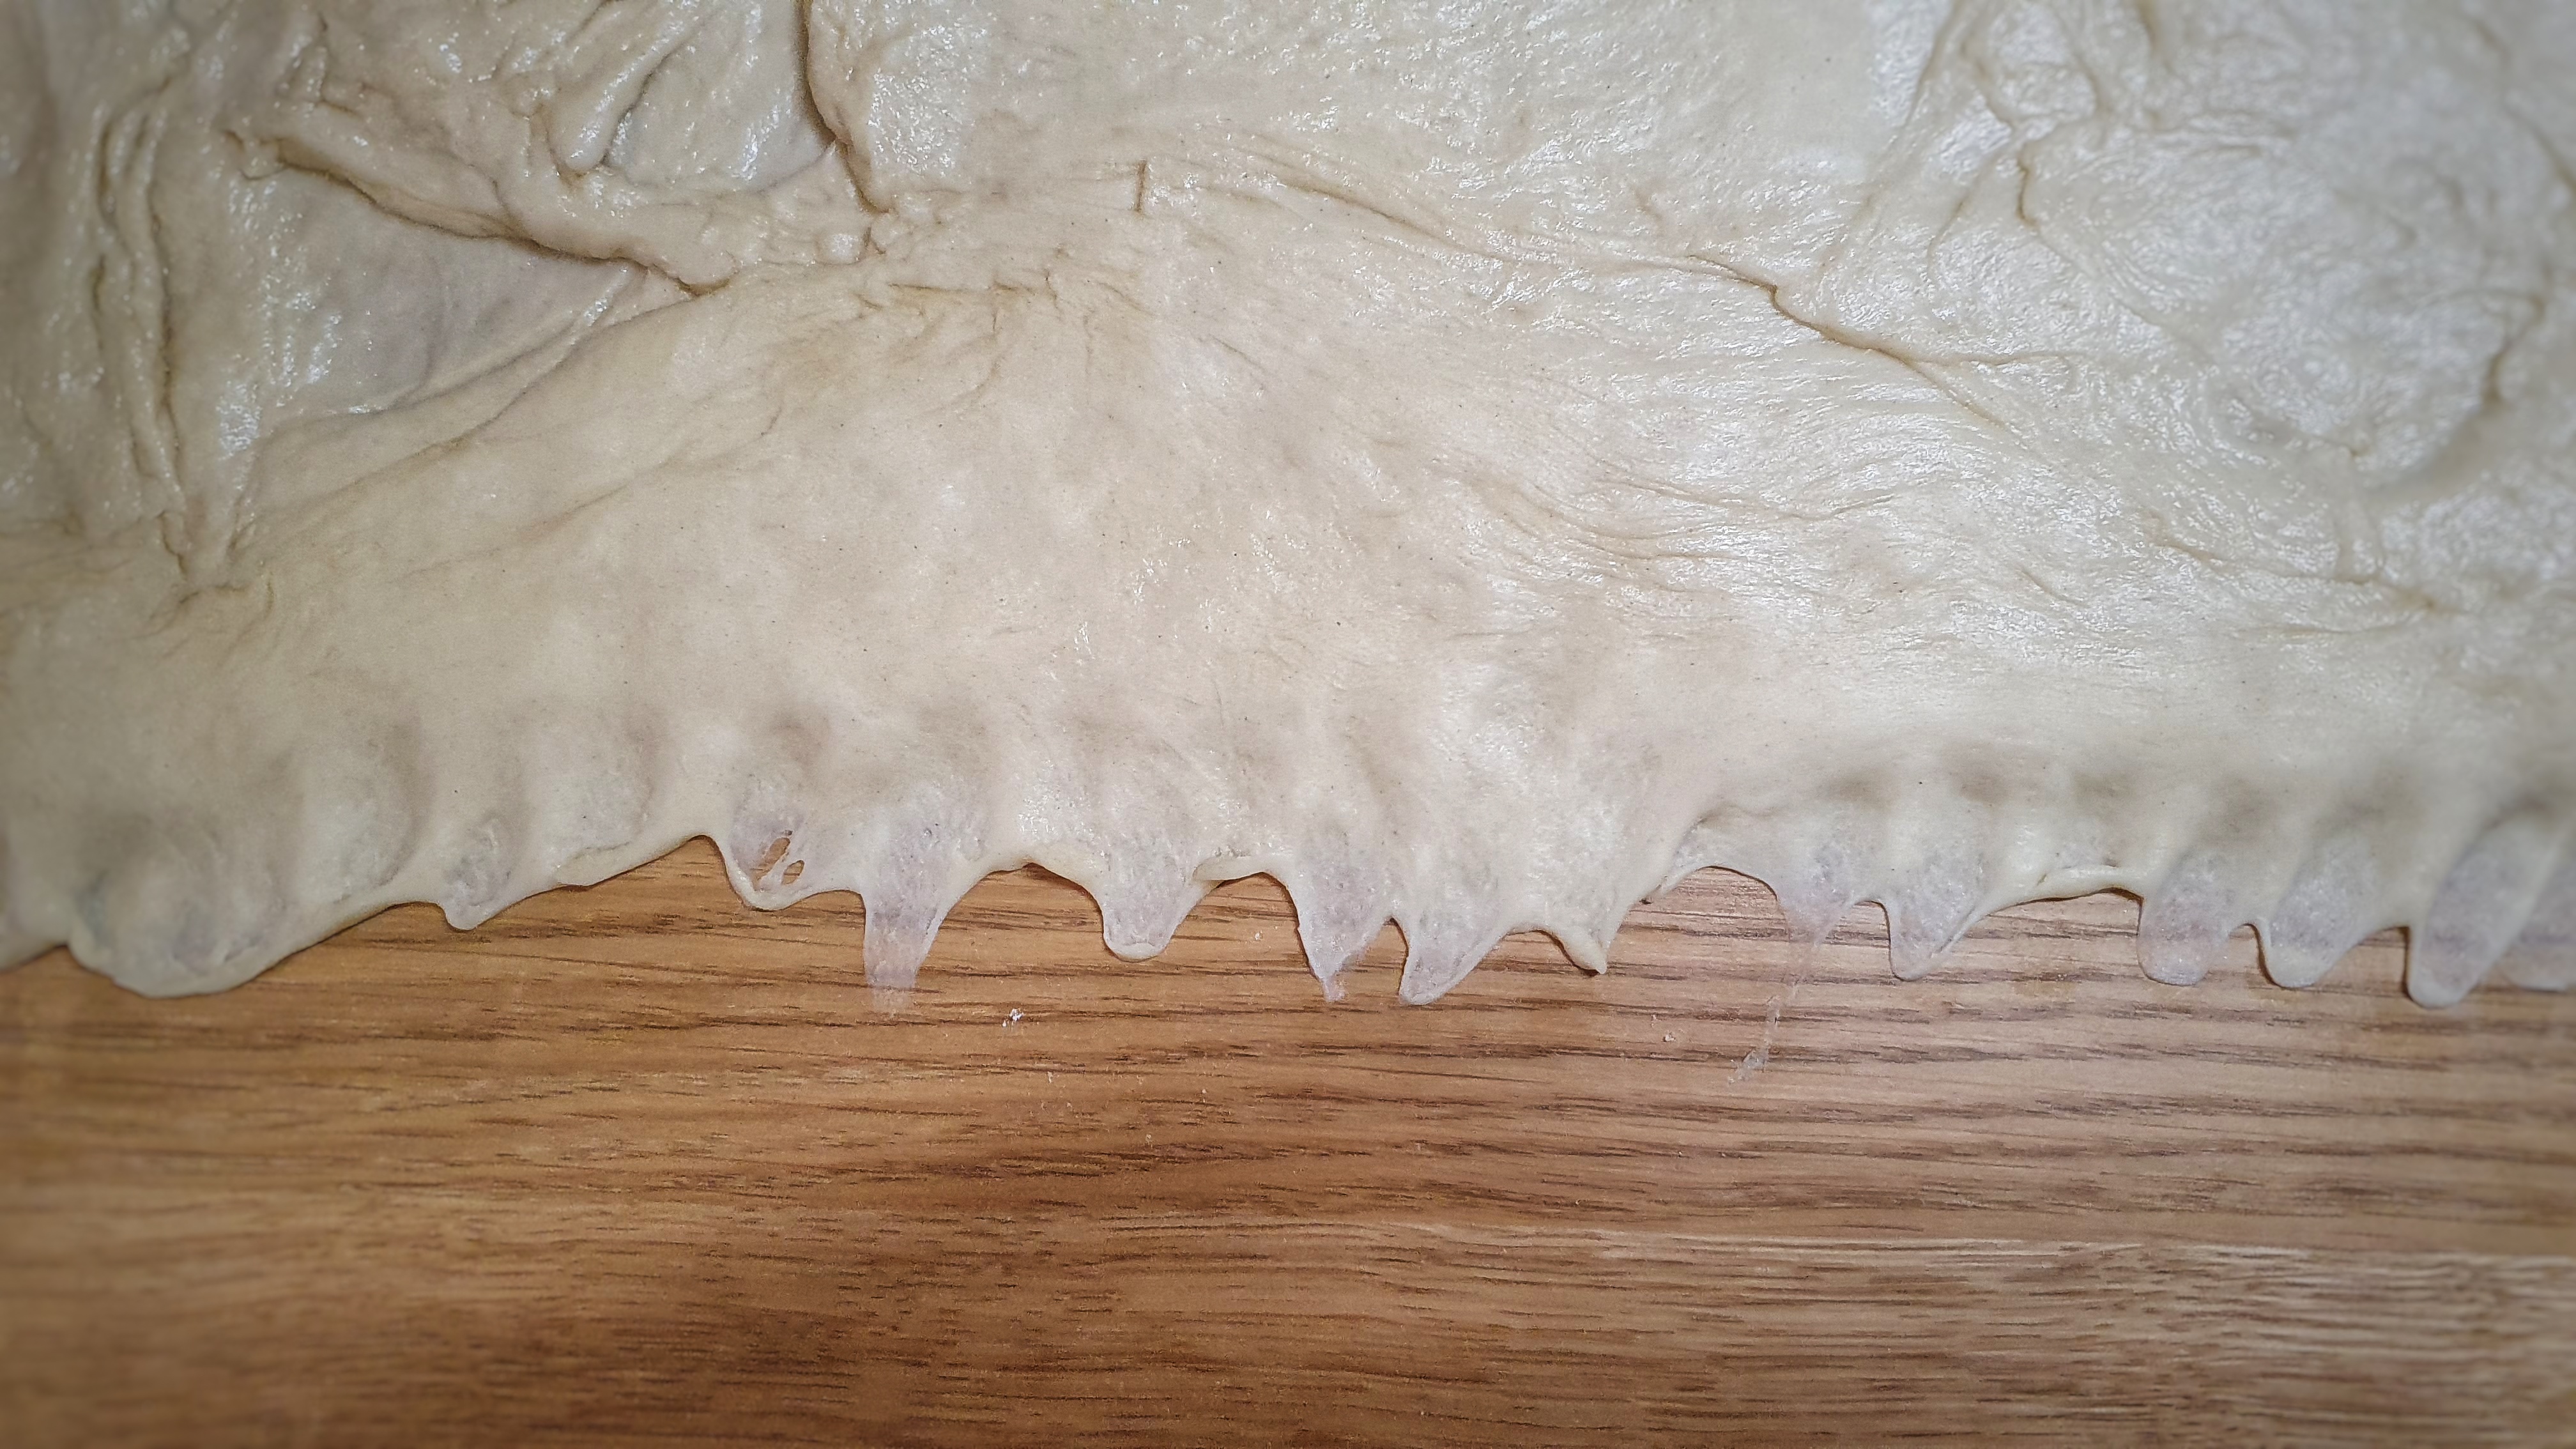
Shape it into an approximate rectangle, then use a rolling pin to roll it into a large rectangle around 30 cm wide and 20 cm deep. Ensure you keep your work surface well-floured because the dough is quite sticky at first.
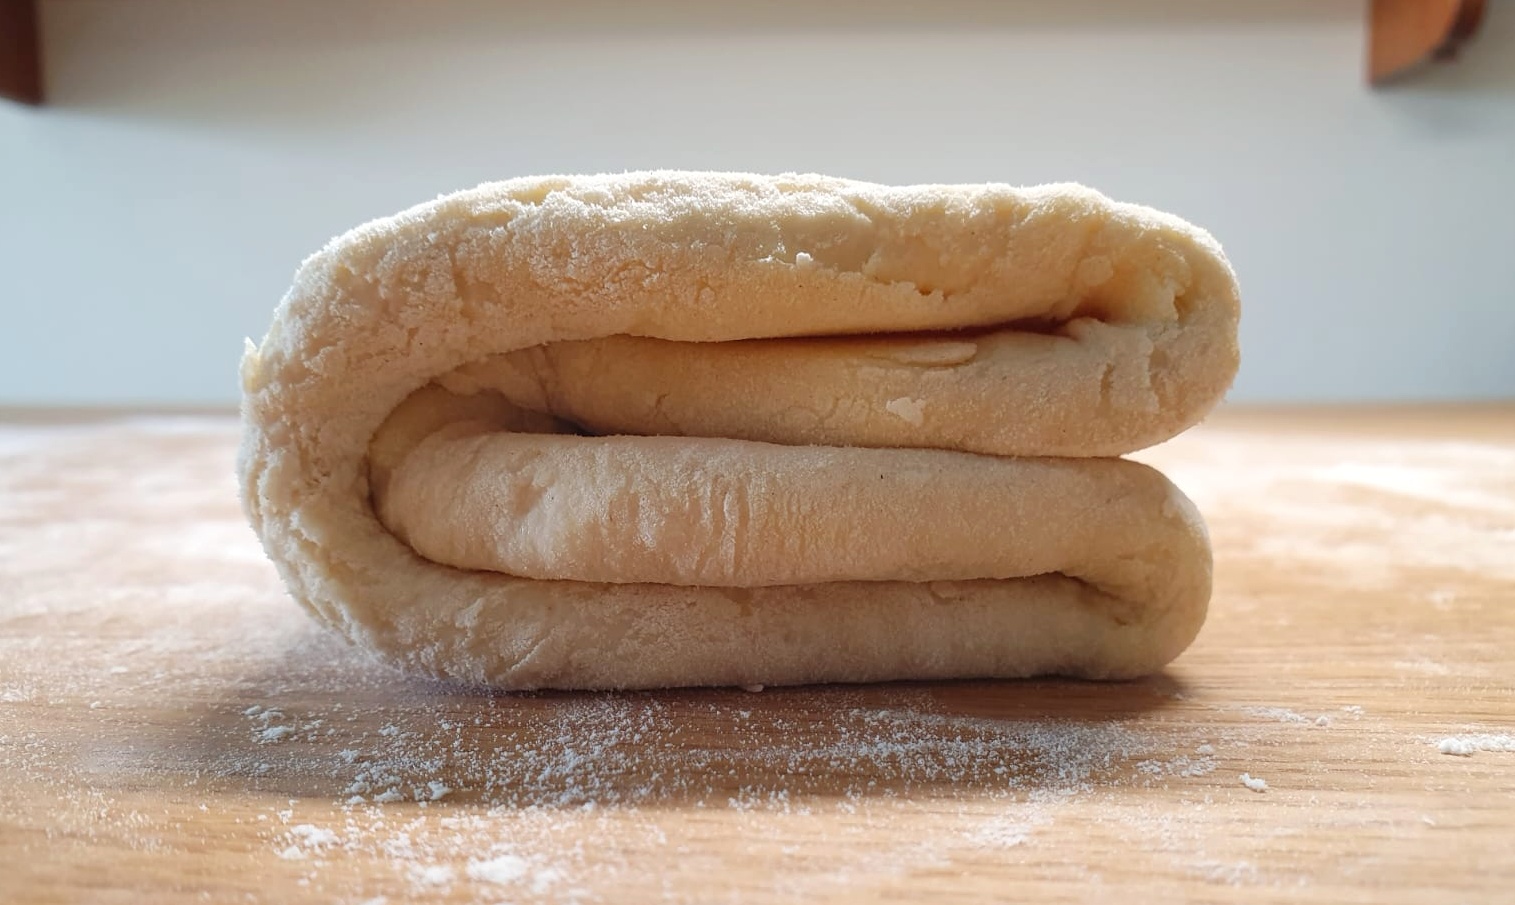
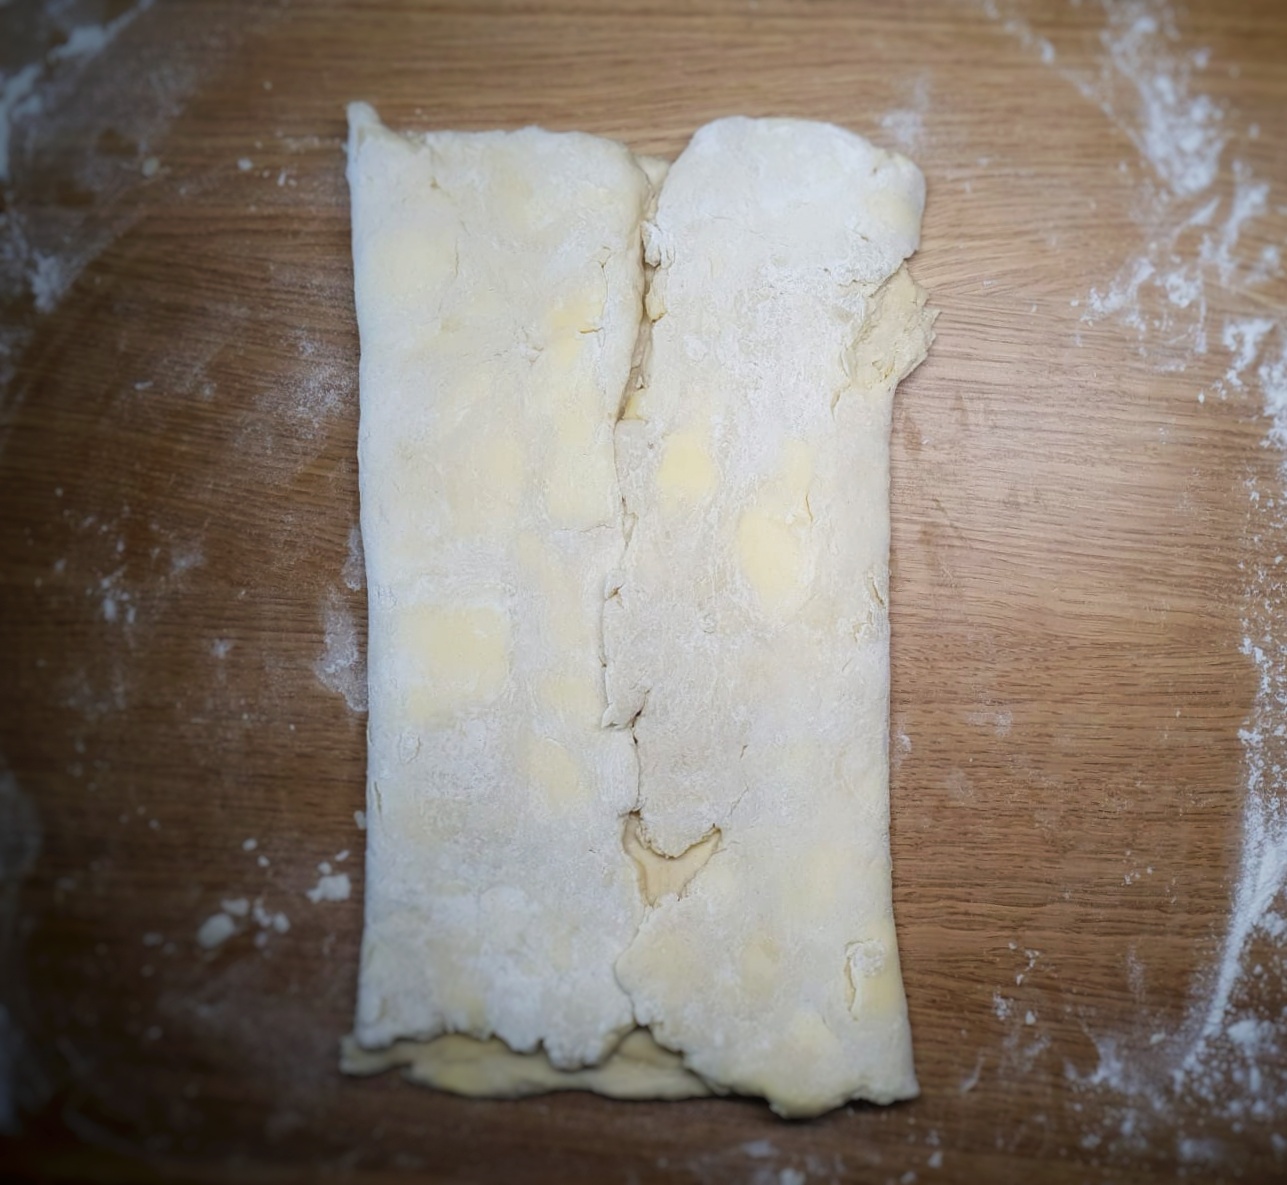
Now fold the sides into the centre of the rectangle and then fold it in half, so it looks a little like a book. Allow it to rest for 2 minutes.
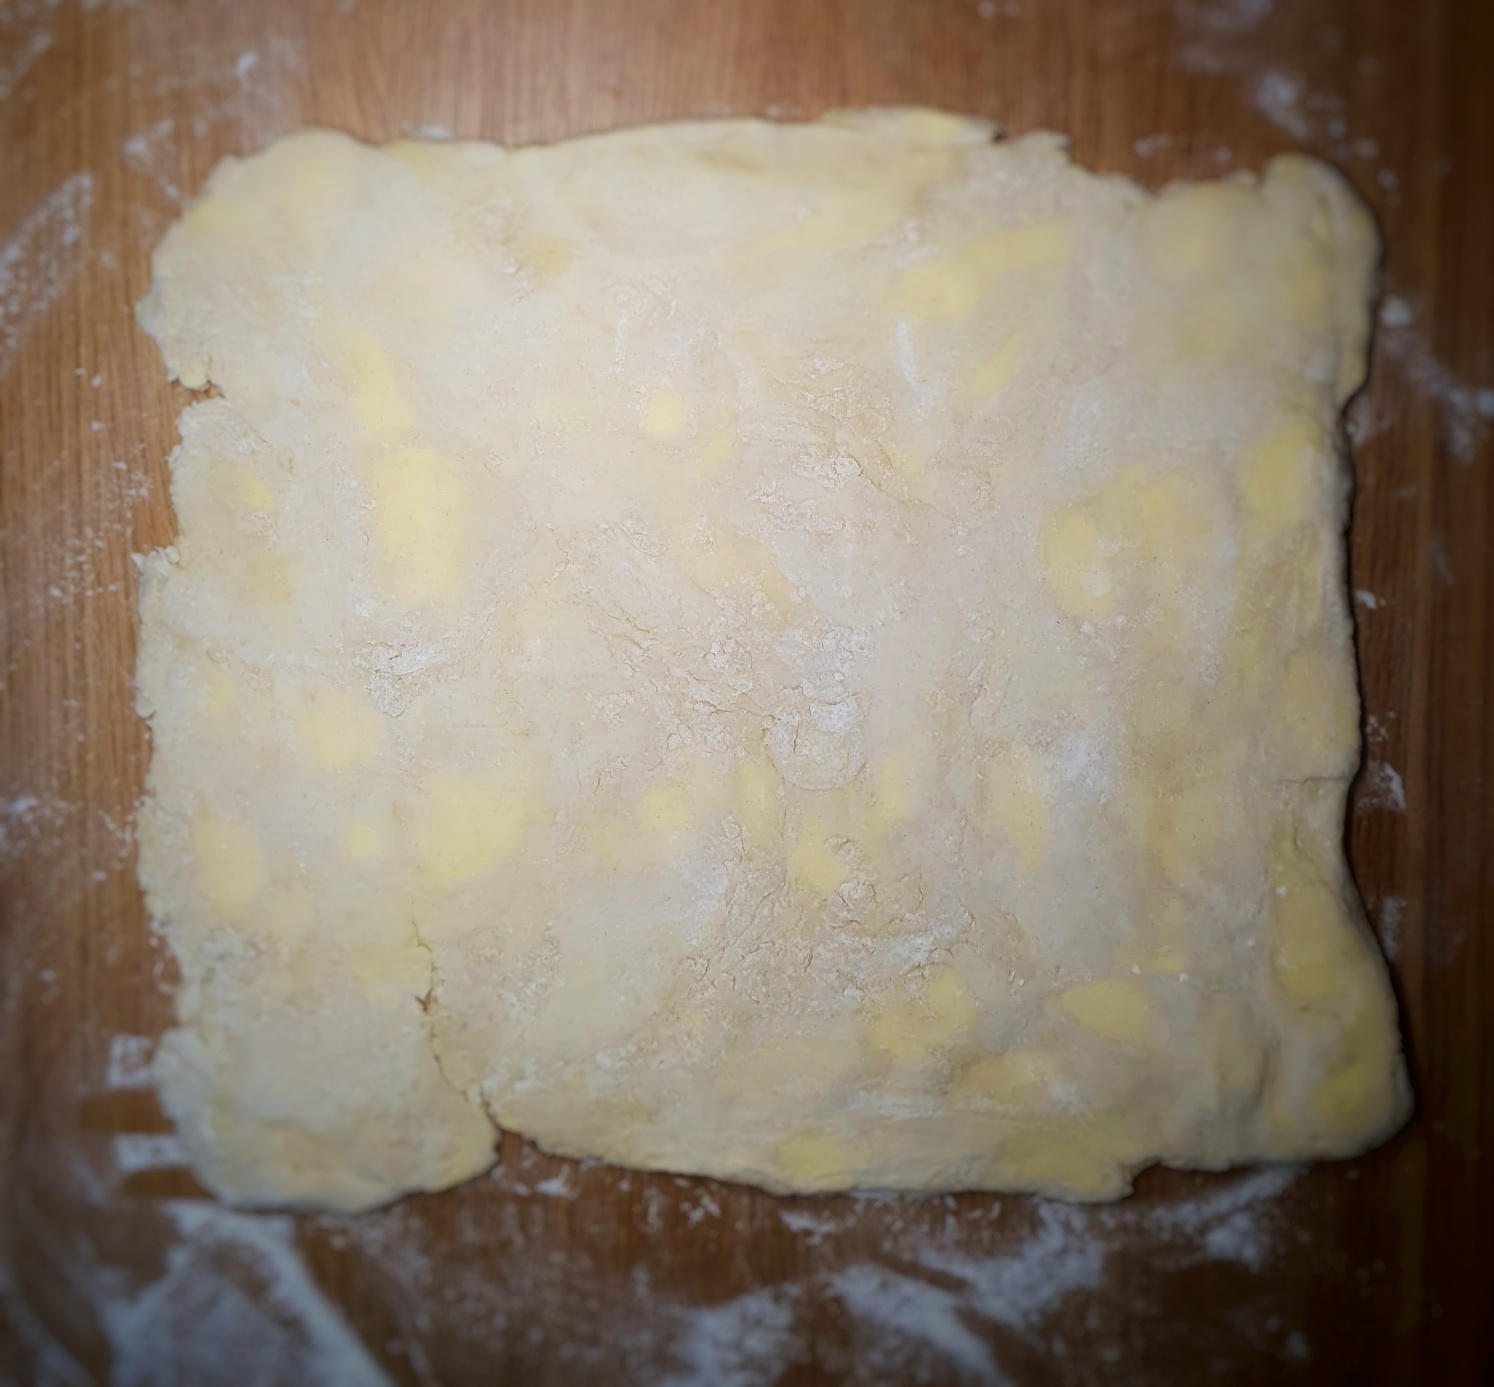
Turn it 90 degrees clockwise and then roll it out again, roll it out thin enough to flatten the cubes of butter.
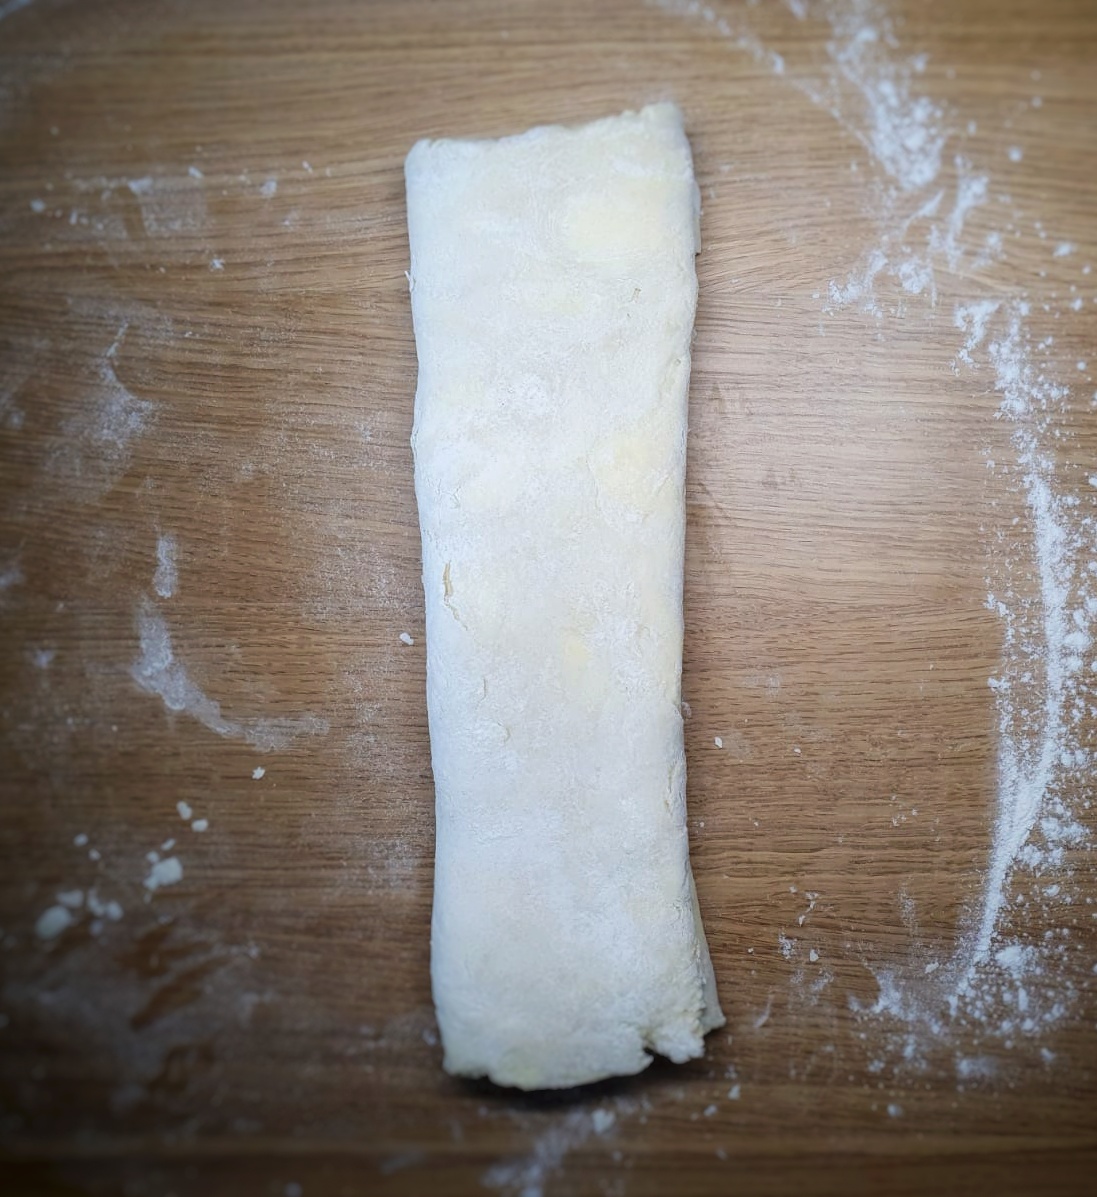
Fold up and roll out one more time, before wrapping in cling film and allowing it to rest in the fridge for 30 minutes, and roll out as required.
After the first turn the pastry looks a little untidyThe pads of flattened butter are obvious on the second rolling-outThe pastry is much neater and smoother after the second turn
Notes:
[1] i.e., Harrison, S. (1751) The House-keeper’s Pocket-book And Compleat Family Cook. 5th edn. R. Ware; Raffald, E. (1769) The Experienced English Housekeeper. First Edit. J. Harrop; Acton, E. (1845) Modern Cookery For Private Families. Quadrille.
[2] This is the third edition: Grigson, J. (1992) English Food. Third Edit. Penguin.
Hello everyone. A very quick post just to tell you about the in-person event at the British Library I am taking part in as part of the British Library’s Food Season Big Weekend 2024. I will be in conversation with historian and food expert Professor Nancy Siegal discussing ‘Revolution & Tea in the USA’.
It’s on Saturday 25 May 11.15 am at the British Library Piazza Pavilion, tickets £5/2.50 (barg!). There will be tea and there will be cake! Click here to book.
It would be great to see you there if you are in or around London on the 25th. You can also buy a weekend pass for the full weekend. See here for weekend passes.
More info from the website:
“Taste the past and find out how 18th century American women, armed with tea and cake, helped stoke a revolution. Nearly 300 years after the United States of America successfully freed itself from Britain, historian and food expert Professor Nancy Siegal moves beyond the battlefields and weapons to meet the women who harnessed the kitchen to champion freedom and American nationalism. Nancy will be in conversation with food historian Dr Neil Buttery. Tea and cake, made from original recipes, will be served.
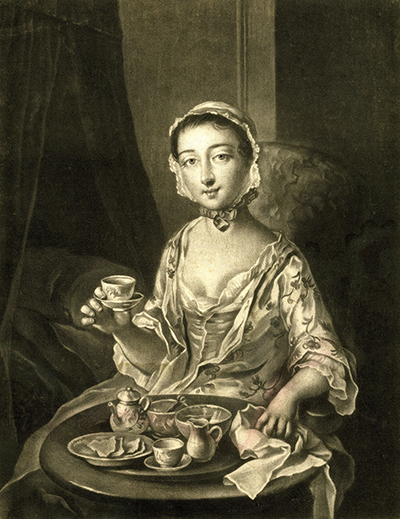
‘Morning Tea’ by Richard Houston (1758; British Museum)
Well hello! Sorry for the long quiet spell, I have been hard at work writing not one, but two books. The manuscripts have been handed in and the usual service can resume. I did keep the podcast going though, so if you’ve not heard the new episodes, listen below:
The books are about baking and puddings, and I’ll tell you more about them later in the year. As I was researching and writing them, I realised that there are recipes I have been meaning to write for you, but, for one reason or another, I have never got around to. Well, I aim to rectify this over the next few months. Top of my pile is the very delicious Chelsea bun, my favourite of the sticky bun tribe.
I recently asked Twitter[1] which was better, cinnamon or Chelsea buns. In my hubris, I expected the Chelsea bun to win easily. It did not, and the main reason it wasn’t picked was that folk didn’t know what one was. Well, today I give you my recipe which I have been working on and I think perfected (I hope you agree).
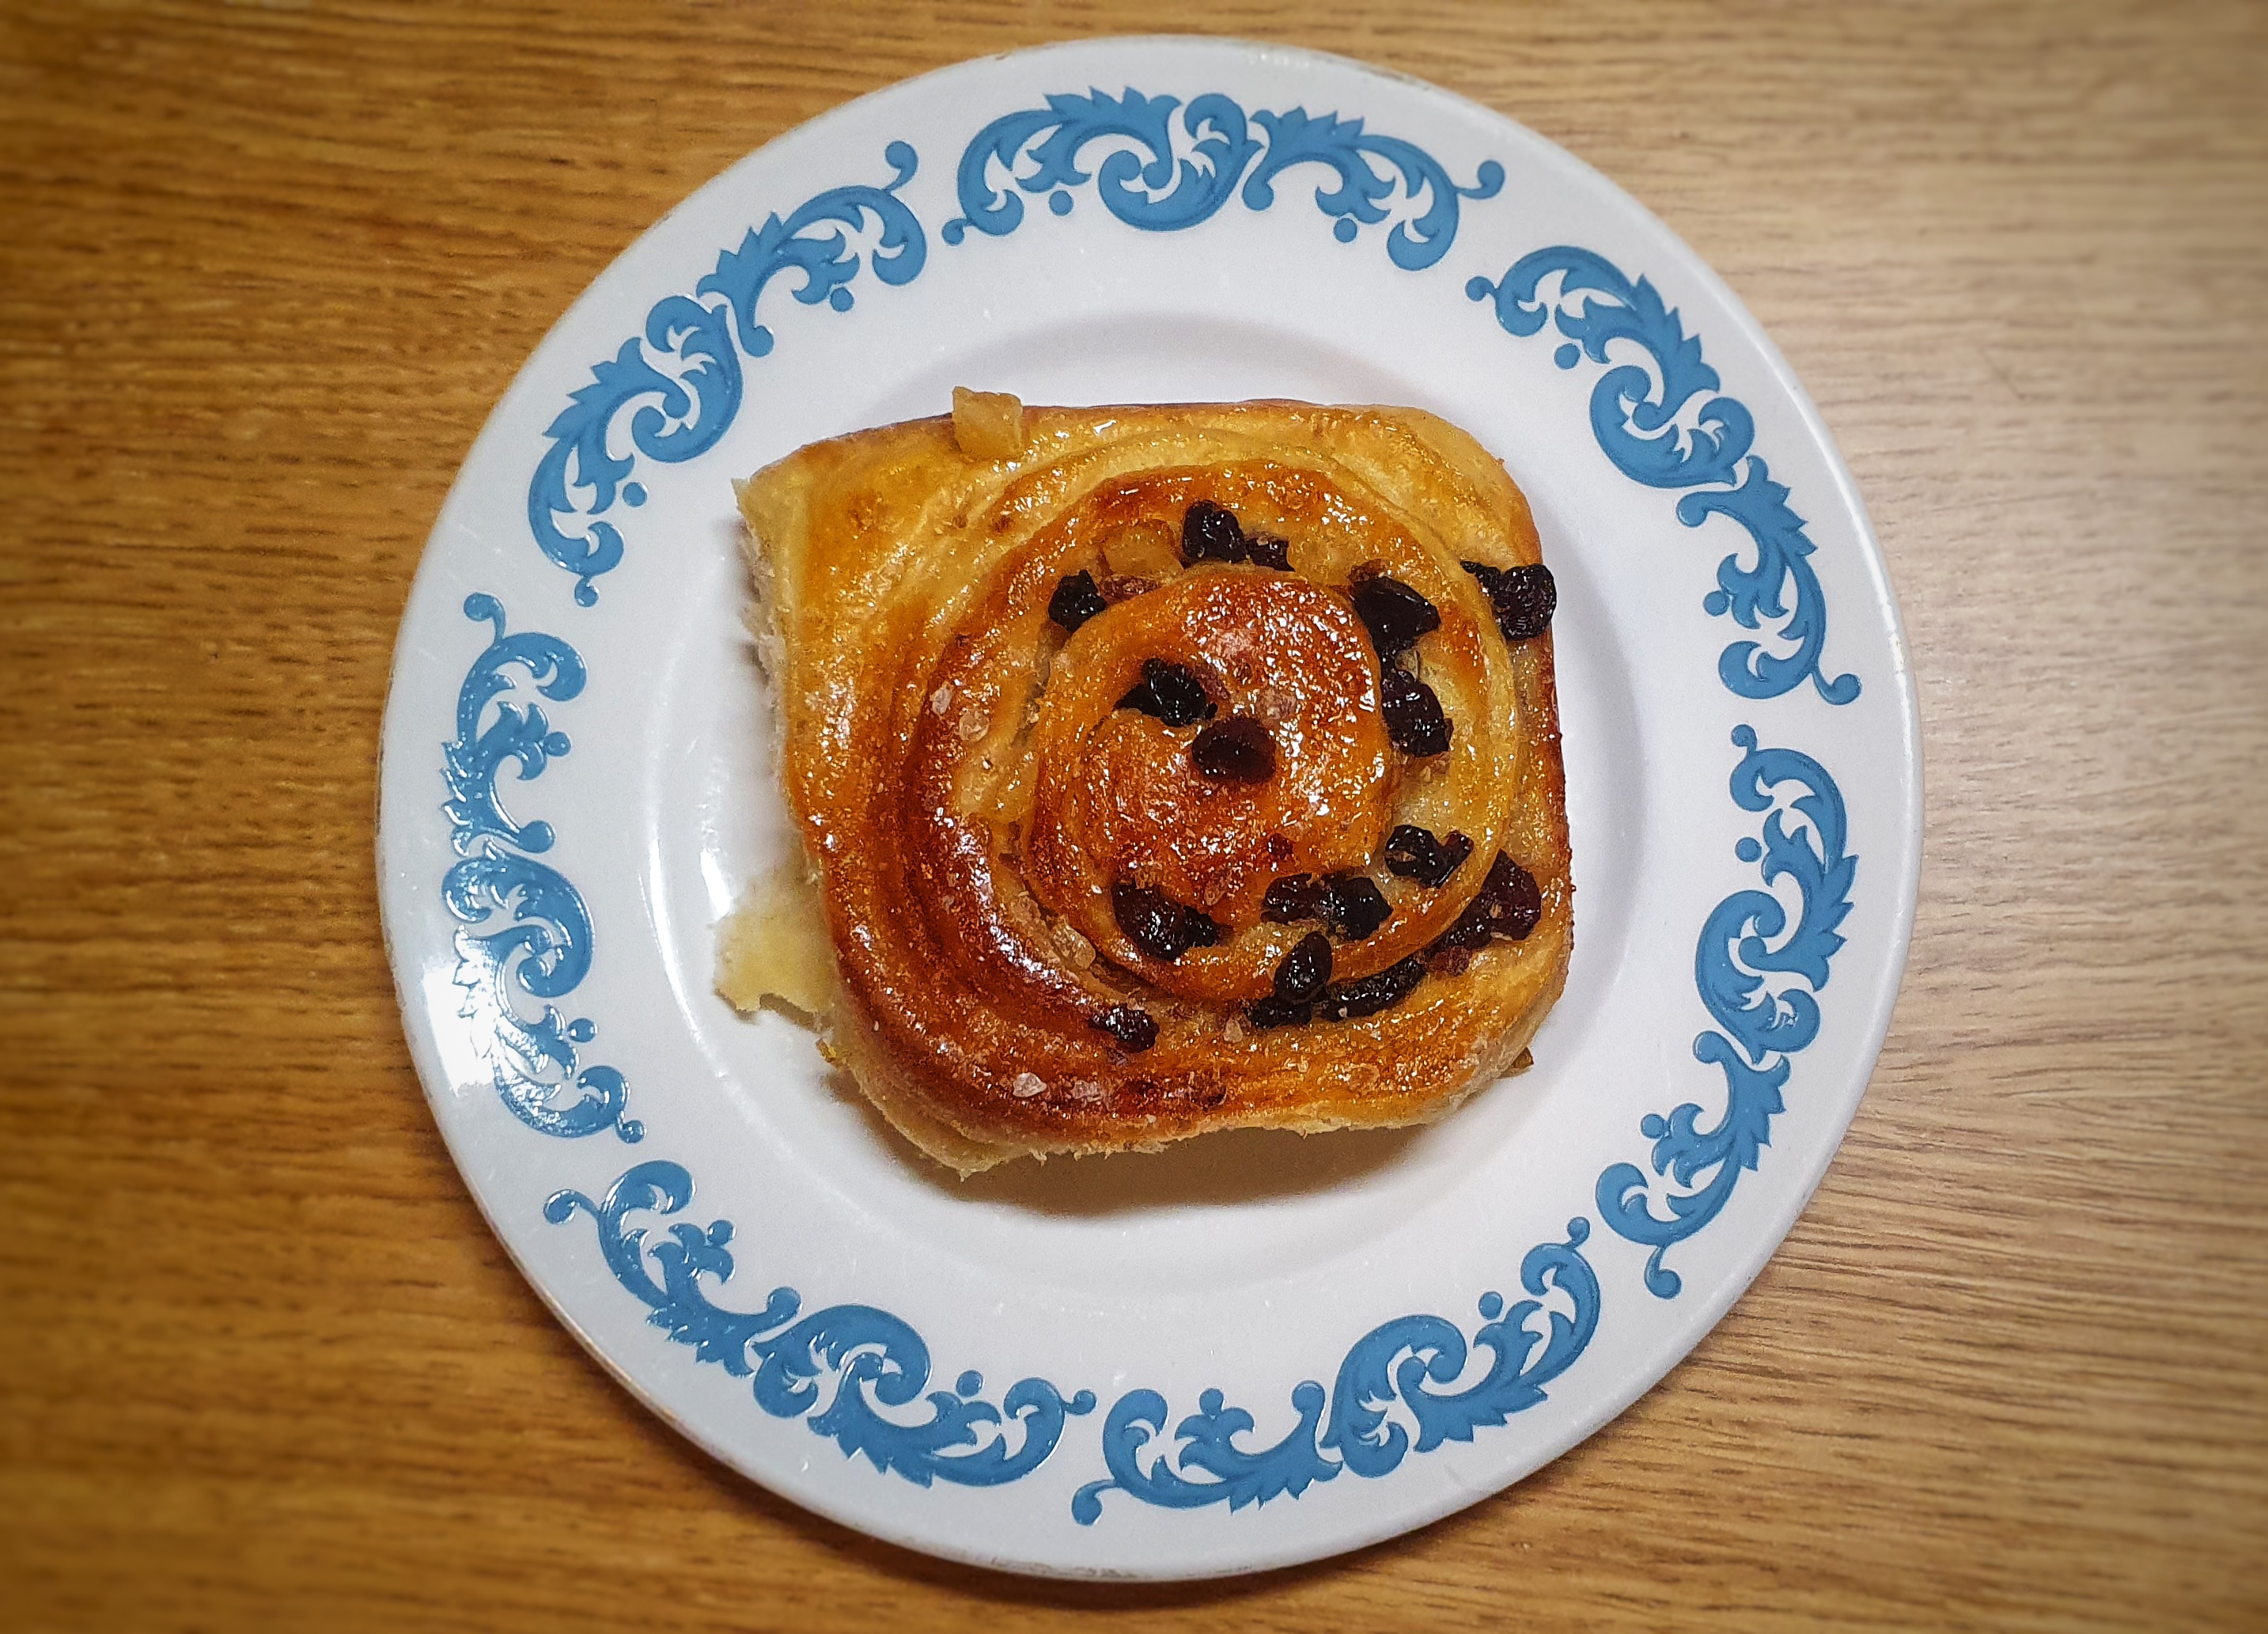
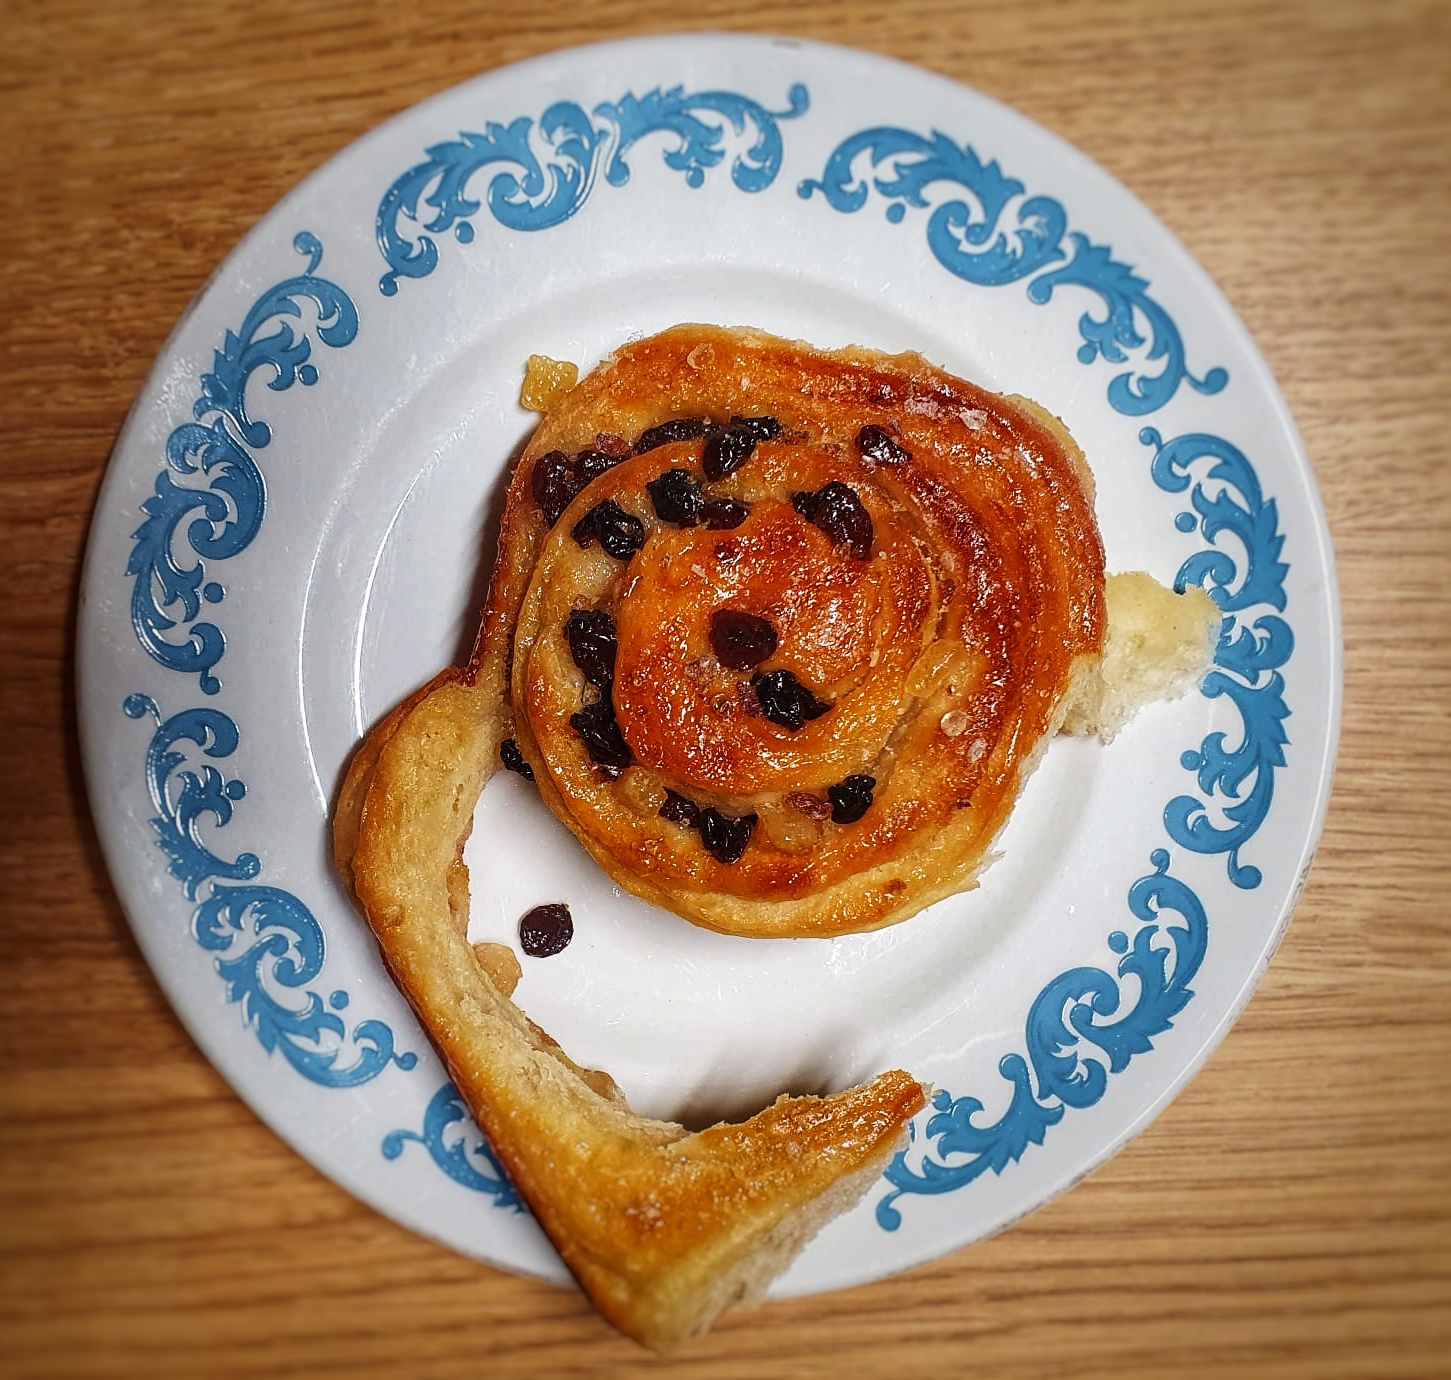
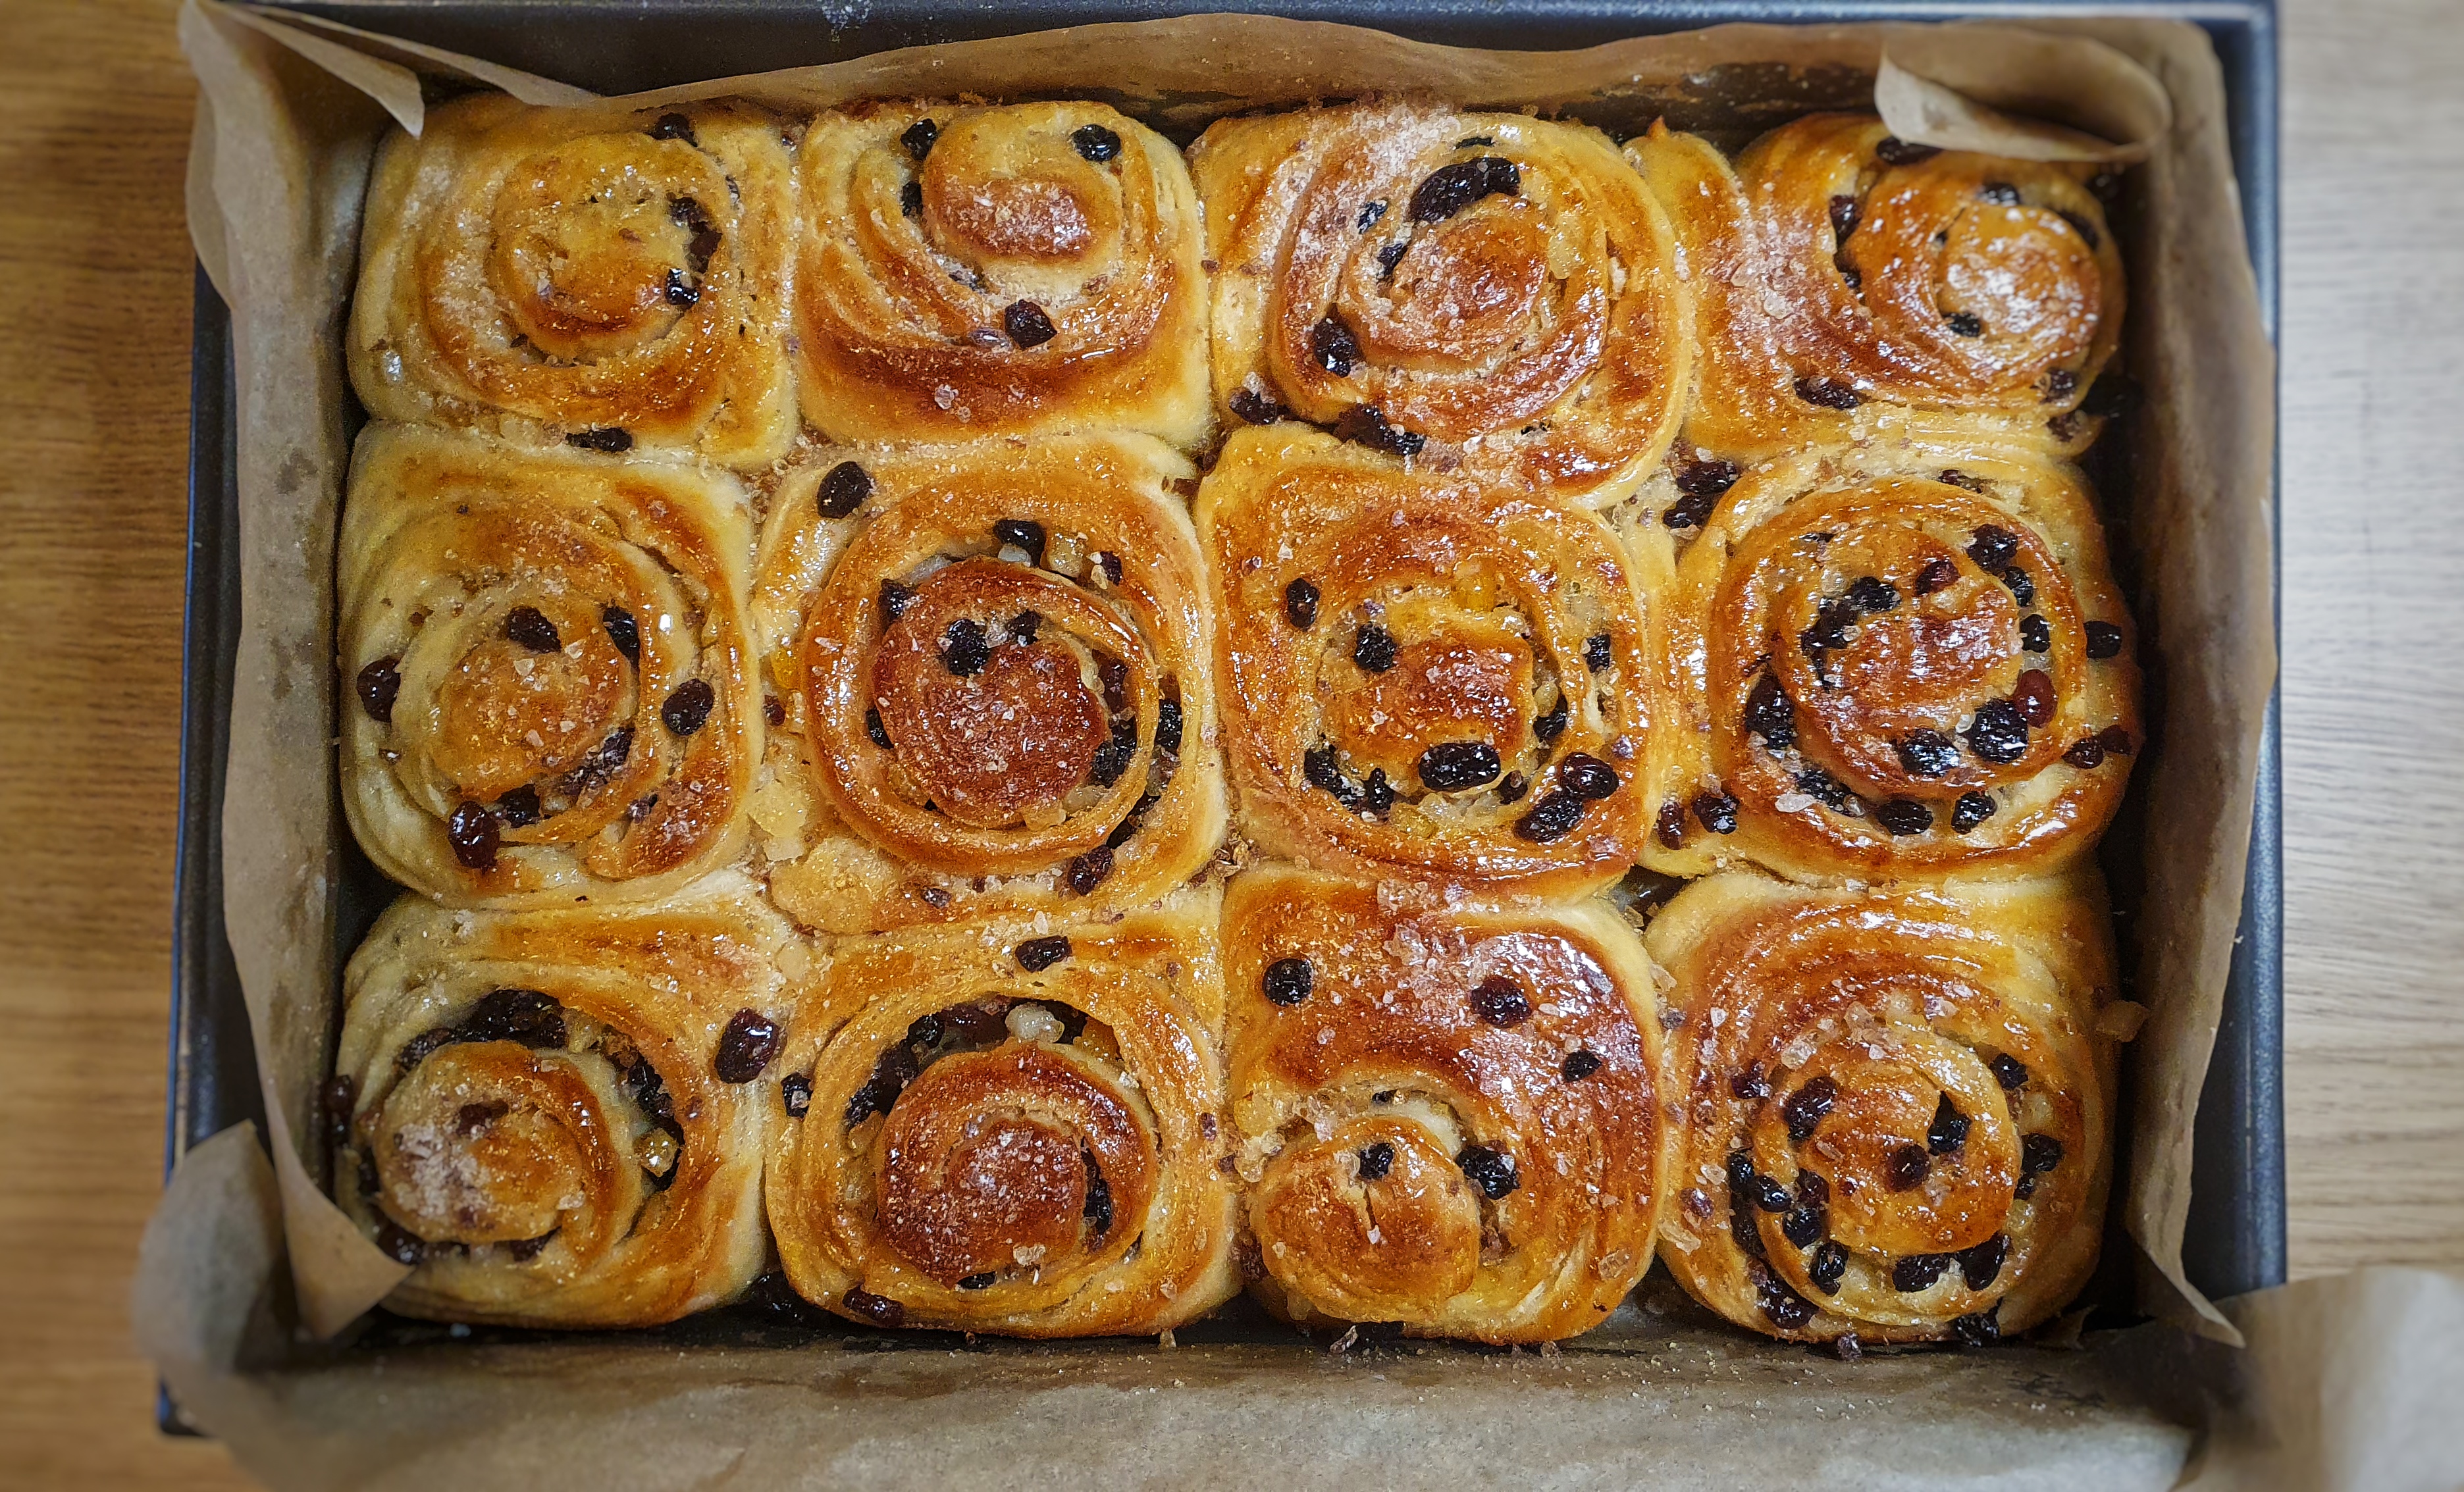
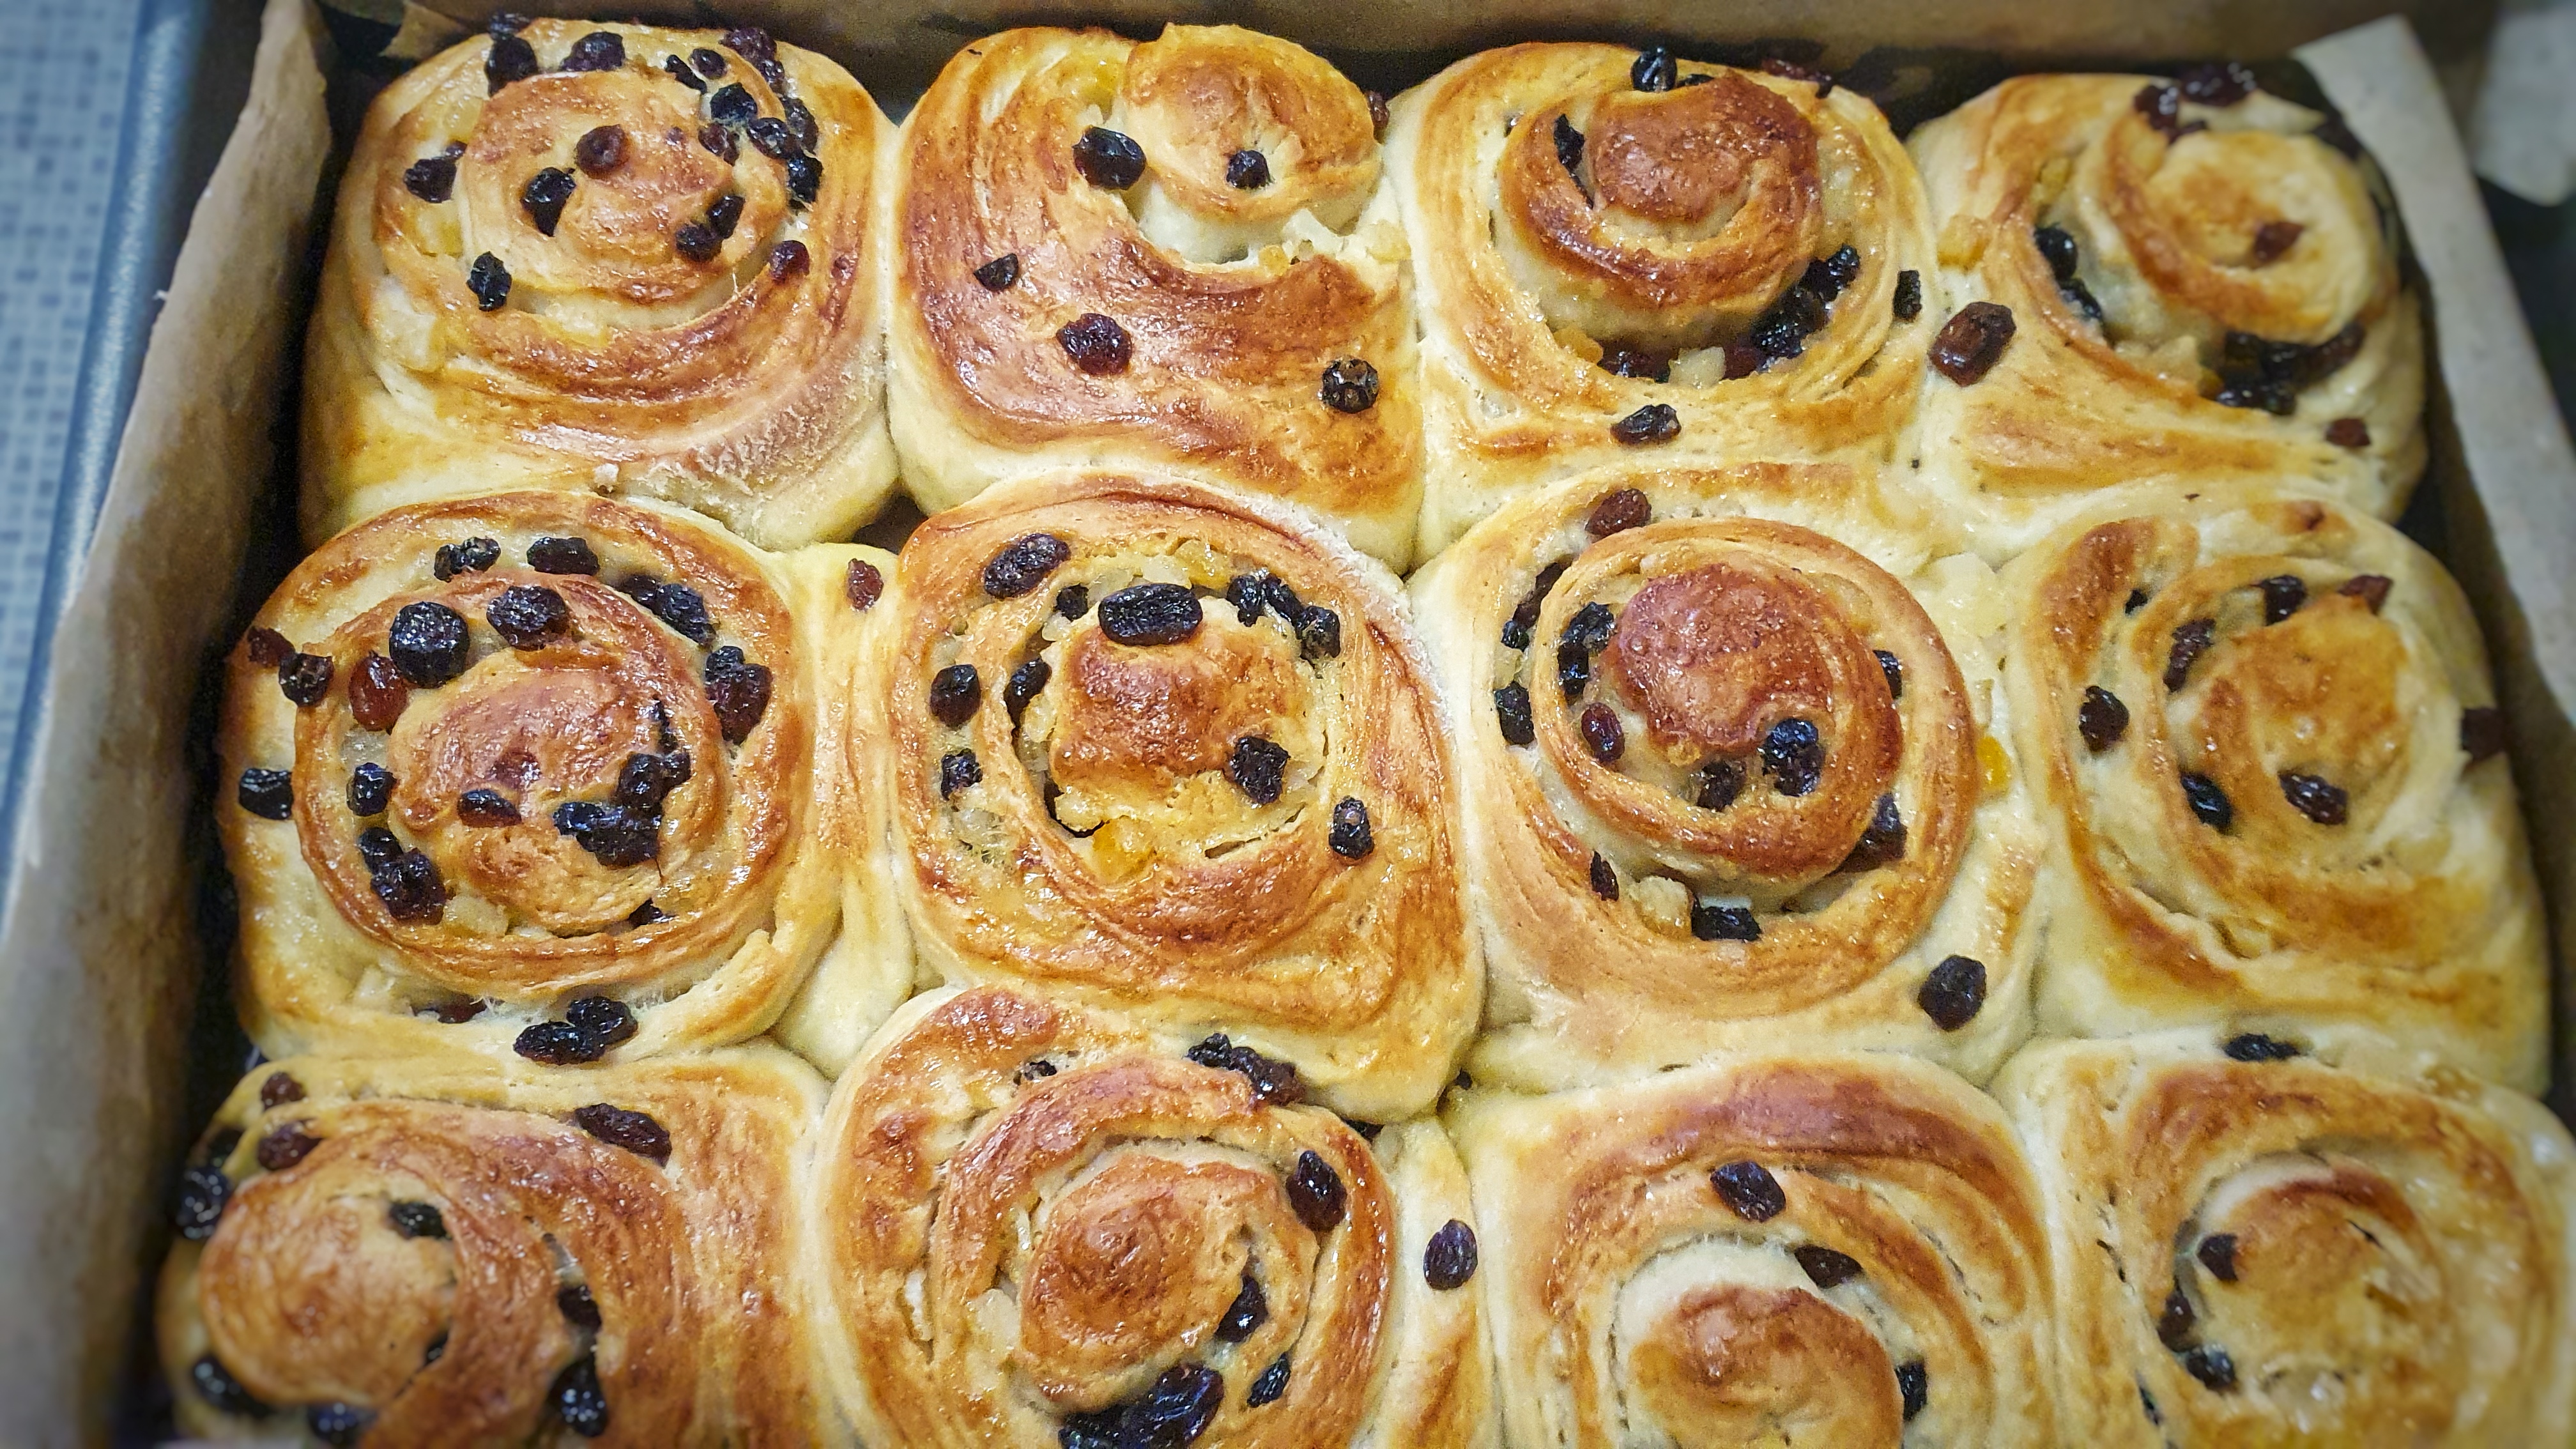
For those not in the know, a Chelsea bun is a coil of enriched dough filled with butter, sugar and dried fruit. They are batch-cooked together so as they grow, they touch, filling the tin, producing buns that are soft on the sides, gooey at the bottom and brown on the top. They are finished with a sticky glaze and adorned with crunchy sugar. Decadent deliciousness. Jane Grigson wrote that they are ‘[t]he best of all the buns, on account of their buttery melting sweetness, and the fun of uncoiling them as you eat them.’[2]
They were first made at the Bun House in Chelsea at the start of the 18th century, the earliest mention of them cropping up in the 1710s.[3] The buns fell out of favour sometime in the early 20th century and are hard to track down, so if you want to try one, you’ll have to make it.[4]
If you like the blogs and podcast I produce and would to start a £3 monthly subscription, or would like to treat me to virtual coffee or pint: follow this link for more information.Thank you.
Recipe
The dough for these buns is sticky and difficult to knead, and I would advise using the dough hook attachment on a stand mixer. Hand-kneading is perfectly possible, it’s just a messy business.
Enriched doughs take longer to prove, so if there is somewhere warm to prove your dough, so much the better.
Makes 12 buns
For the bun dough:
500g strong white flour
5g/1tsp instant yeast
10g/2 level tsp salt
60g sugar (caster or brown)
90g softened butter
250ml warm milk, or half-milk-half-water
1 beaten egg
For the filling:
60g melted butter
90g sugar (caster or brown)
90g raisins and/or currants
40g candied peel
Egg wash
For the glaze:
50ml water
50g caster sugar
Crushed lump sugar (optional)
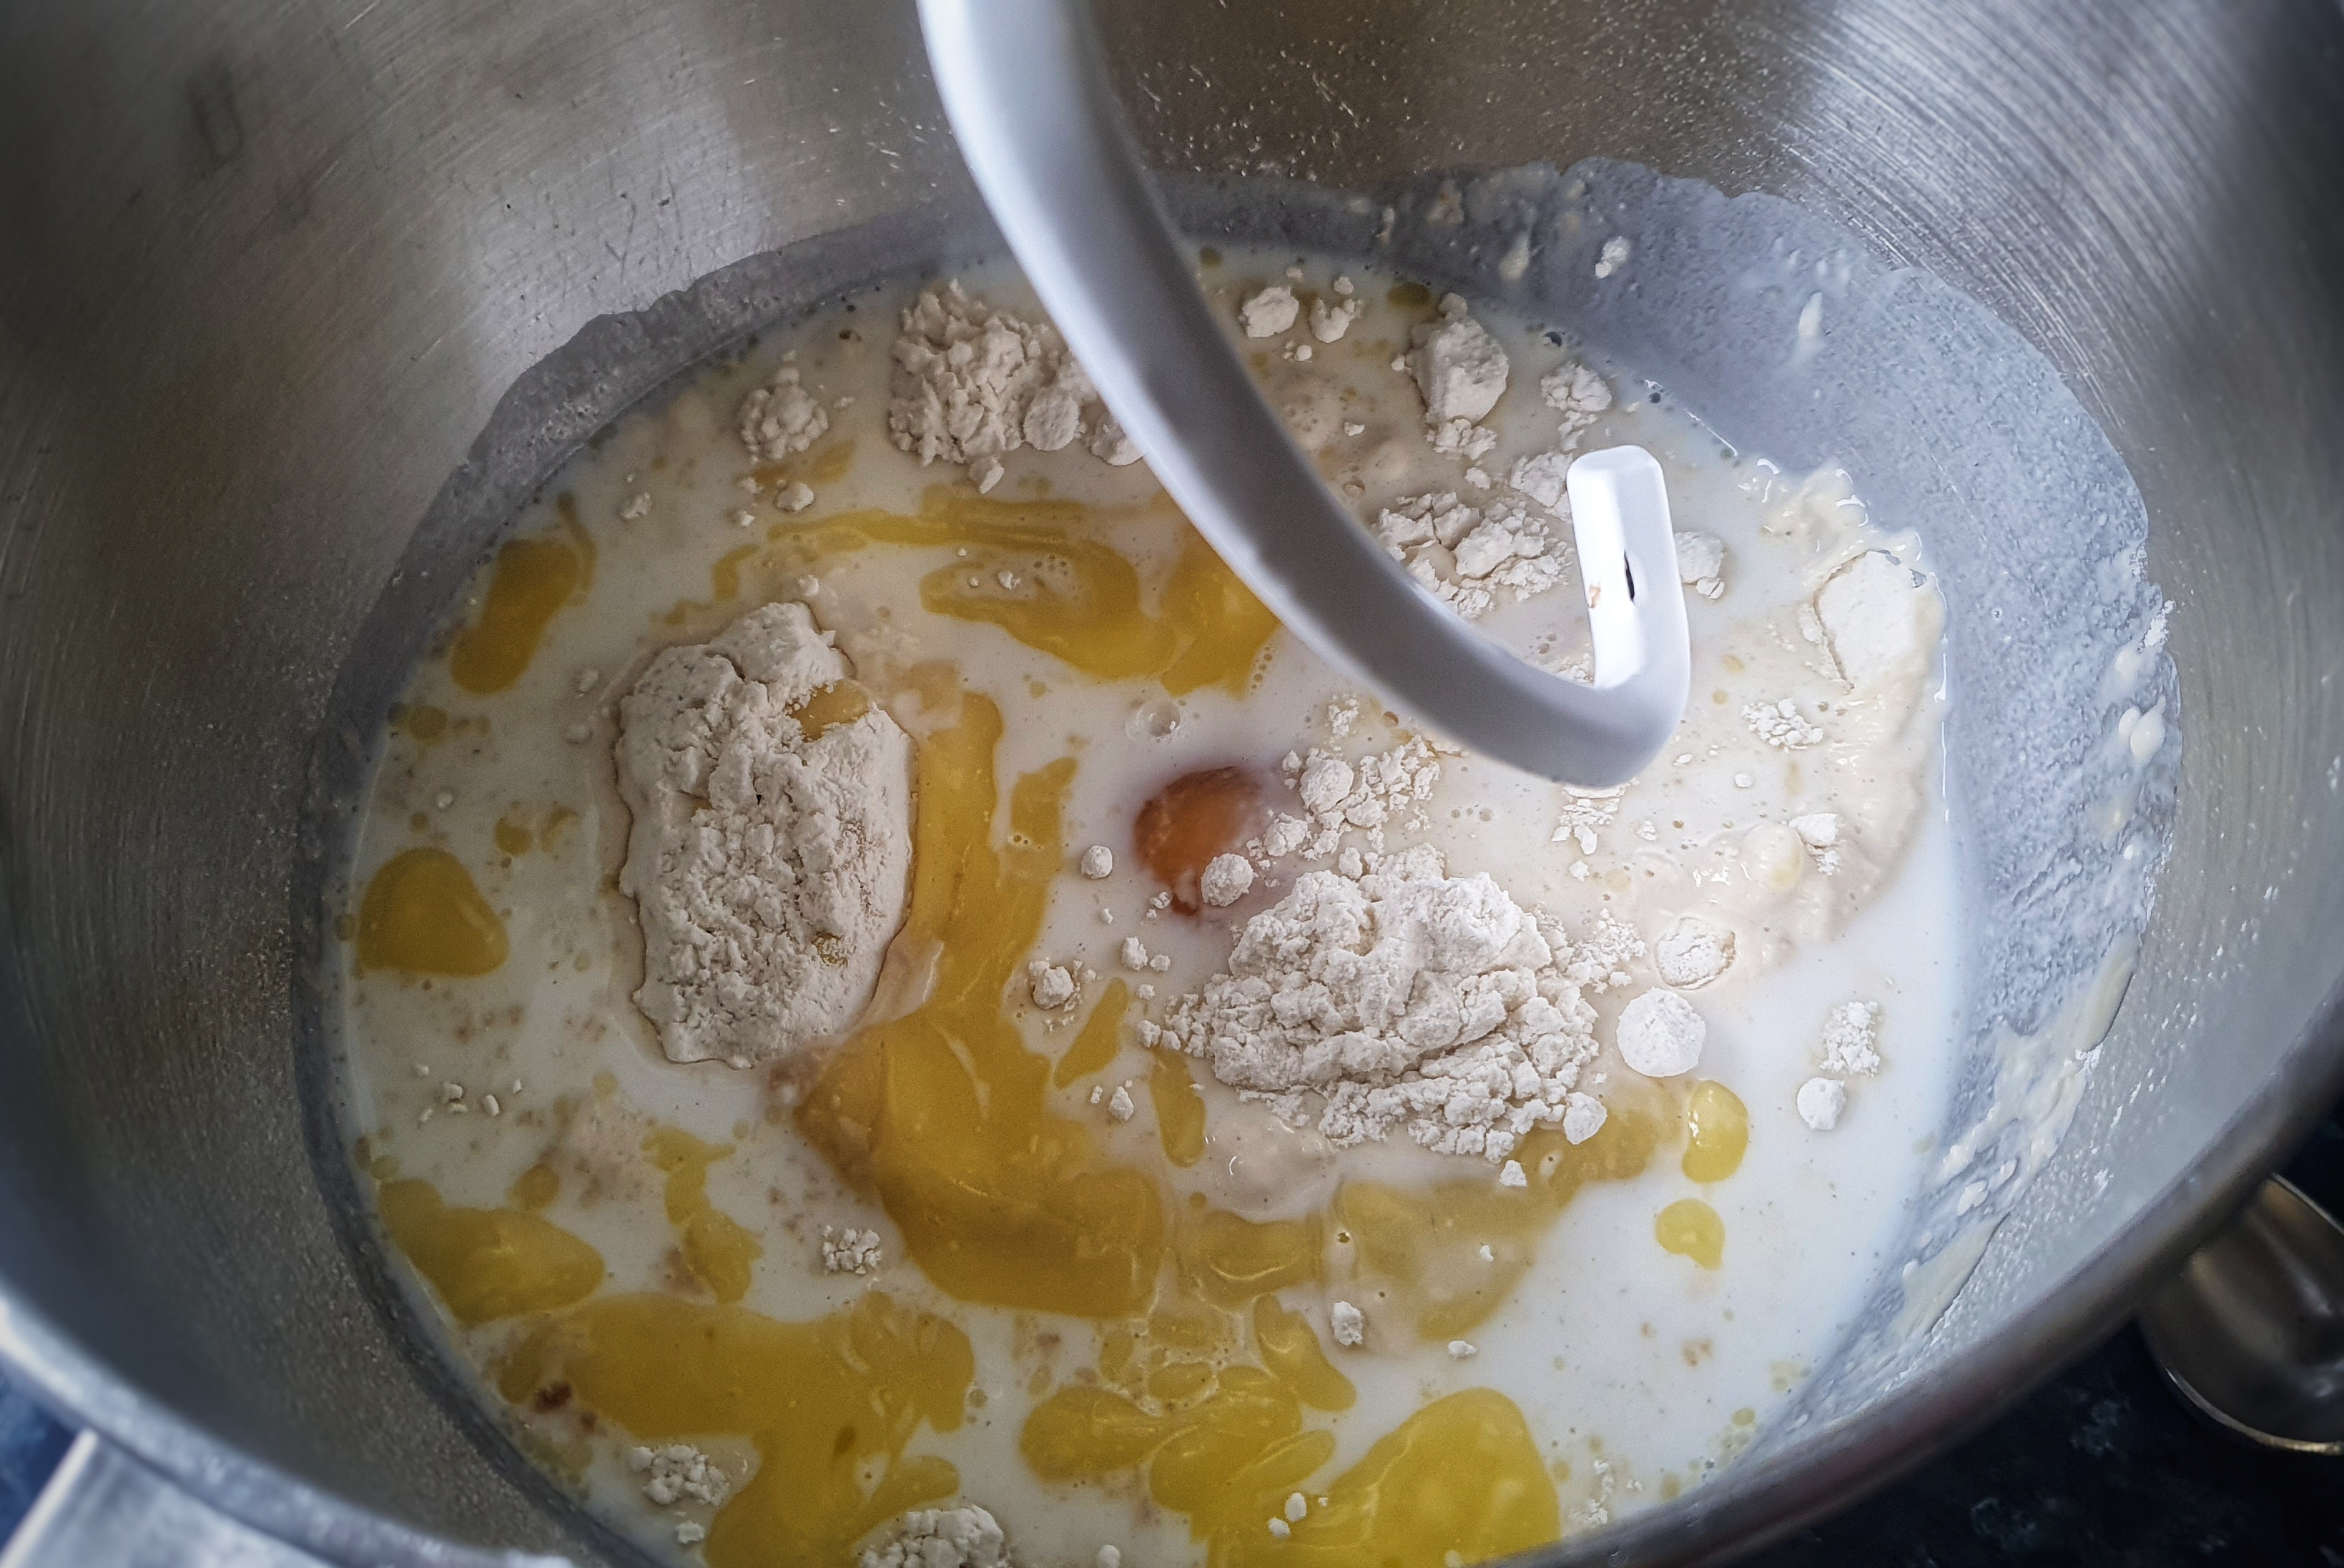
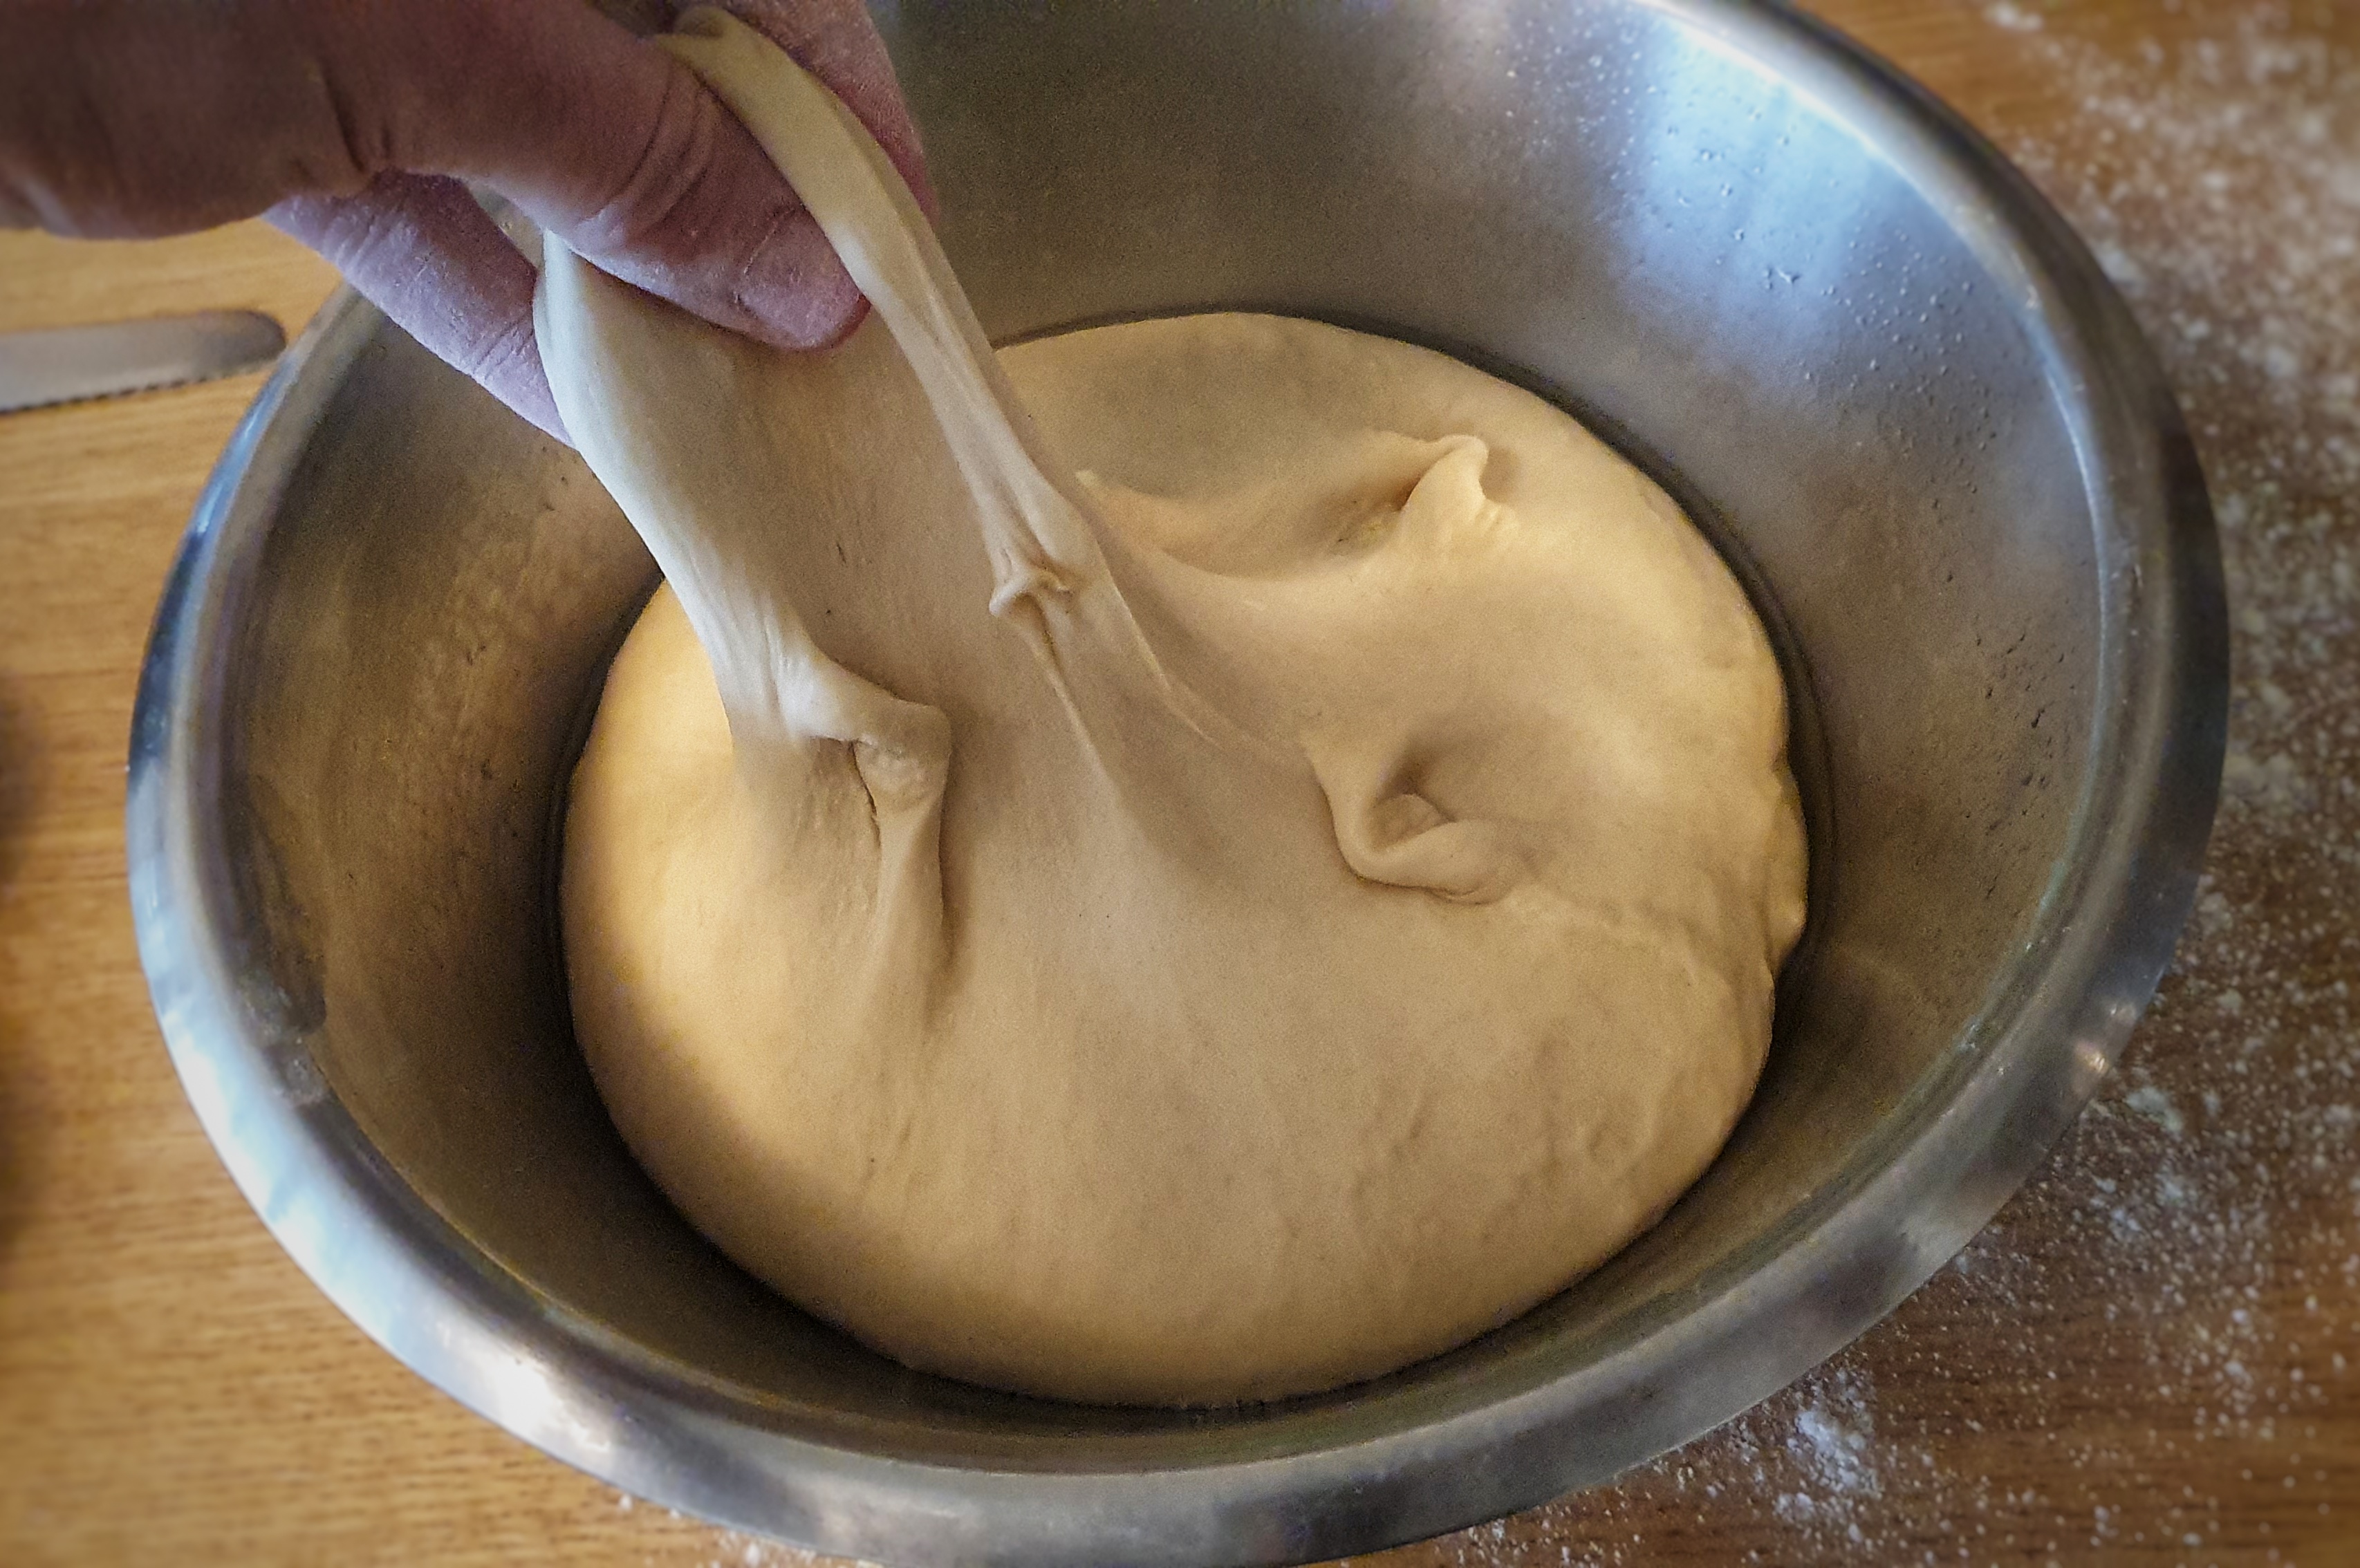
Make the dough using a stand mixer, if possible: first, mix all of the dry ingredients in a mixing bowl. Next, make a well in the centre and add the butter, liquid and egg. Mix to combine the ingredients and then knead with a dough hook on a slow-medium speed for around 10 minutes until smooth and the stickiness of the mixture has much reduced. Lightly oil another bowl (and your hands) and turn out the dough, tightening it up into a ball. Cover and prove until at least double in size. I proved mine at room temperature and it took 90 minutes.
As you wait, line a 24 x 34 cm deep-side tray with greaseproof paper, fixing it in place with dots of oil or butter.
Fix the side closest to you by pressing and spreading the doughy edge to the worktop.
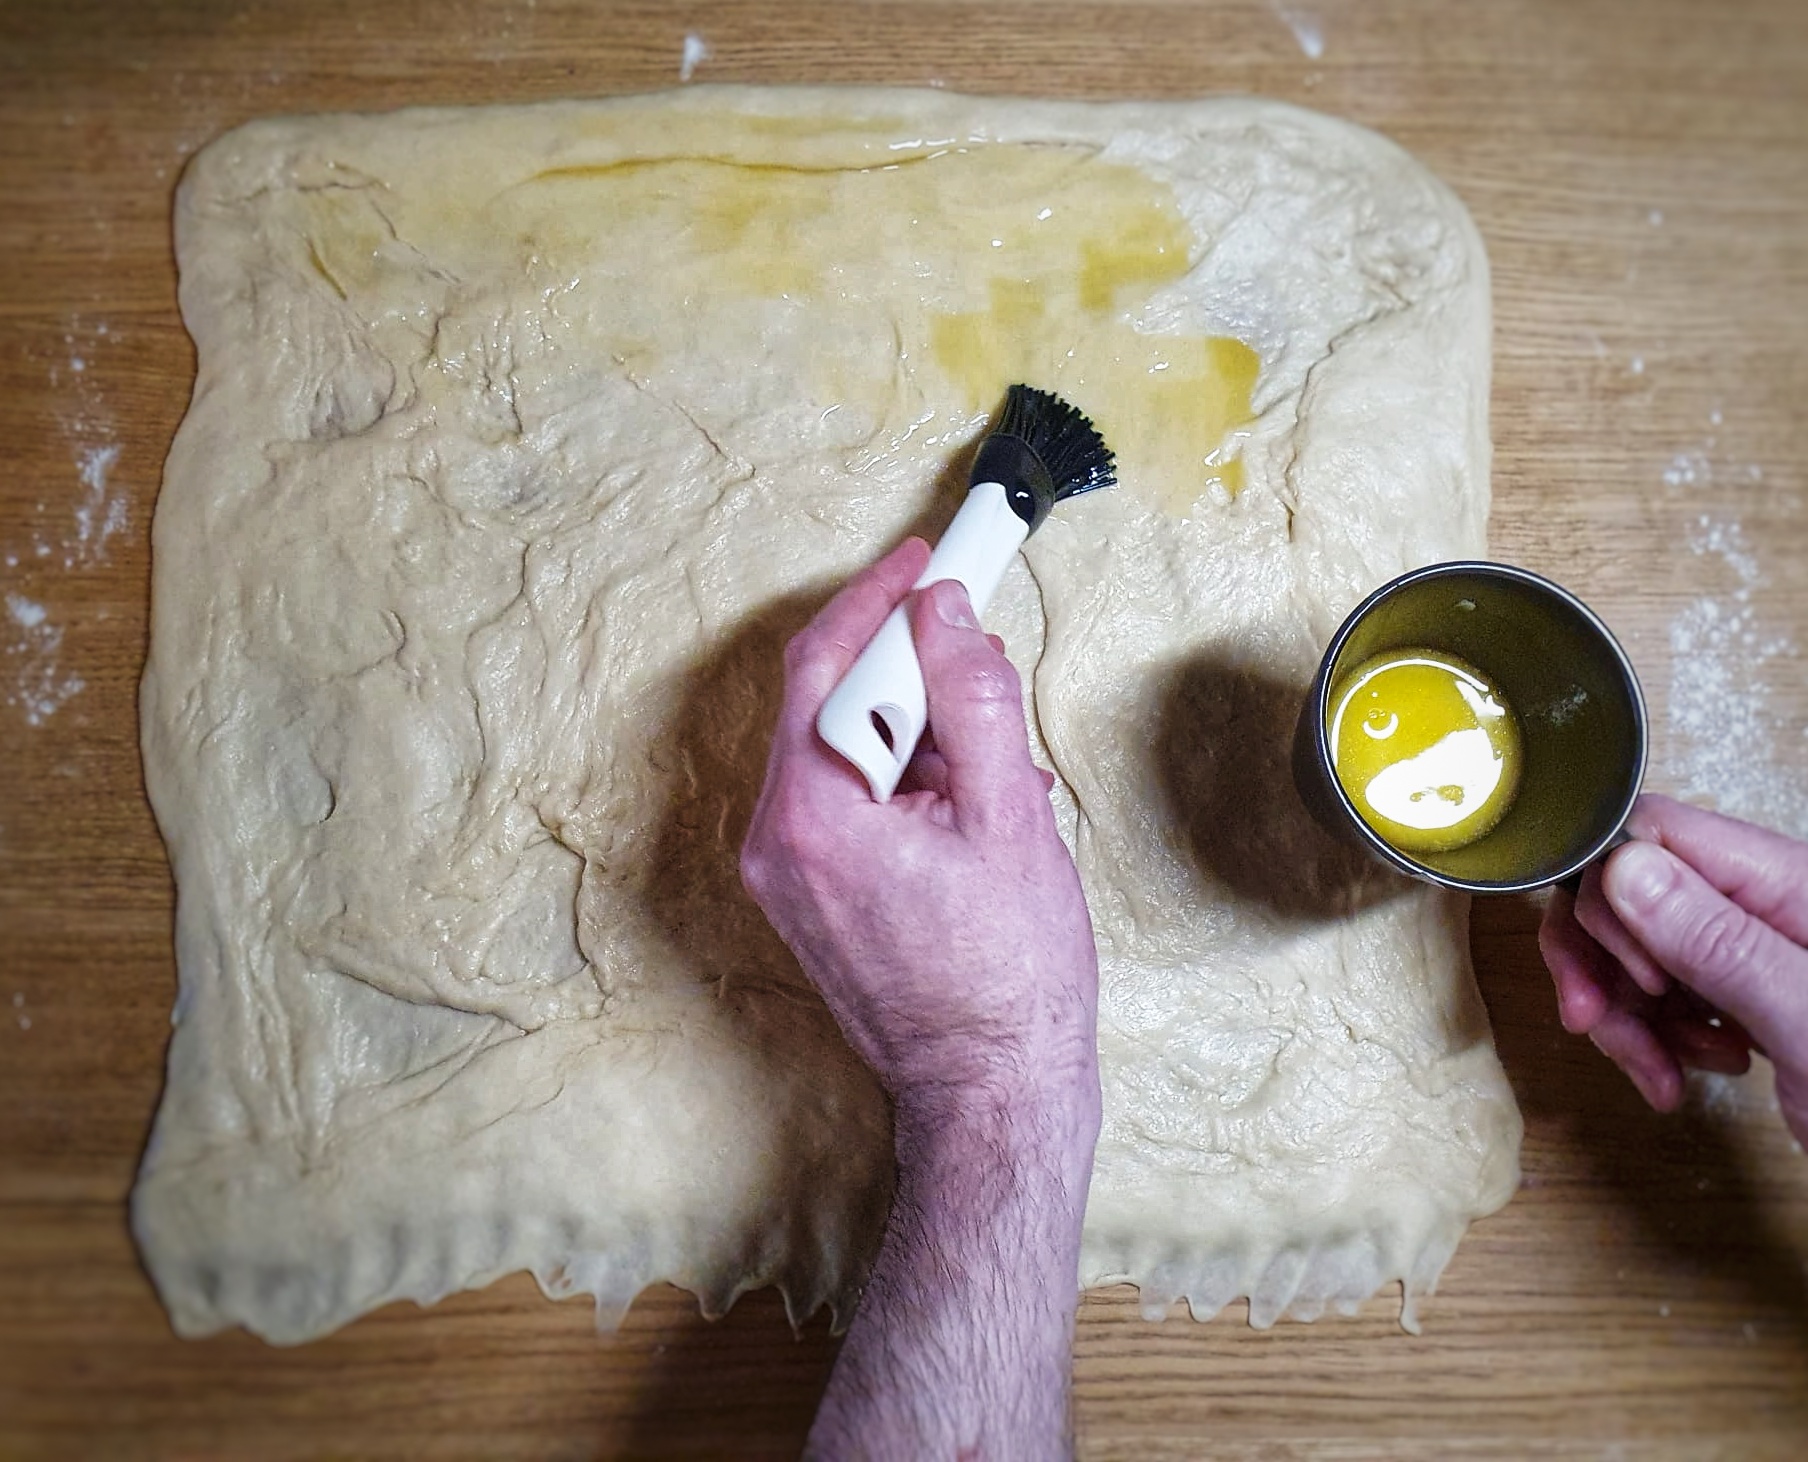
When doubled in size, roll or press out the dough out on a lightly-floured surface – it’s still sticky so make sure you reapply flour to your worktop regularly – until you make a rectangle measuring approximately 40 x 60 cm, the dough with its long side facing you. Have patience and try to make the dough of even thickness.
Now apply the filling: lavishly brush the dough with the melted butter, go right up to the back edge, but leave a 1-cm gap on the side edges and 2-cm on the edge facing you.
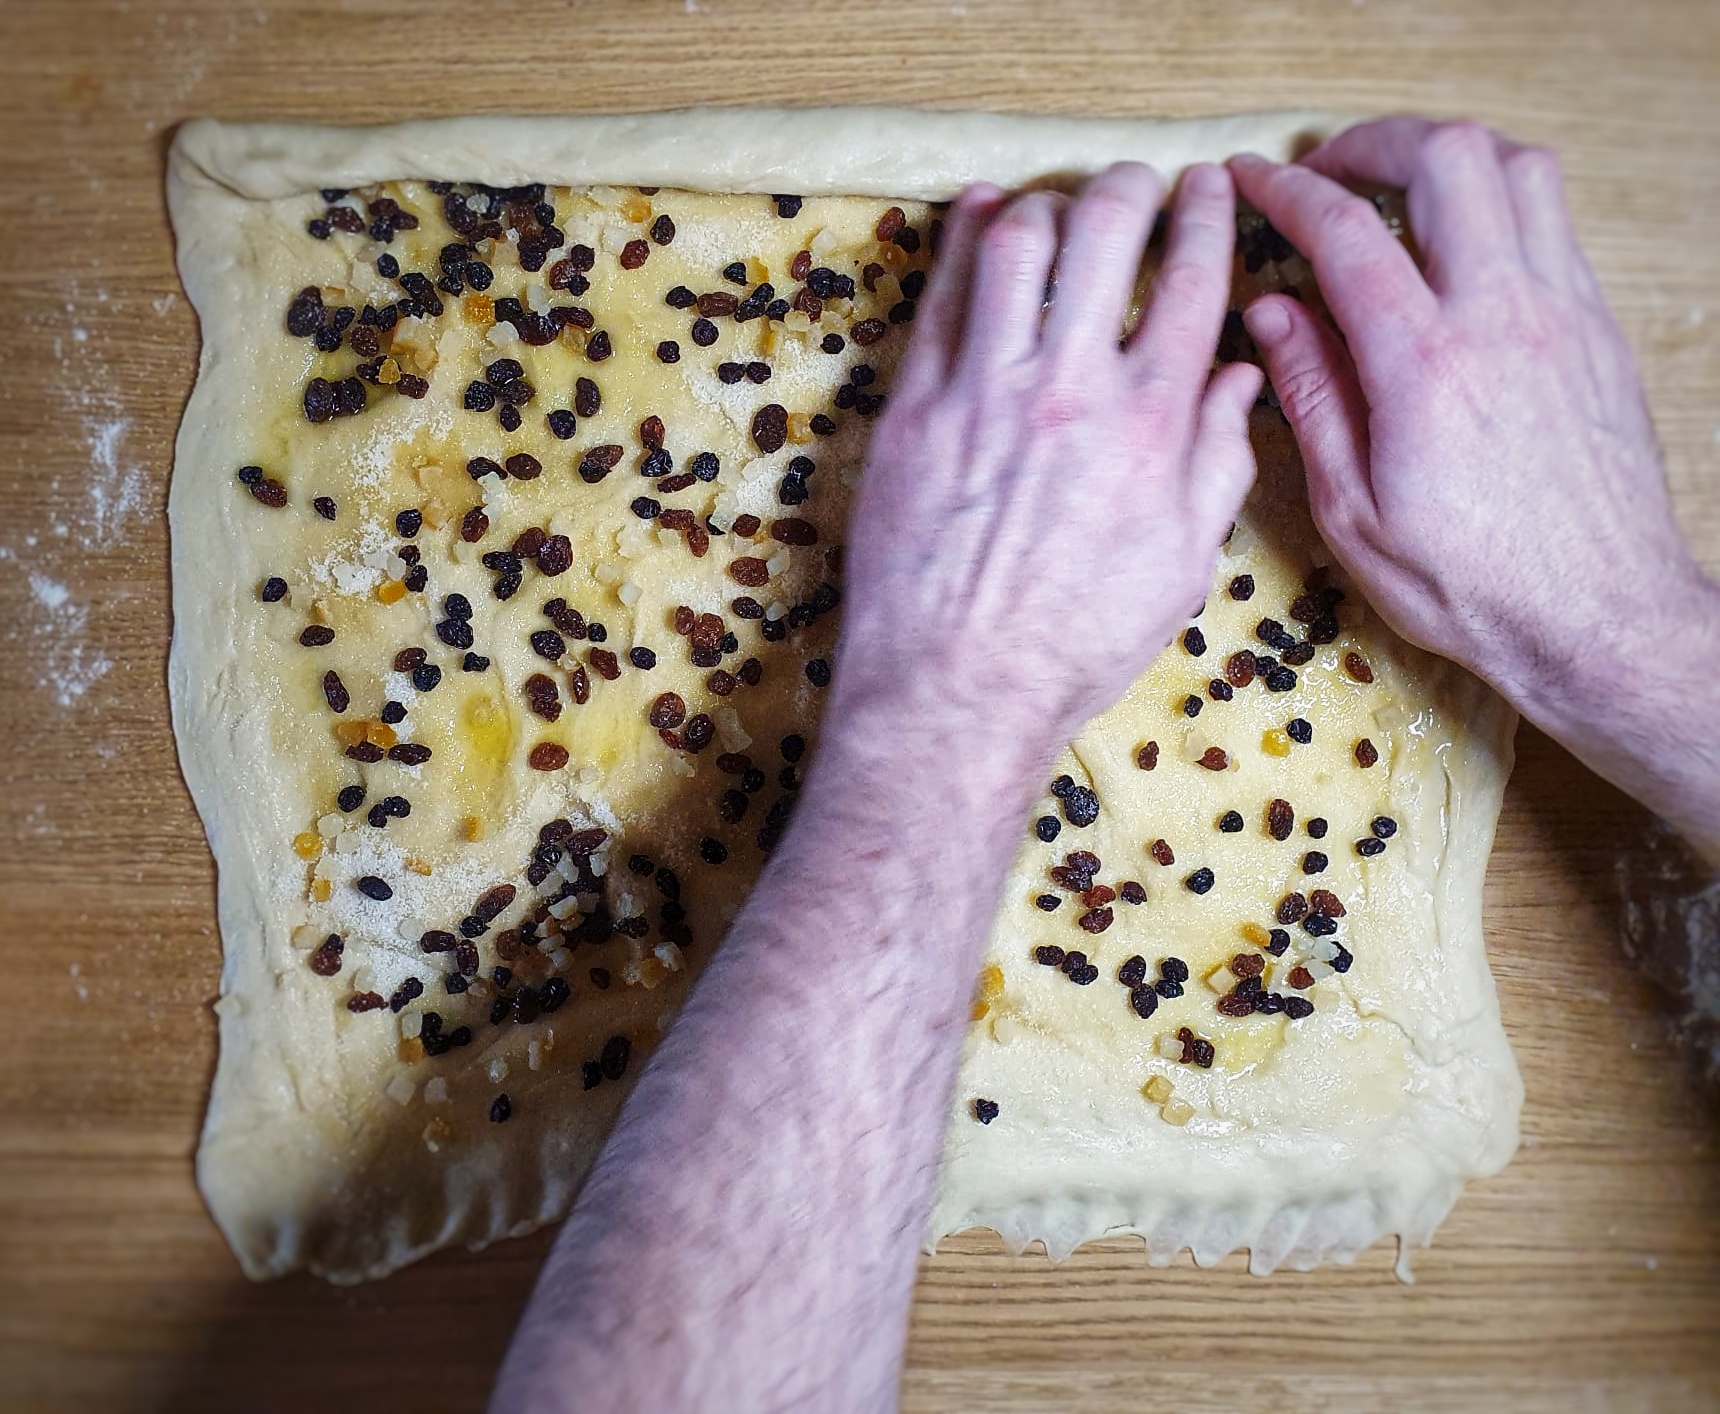
Next, sprinkle the sugar evenly, then the dried fruit and candied peel.
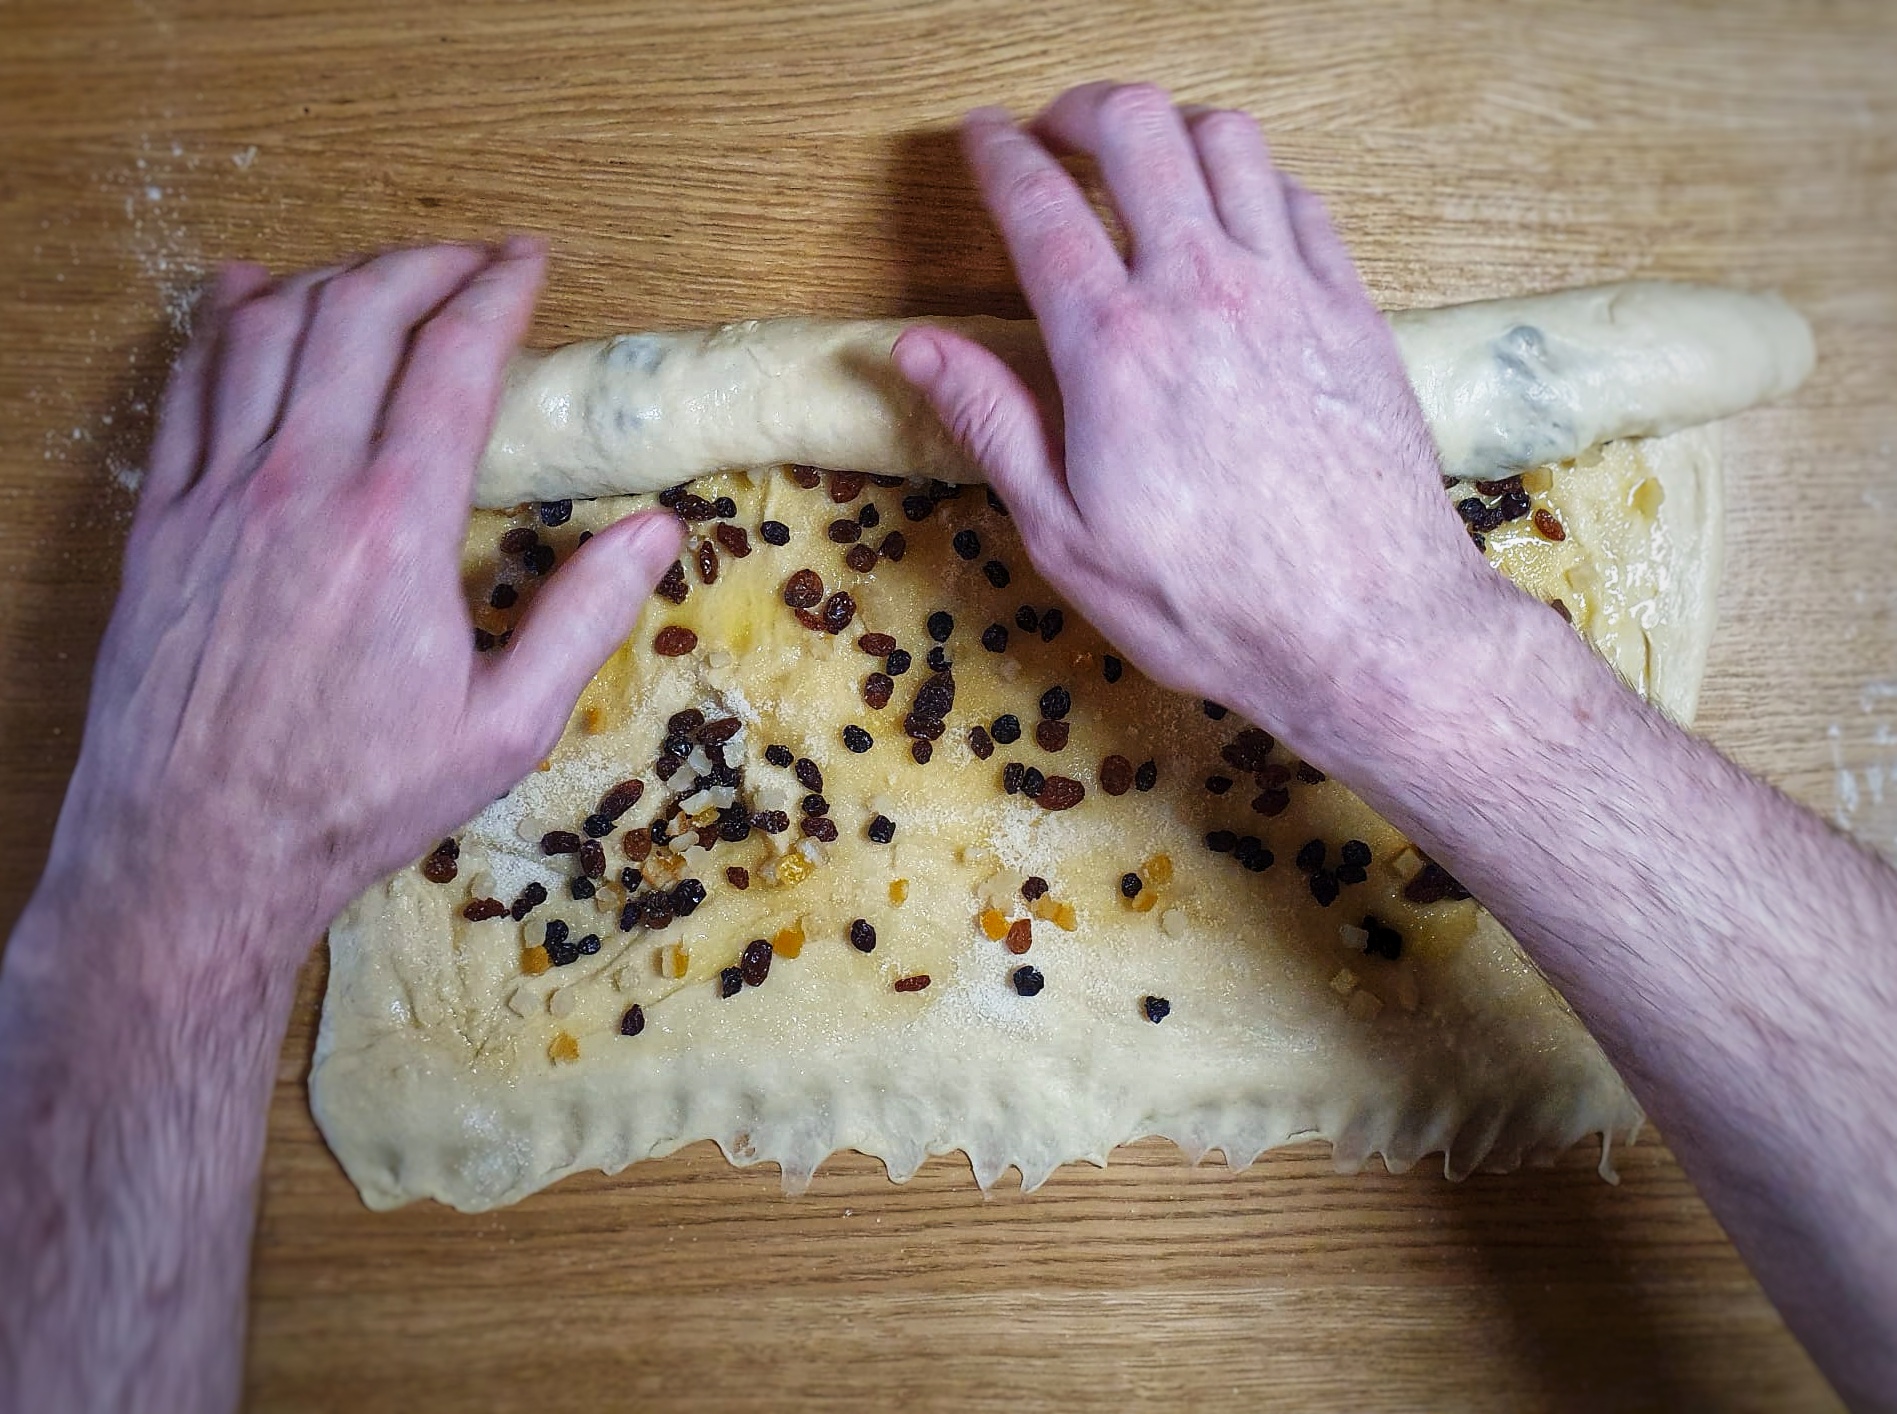
Now the fun bit: fold the further edge over and start to roll up the dough by lifting and stretching gently before rolling, keeping the coil tight. It is easiest to do this in sections. Keep going until the dough is almost rolled up, then lightly brush the facing edge with a little water.
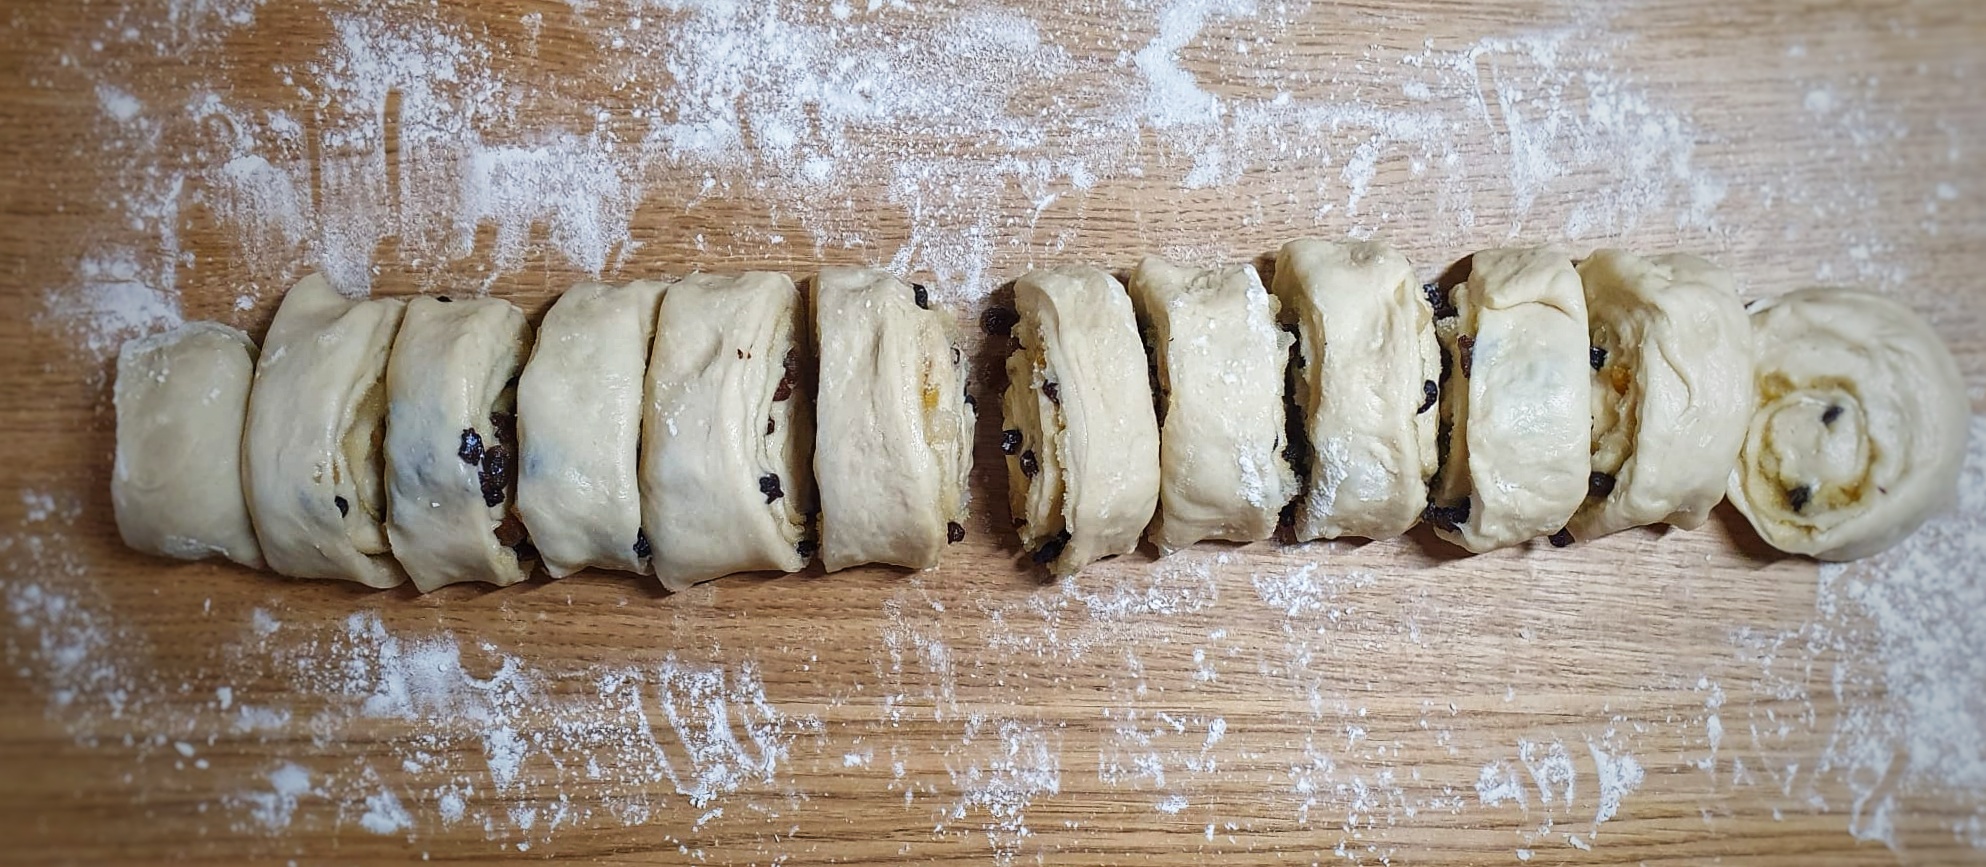
Using a sharp knife, cut off the two ends[5] – I like a serrated knife for this job – then cut the dough into 9 or 12 pieces. If the knife presses the edges a bit and flattens the coils, don’t worry, they can be easily reshaped by hand.
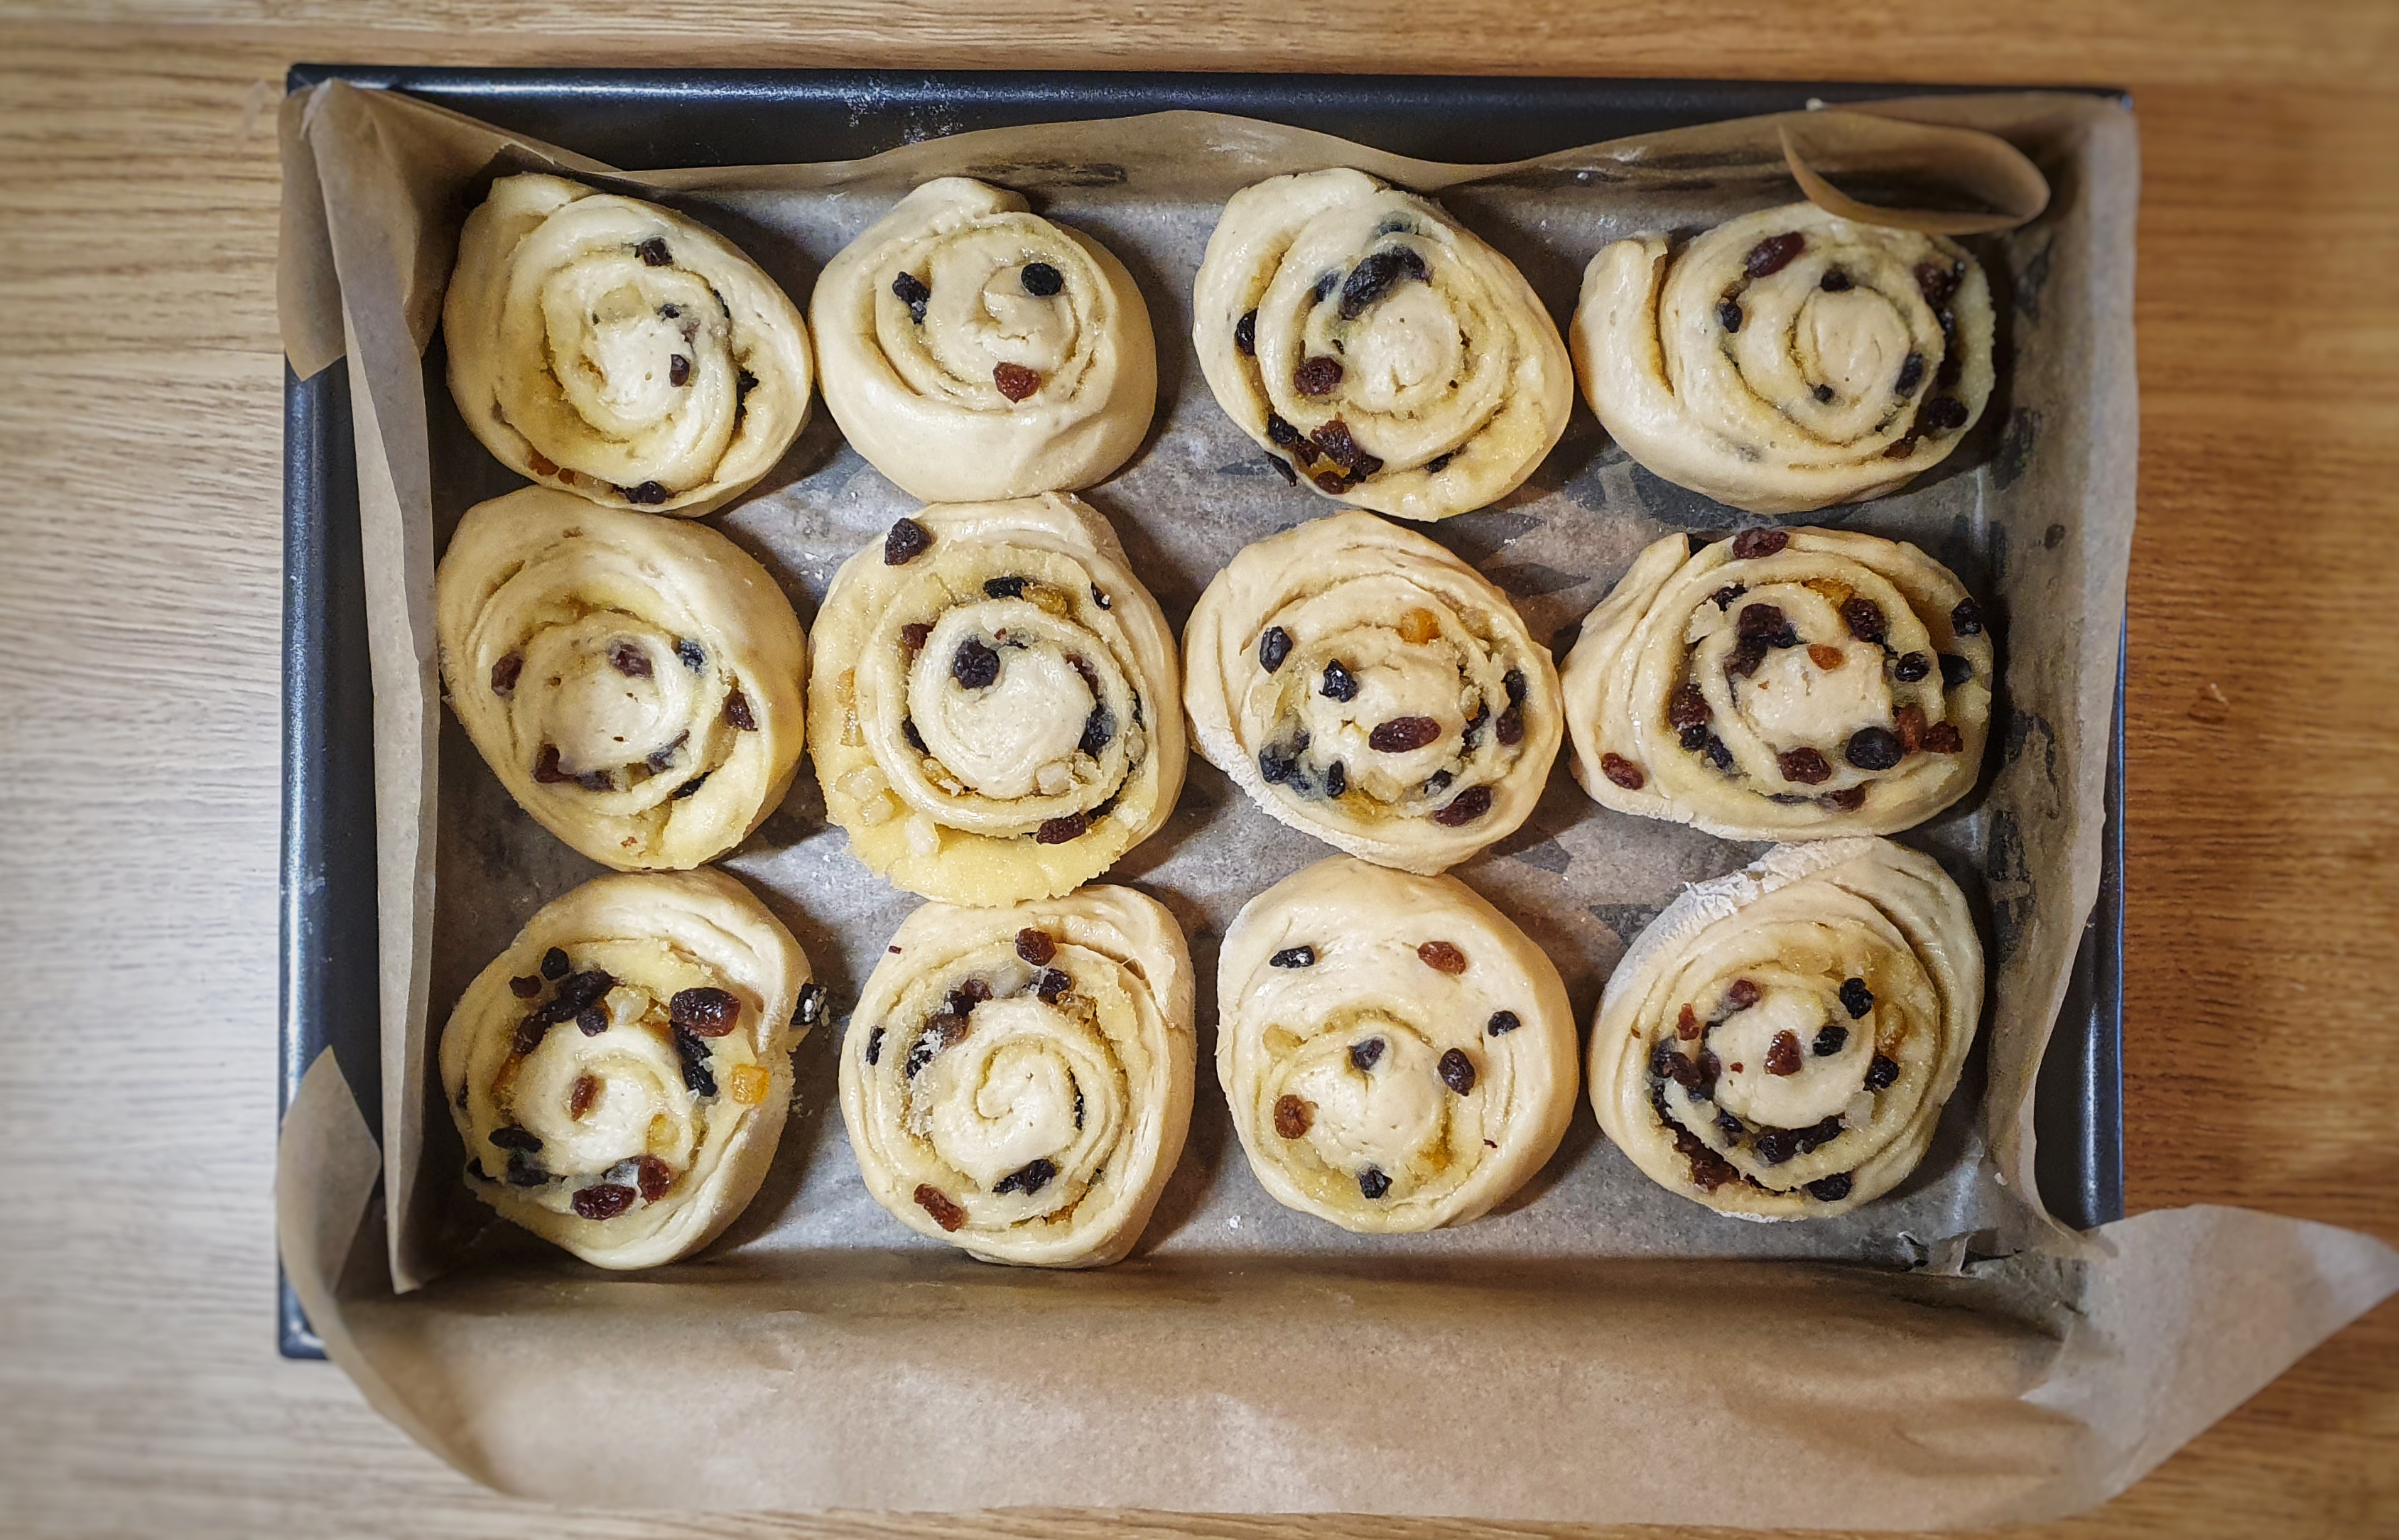
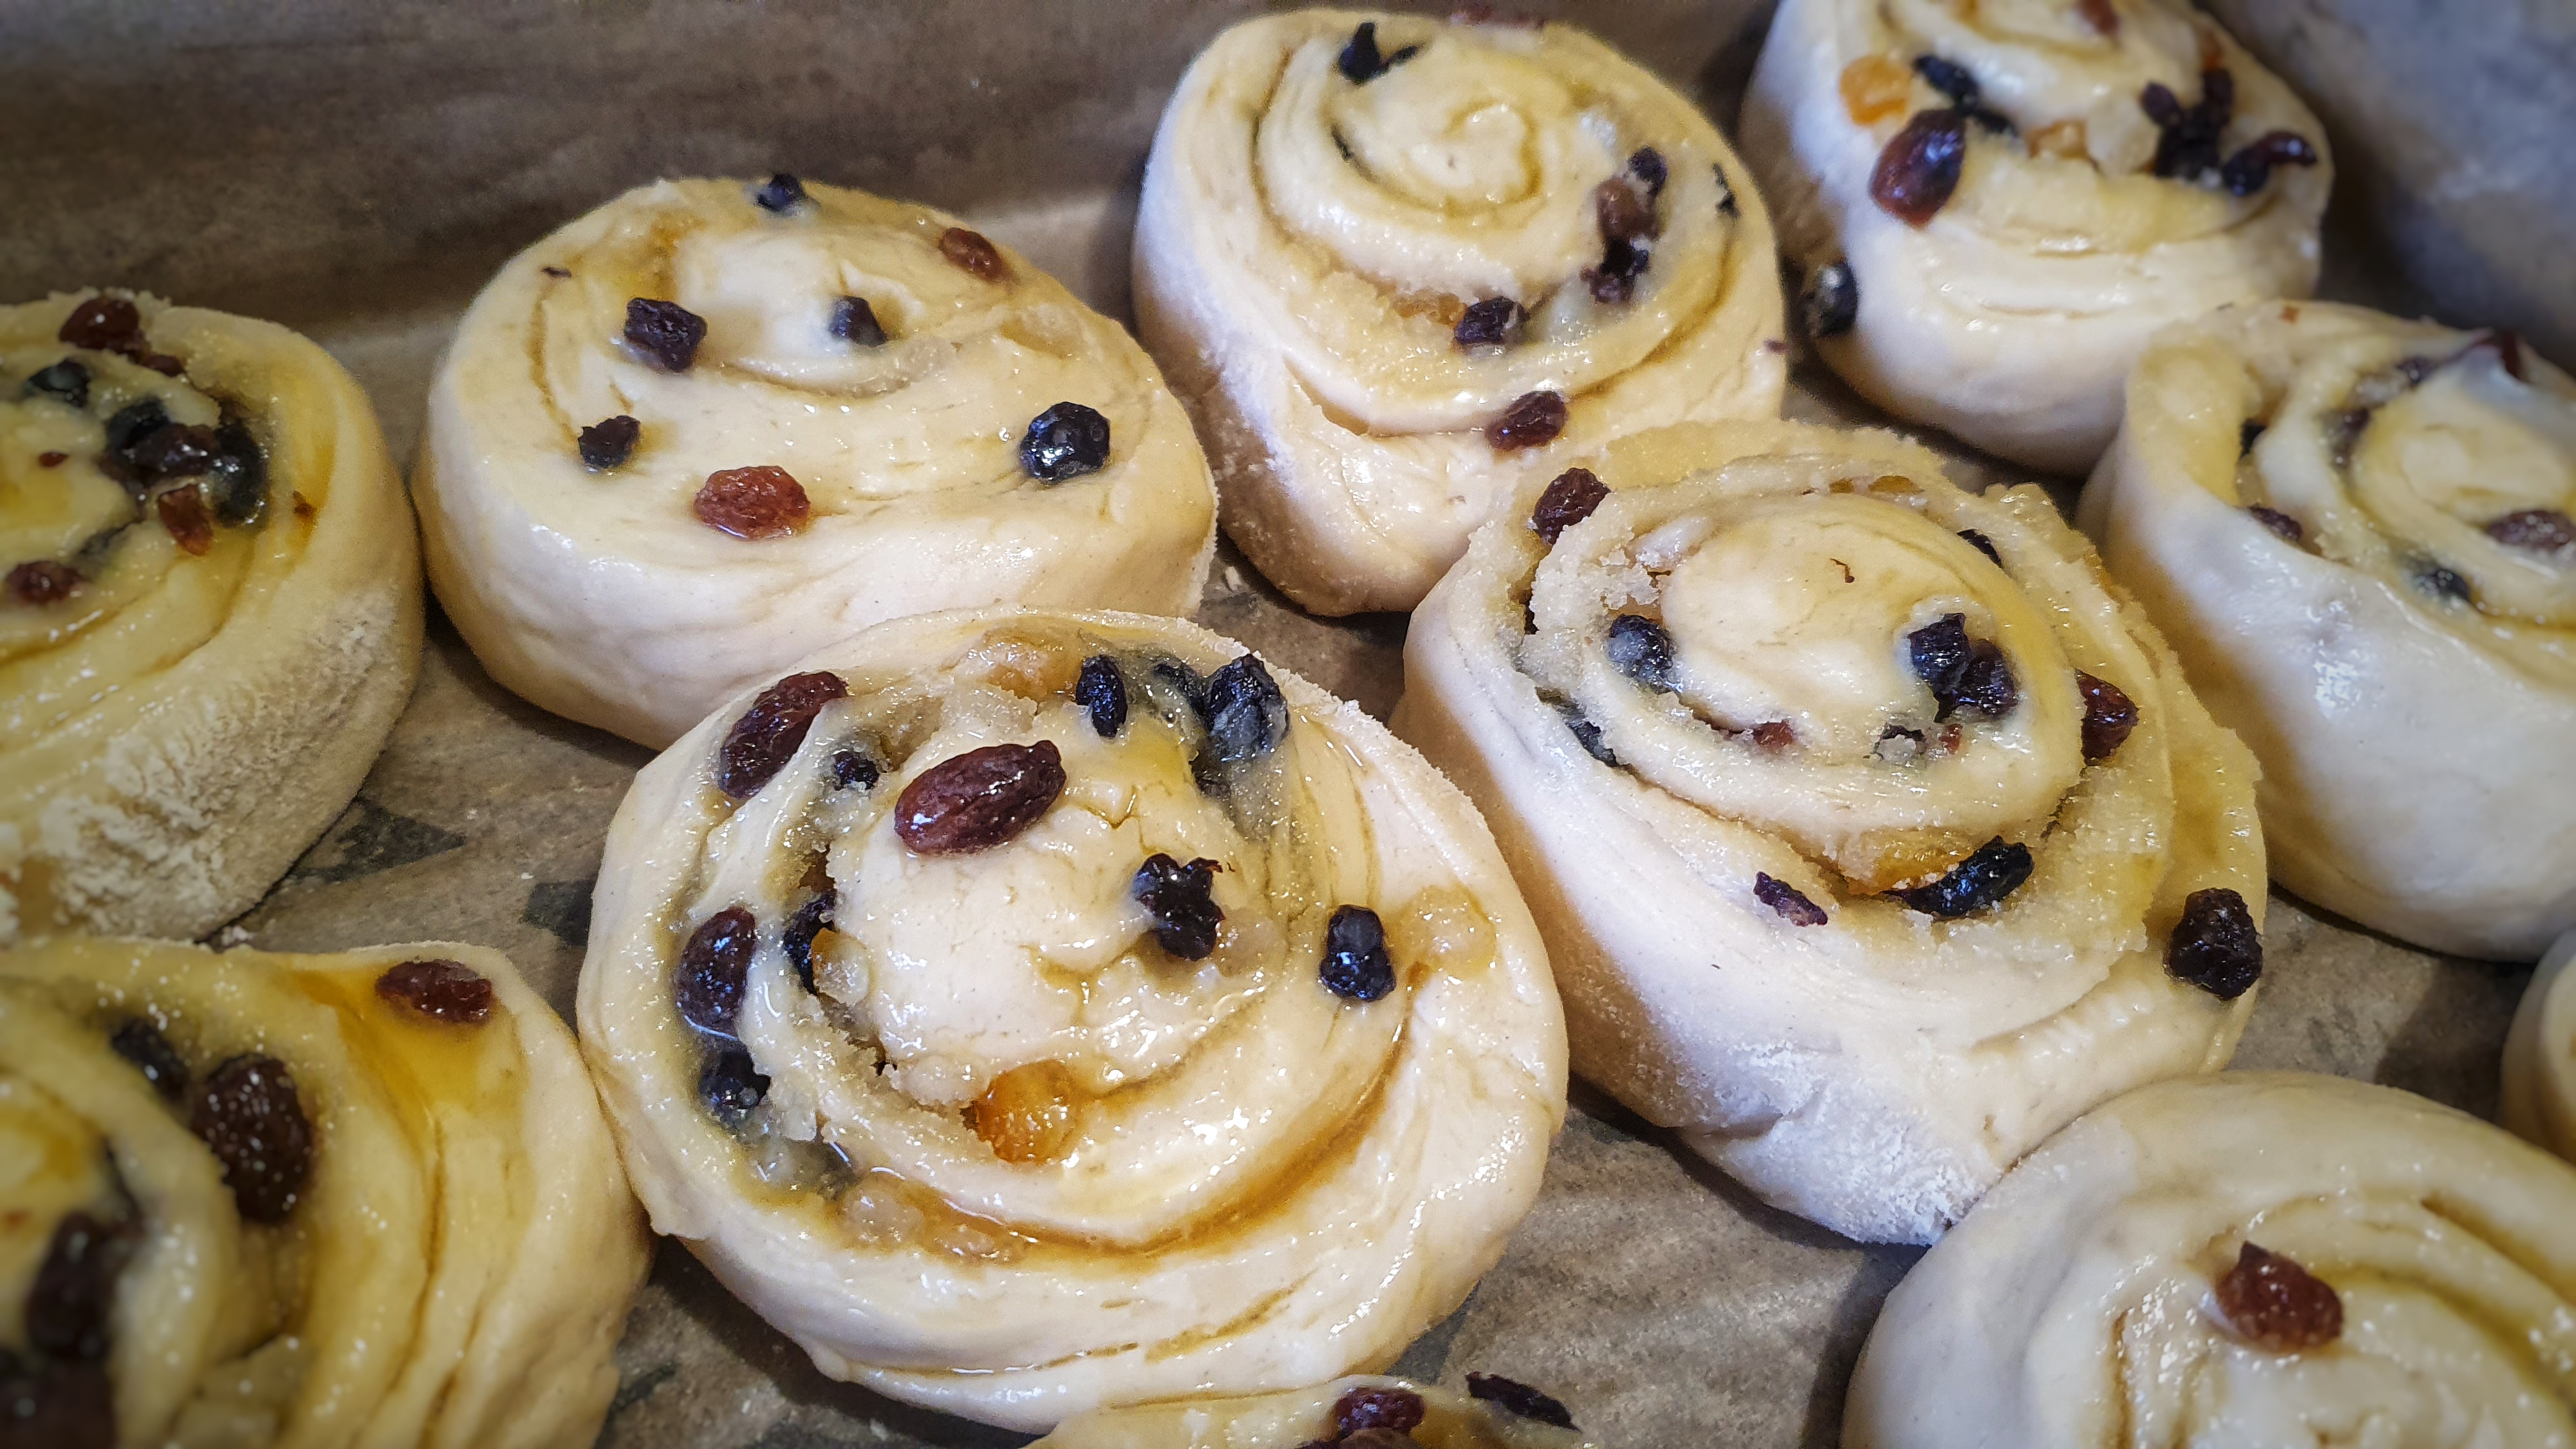
Arrange your buns in your prepared tin, leaving a good and even gap between them. Cover and allow to prove again: for me, this took 60 minutes.
When they are almost proved, preheat your oven to 200°C. When ready, brush each bun with beaten egg. Slide into the oven and bake for 25 to 3- minutes if baking 12 buns. It’s worth investigating them to check they have baked all the way through.
When they come out of the oven, sit them on a cooling rack in their tin.
Make the glaze by mixing the sugar and water in a pan over a medium heat. Stir to dissolve, increase the heat and bring to a boil, and let it bubble away for 30 seconds. Take off the heat and brush the buns: be lavish. It might take a couple of coats to use up all the glaze. If you like, sprinkle with crushed lump sugar.
This post complements the 2023 Christmas special of The British Food History Podcast called ‘Mince Pies’:
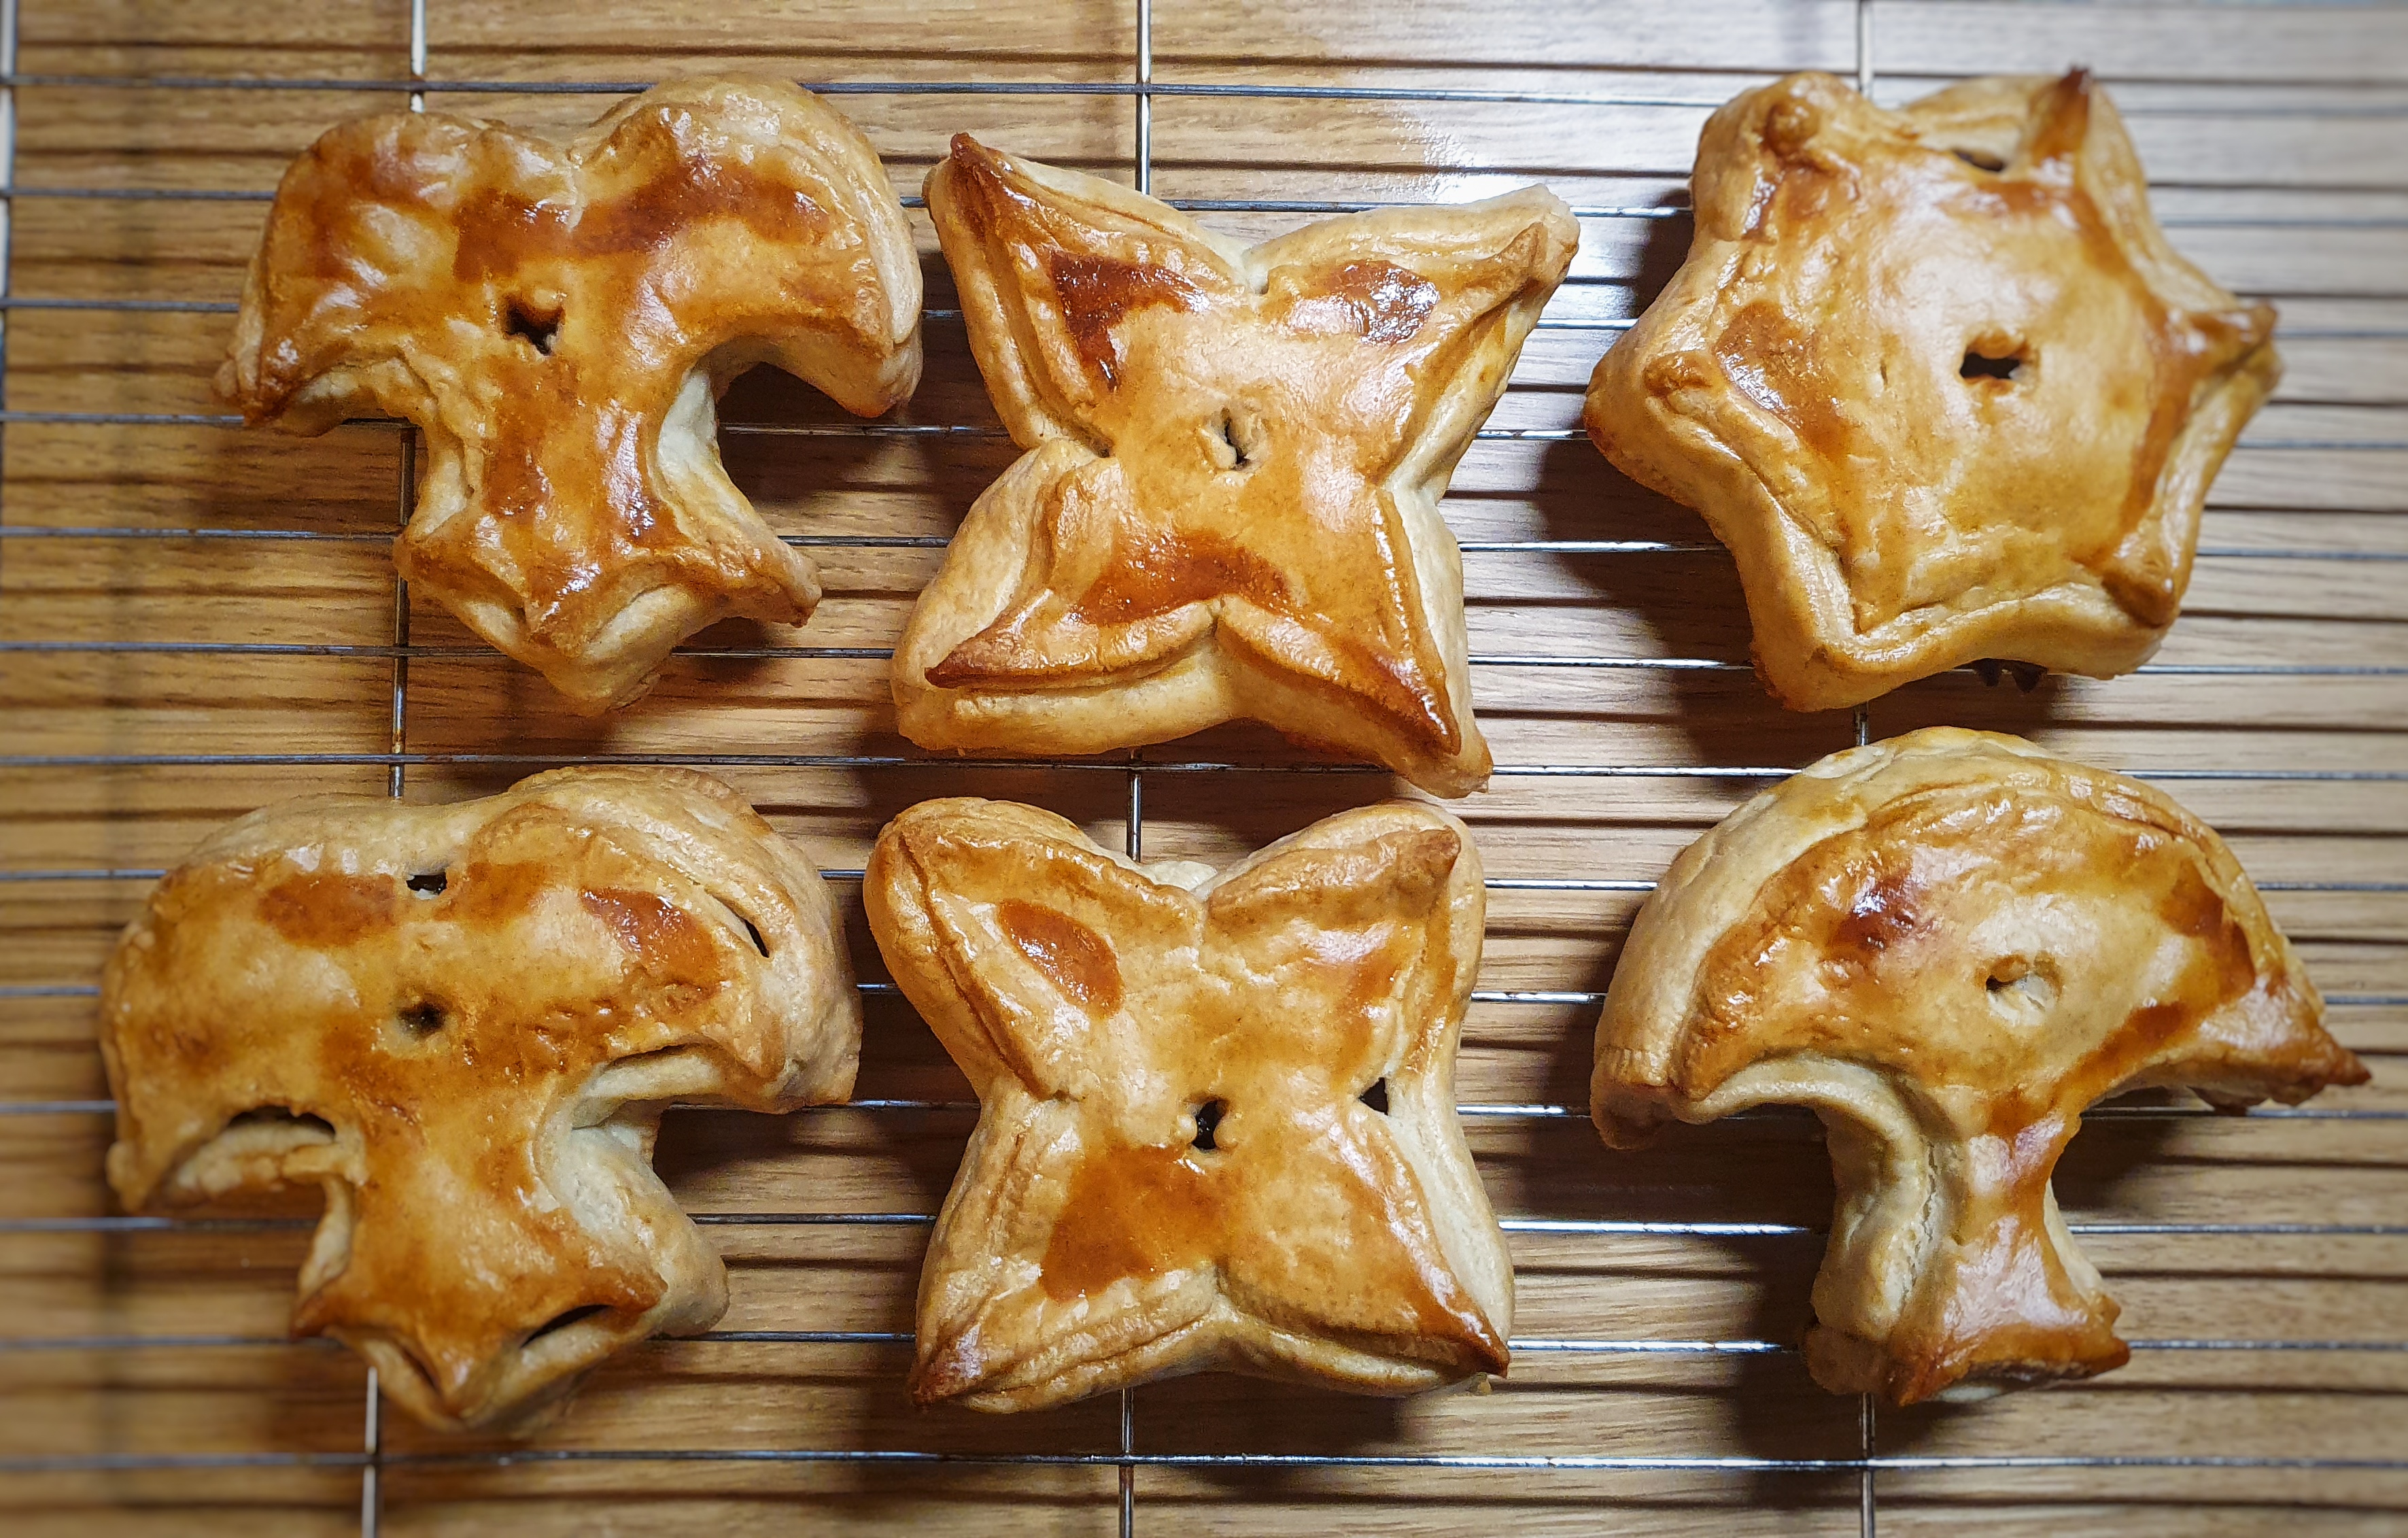
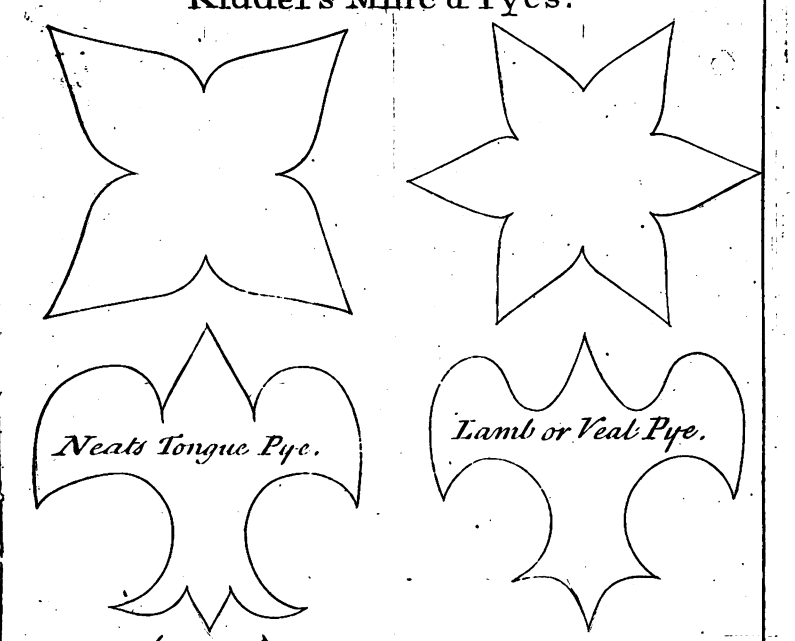
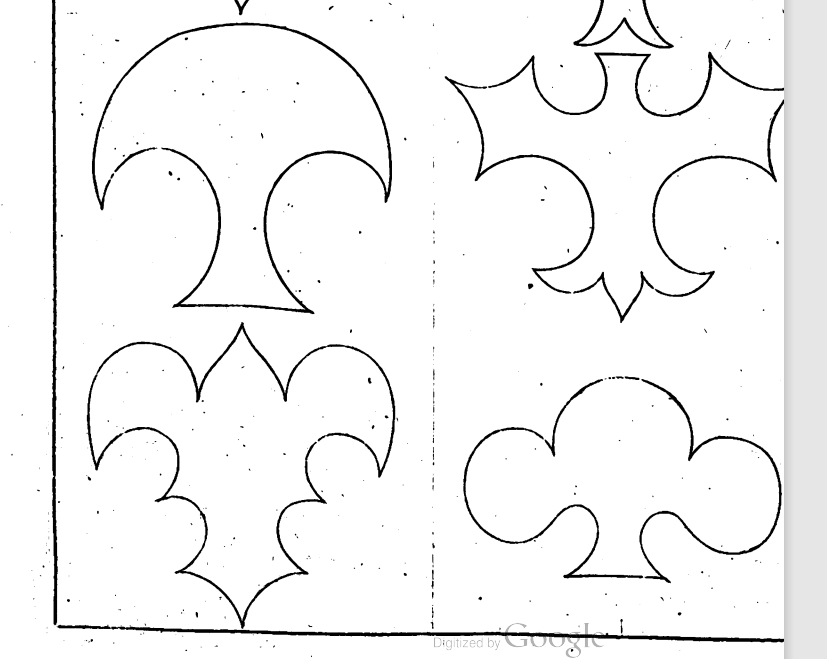
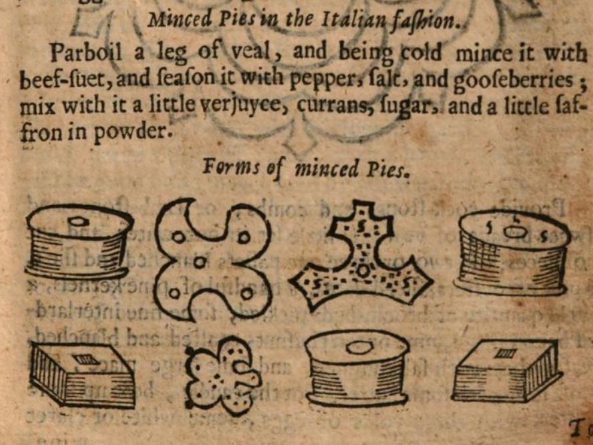
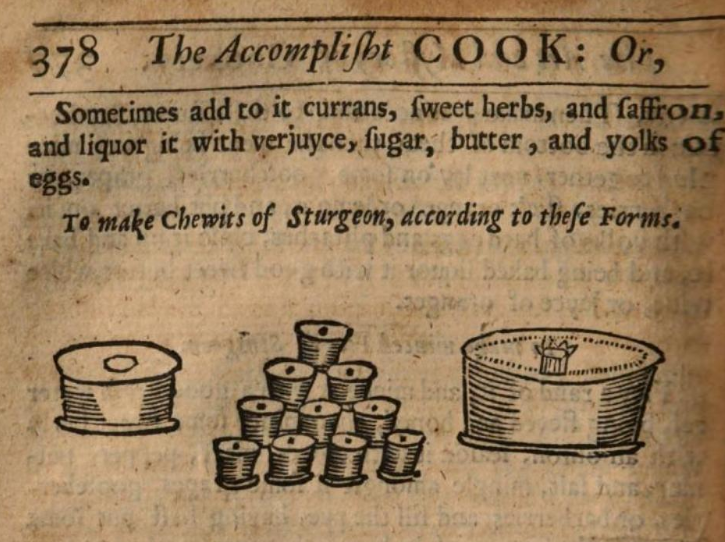
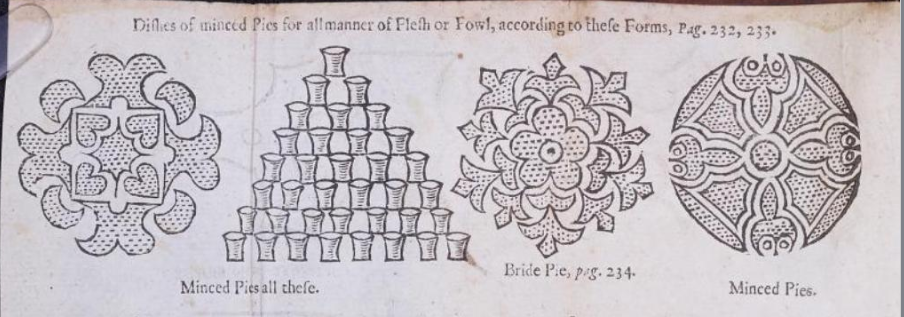
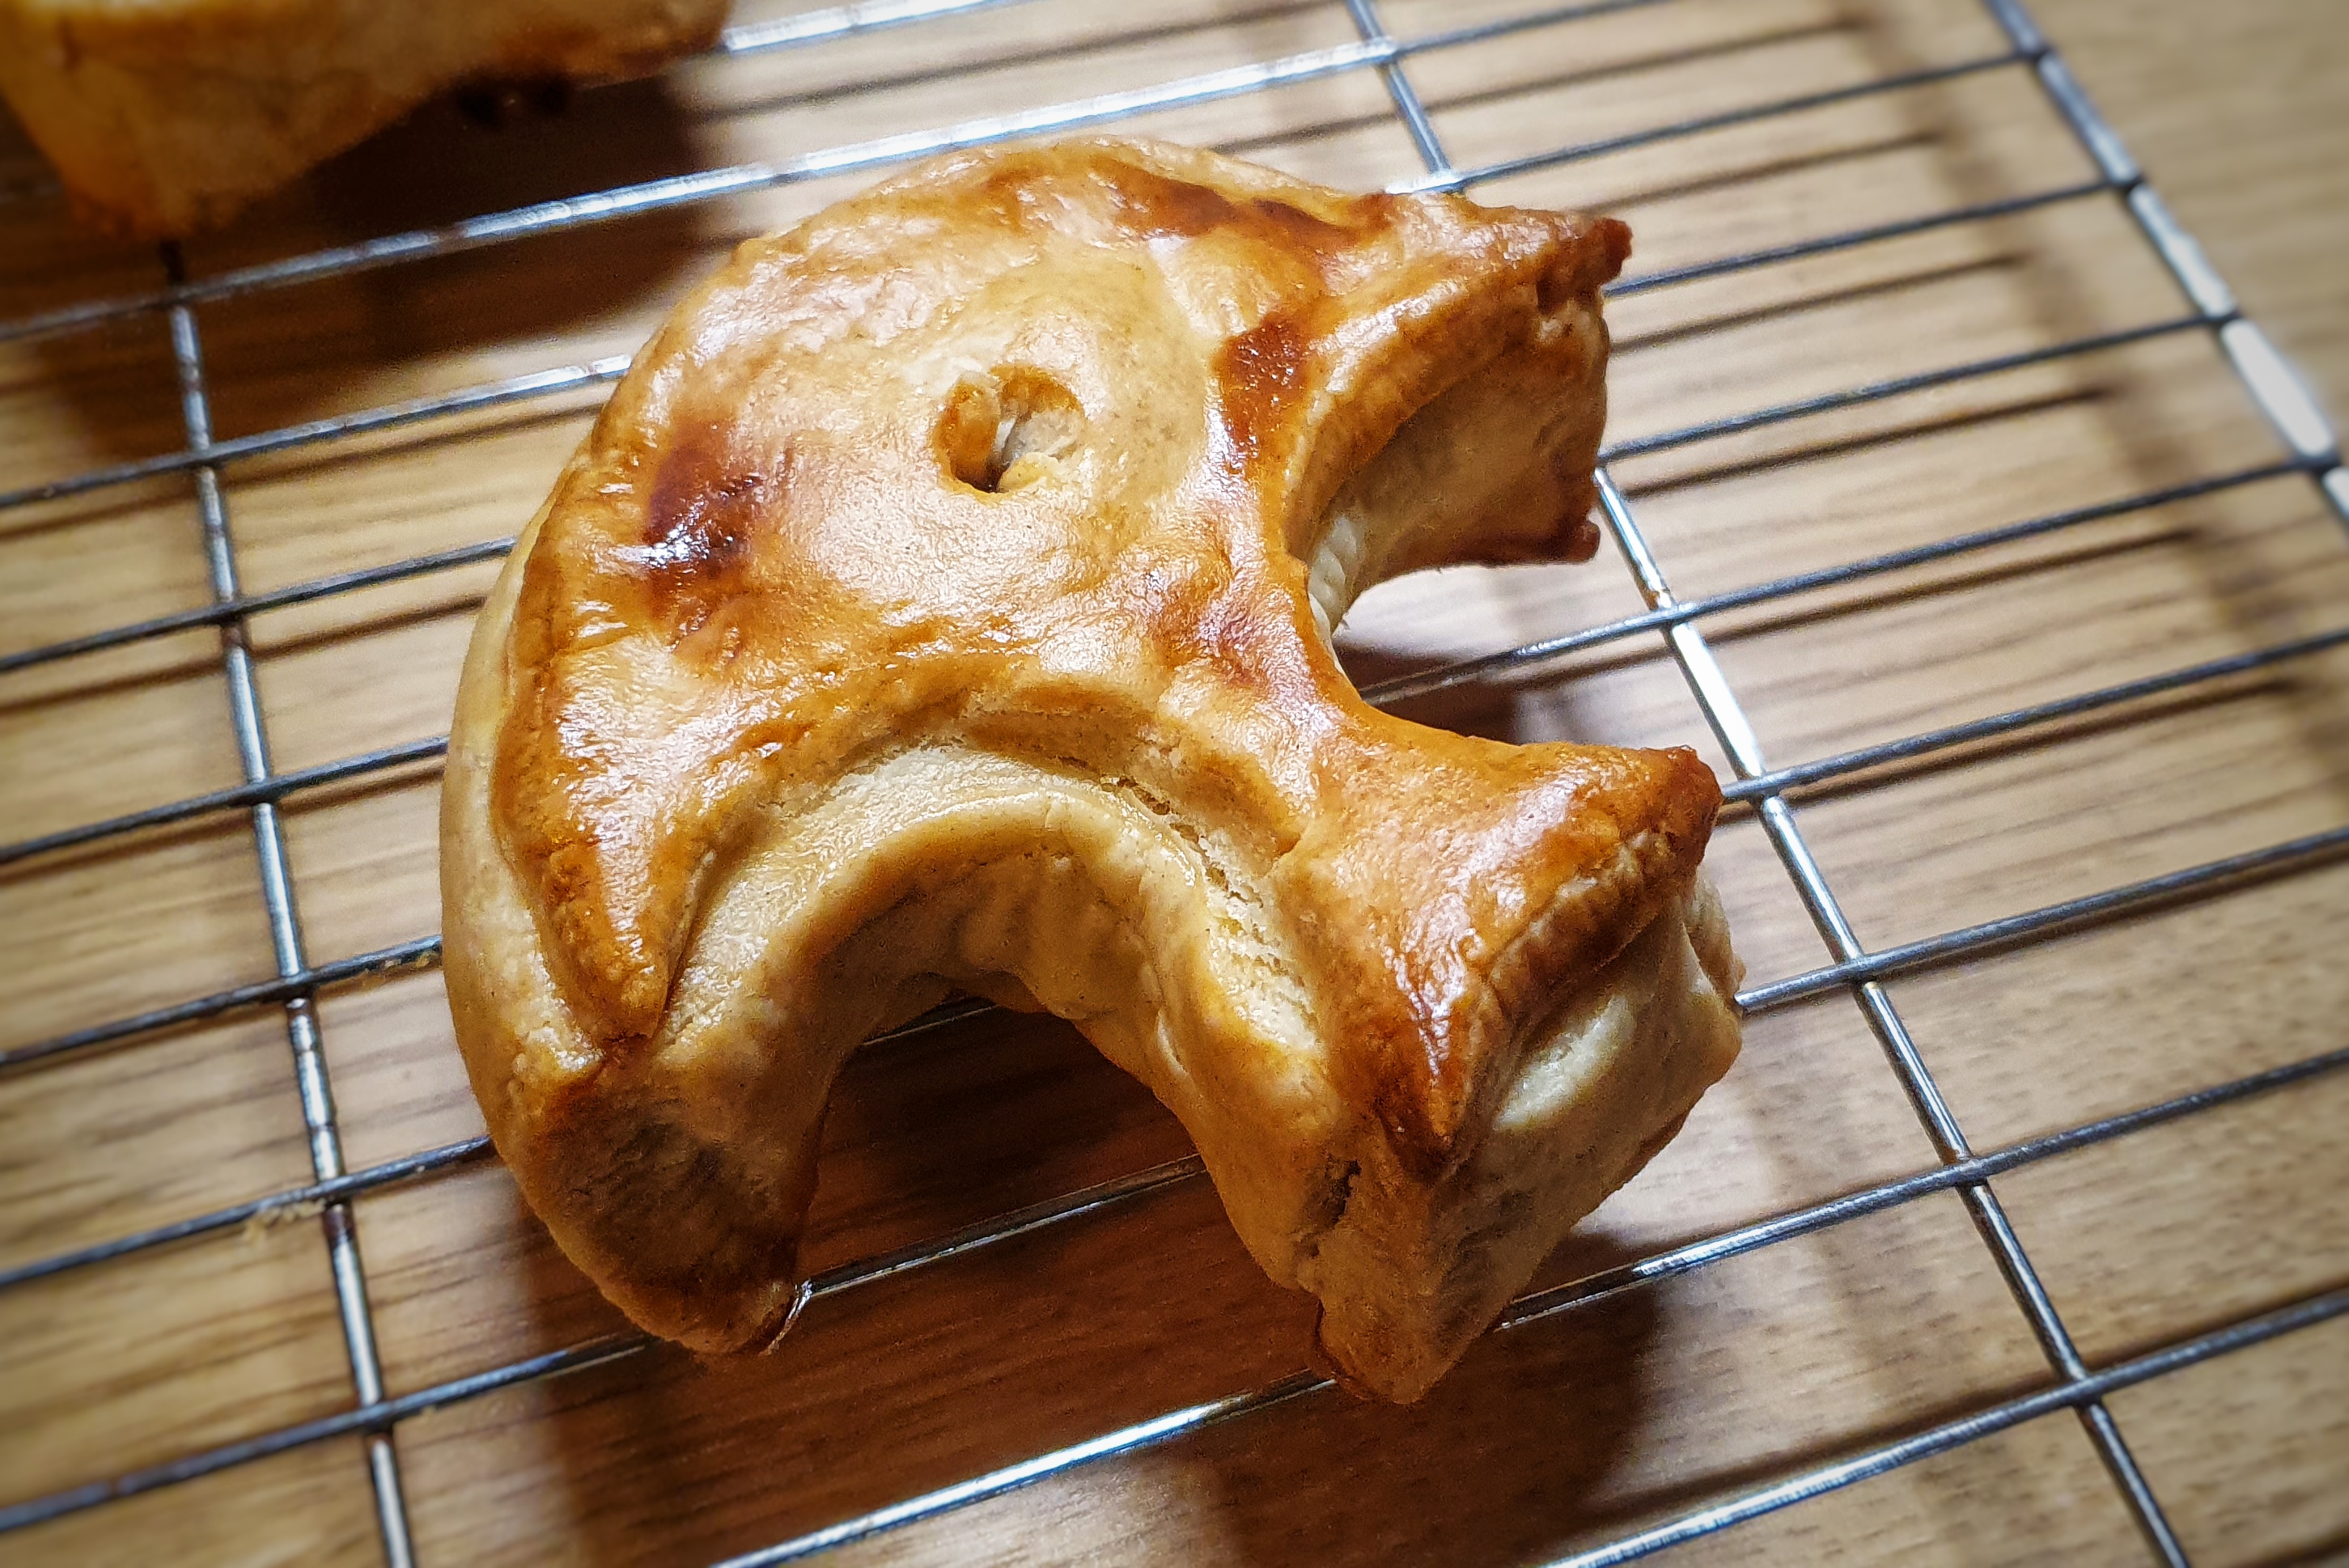
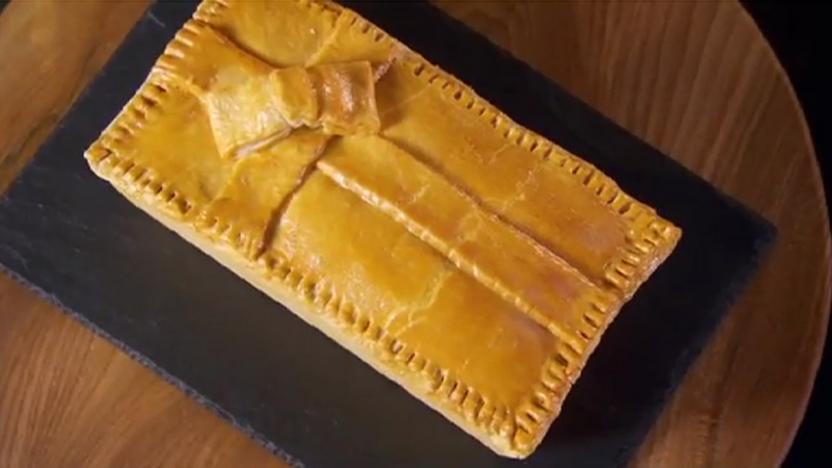
As promised on this year’s Christmas episode of the podcast, all about mince pies, here is my pastry recipe and method for making the shaped-mince pies in E. Kidder’s Receipts of Pastry and Cookery. It was originally published in 1721, but I used the 1740 edition of the book (here’s a link to the document). If you go to the end of the book, you will see lots of different minced pie templates, just like the ones below. The idea was that you rolled out your pastry and cut a shape out, then made pastry walls, filled them with mincemeat, placed on lid on top and baked it. Really beautiful, but fiddly-looking shapes, I’m sure you’ll agree.
I felt a little nervous making them, so let me at this point, say a massive thank you to Ivan Day for the advice he gave me on shaping these pies. Ivan has an excellent blog with a fascinating article about mince pies (click this link to read it).
In the Christmas episode, I considered making some of the pie designs in Robert May’s The Accomplisht Cook (first published in 1660), but I found Edward’s designs much easier to extrapolate into three-dimensional pies! However, here are a few from May’s book to give you an idea of the sorts of minced pies he was making:
The Materials
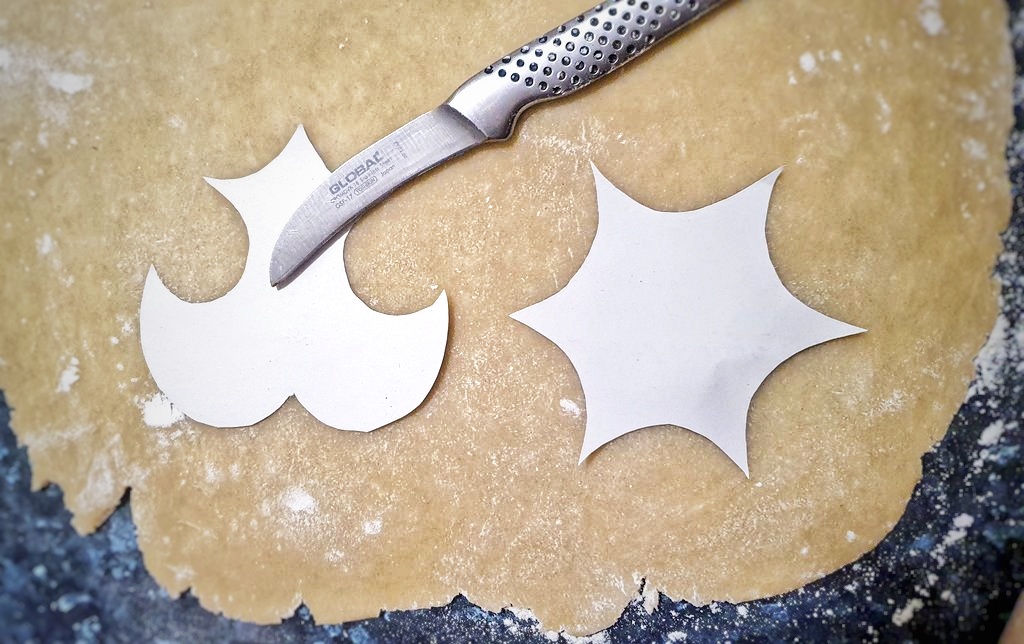
The first thing you need to do is get organised with your templates. I simply took screenshots of the book, printed them out and cut them out. You can make them any size you like. My shapes were around 10cm wide, and I went for the ones that looked the easiest!
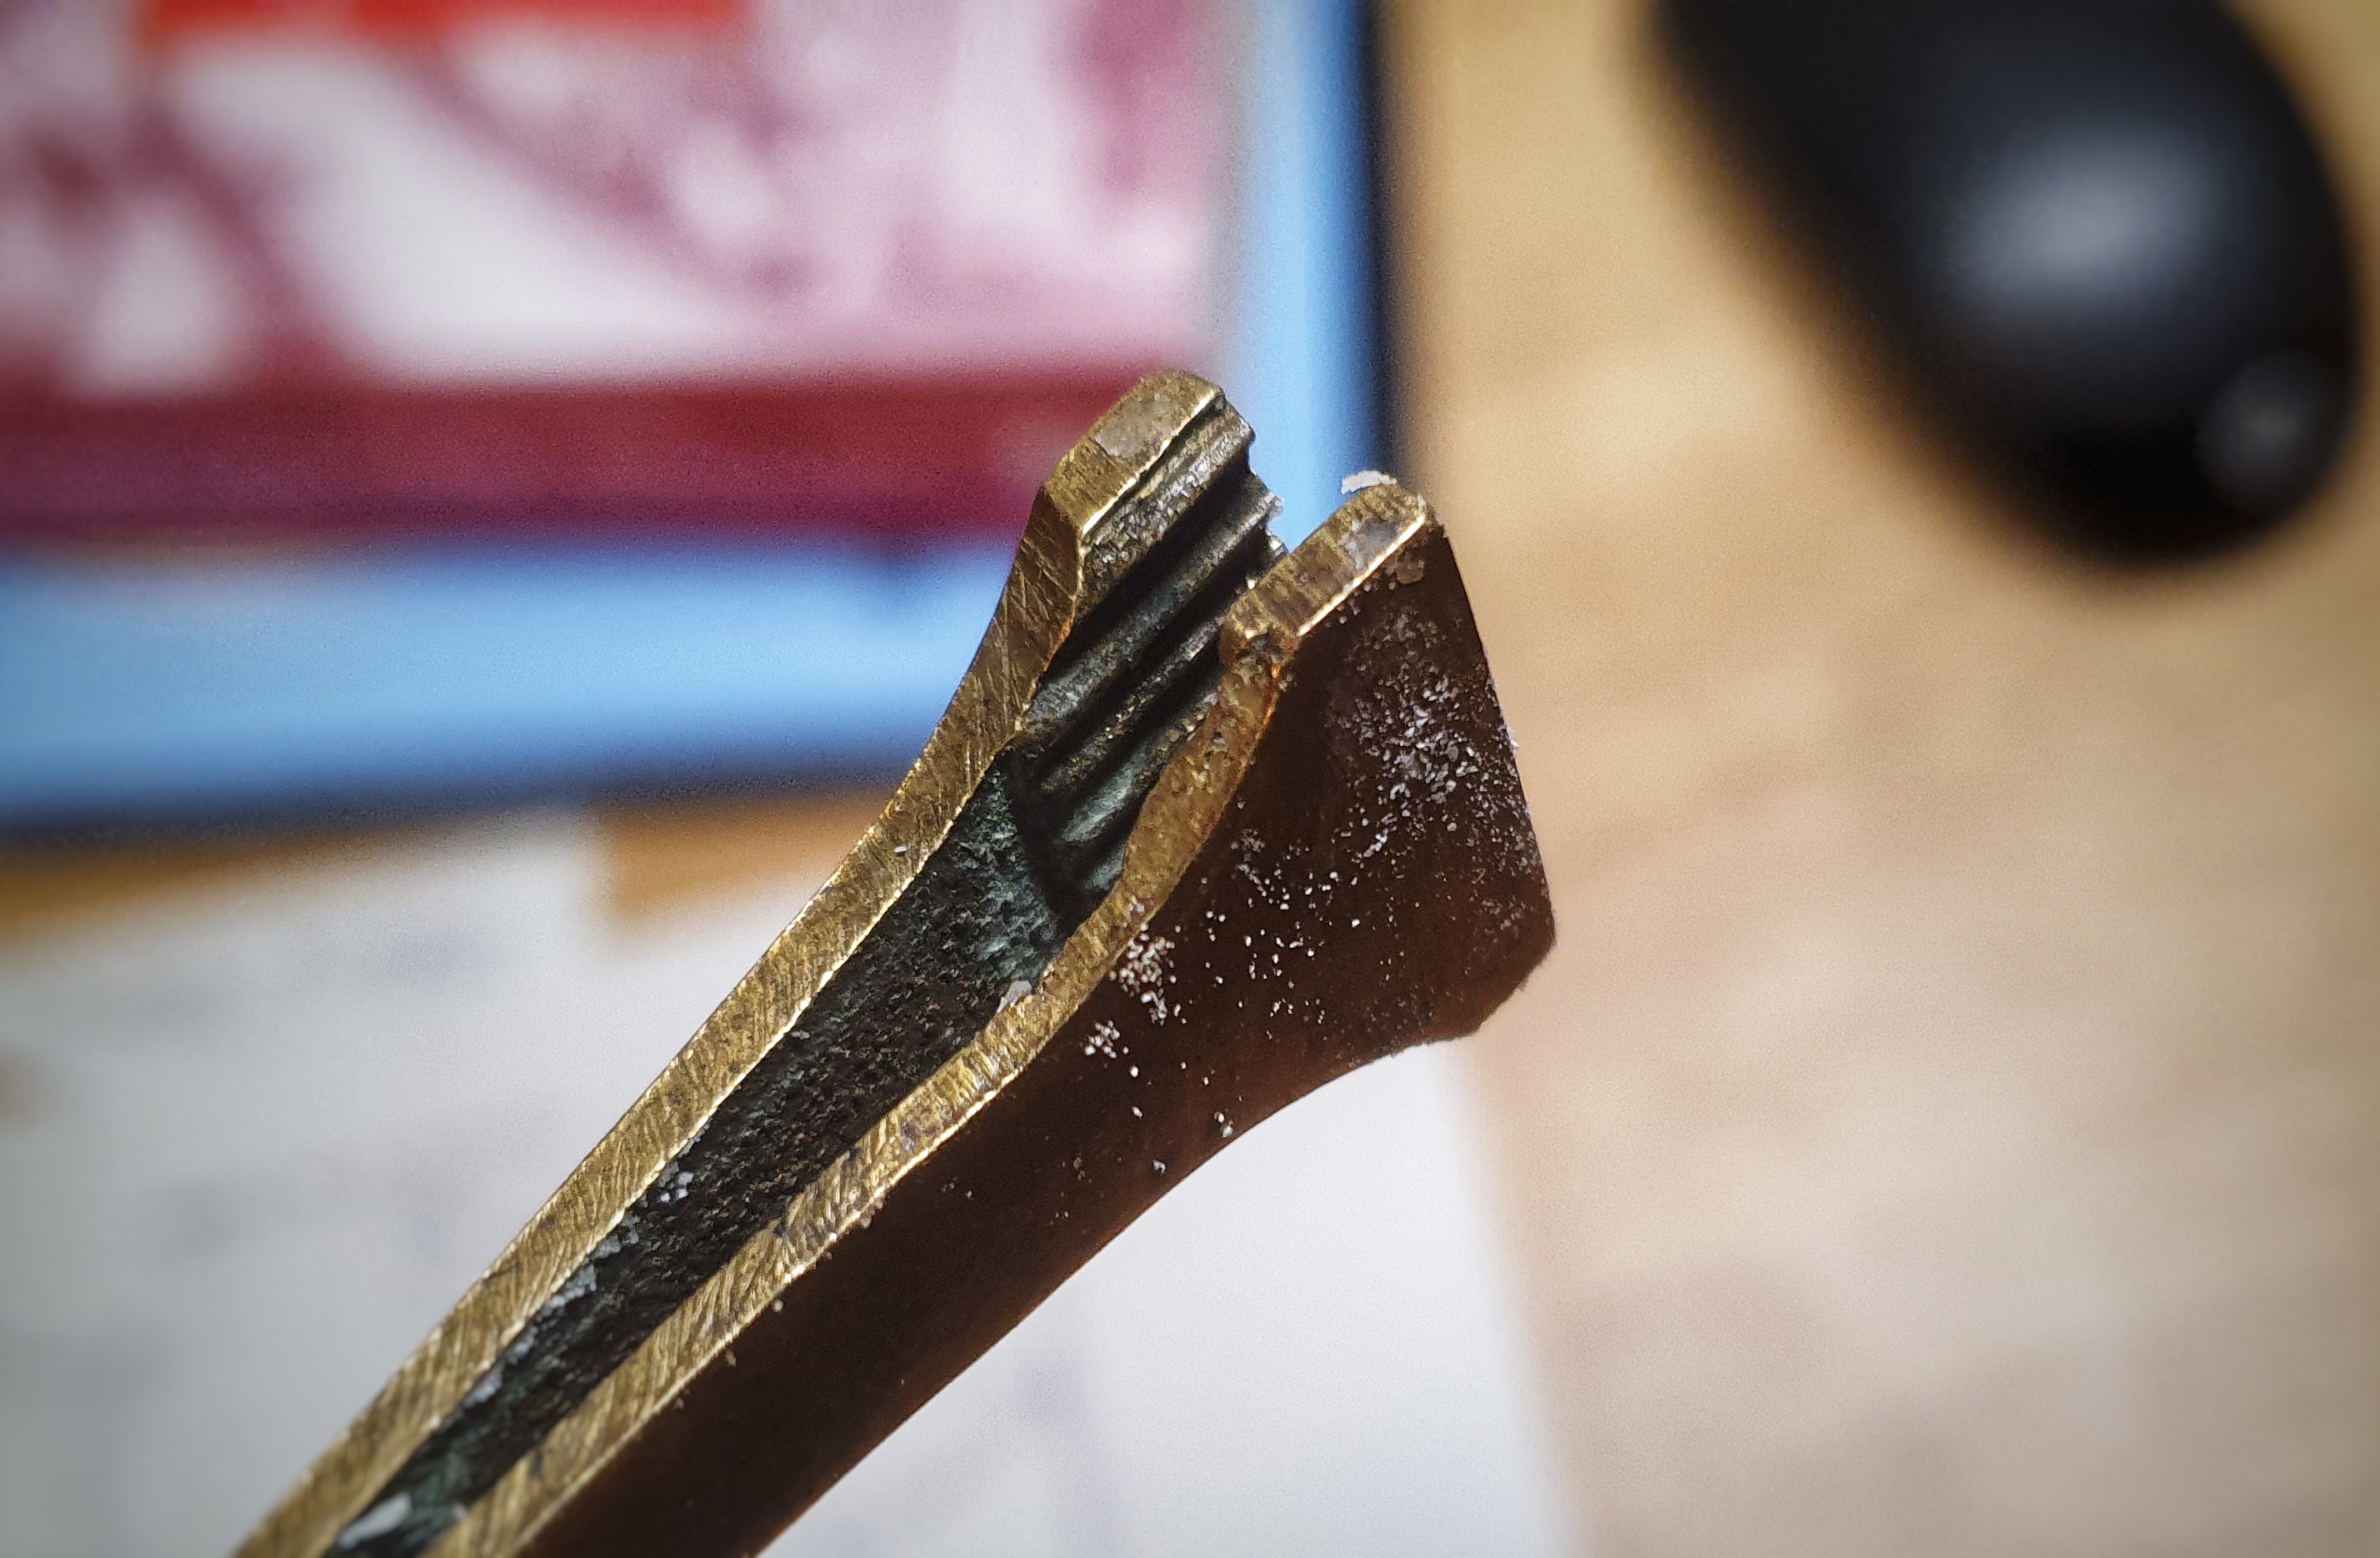
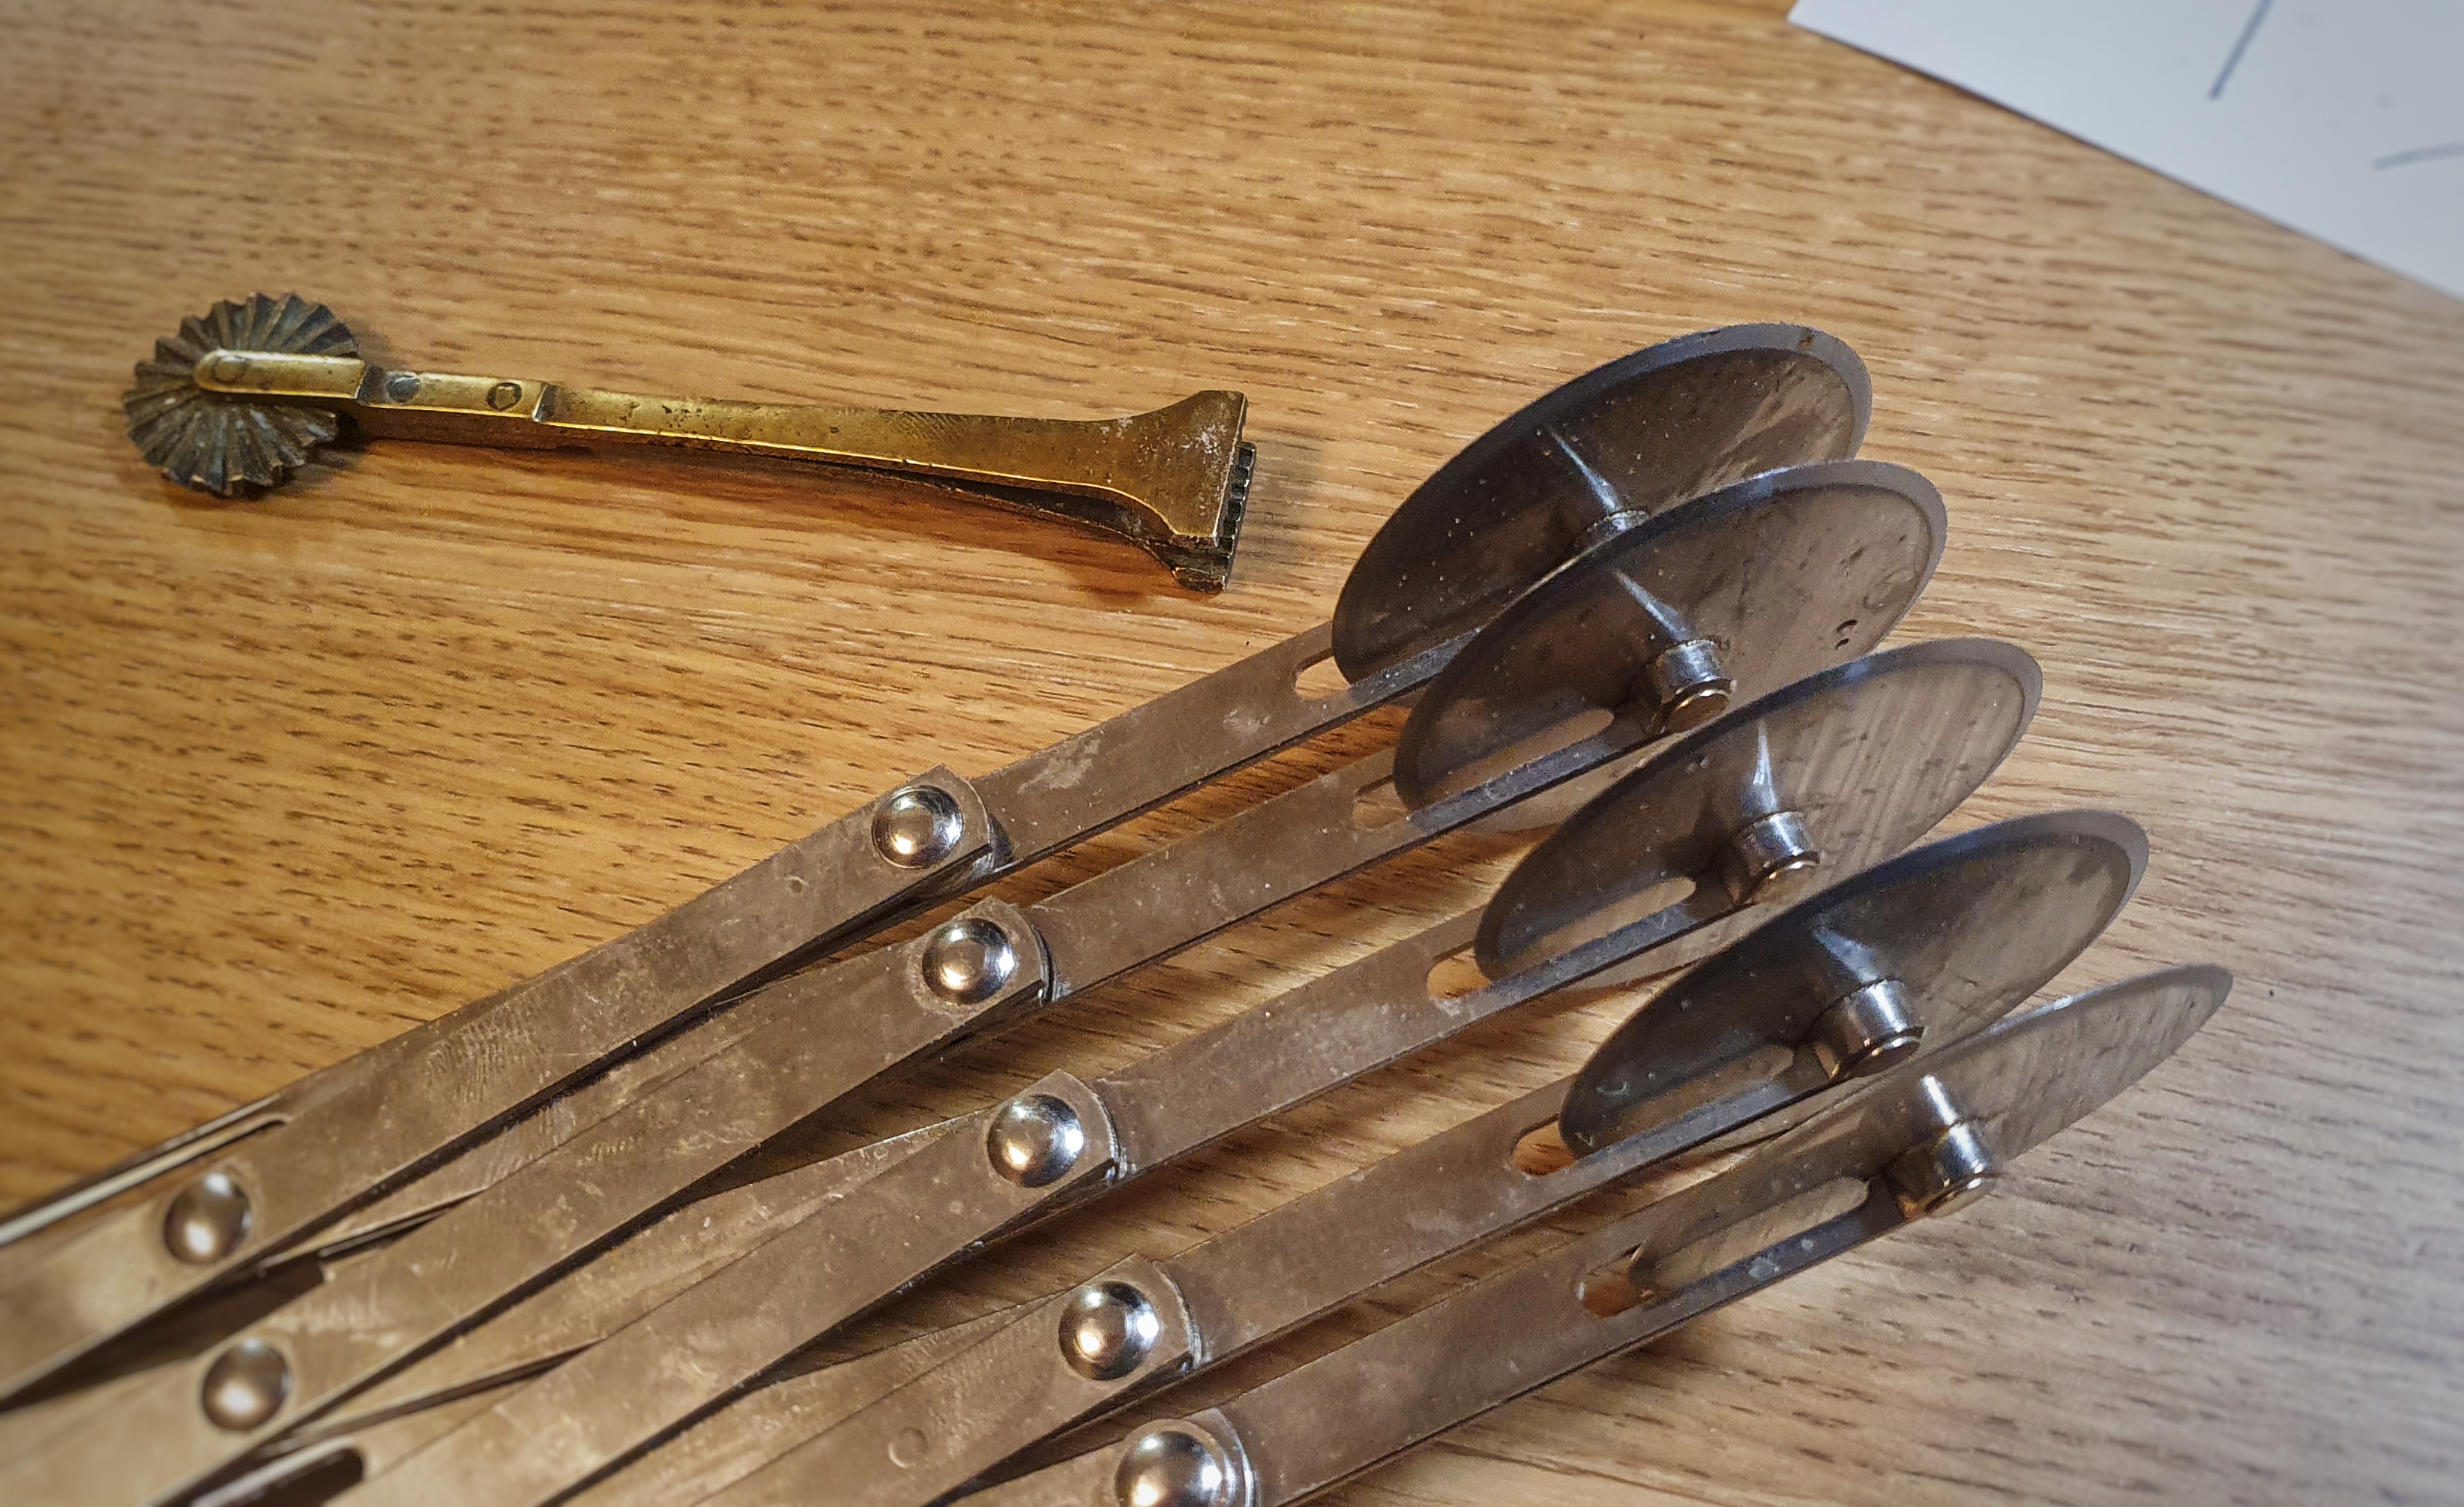
Then you need the correct tools for the job. I have collected over the years various pastry tools, both antique and modern. The wheels are called jiggers, which are used for cutting pastry. The antique ones usually come with a crimping tool attached, and these are used to fuse two pieces of pastry. The one I own with what looks like a flat pair of tweezers was particularly helpful for the pies I made here. I used a paring knife to cut out the shapes – the jiggers weren’t appropriate for these smaller pies.
Jiggers do come in handy for cutting out the pastry walls – essentially strips of pastry – I have a tool that’s made up of 5 jiggers on one expandable frame so you can cut several strips of the same thickness in one go.
That’s the tools of the trade, but now let’s look at our ingredients: we need mincemeat (I used the lamb mincemeat, recipe here) but you can use any you like.[1] Then we need some pastry that is mouldable (we don’t want the walls collapsing in the oven!) yet edible.
If you like the blogs and podcast I produce and would to start a £3 monthly subscription, or would like to treat me to virtual coffee or pint: follow this link for more information.Thank you.
Mouldable Hot Water Pastry
I came up with the following recipe, based on one given by Jane Grigson in English Food.[2] It’s very good for moulding, but not particularly delicious, I made a few changes and I think it’s pretty good. It is simple to make, and this was enough for 8 to 10 pies, depending upon how large your templates are (you could, of course, make one large one!)
500 g plain flour
125 g salted butter, diced
125 g lard, diced
75 ml hot water
2 tbs icing sugar
First, rub the butter into the flour until it resembles breadcrumbs. Put the lard in a saucepan and pour the hot water over it. Heat gently, but be careful – you don’t want it to boil and splutter. Stir in the icing sugar and when it is dissolved, make a well in the centre of the flour-butter mixture and pour into it three-quarters of the hot liquid. Cut the liquid in with a knife, then pour the remaining hot liquid to pour over any dry patches that remain. Once all of the water has been added, give the pastry a knead (leave it to cool a little if you need to). It should be smooth, pliable and waxy. Cover with cling film and allow to cool completely, but do not refrigerate.
Constructing the Pies
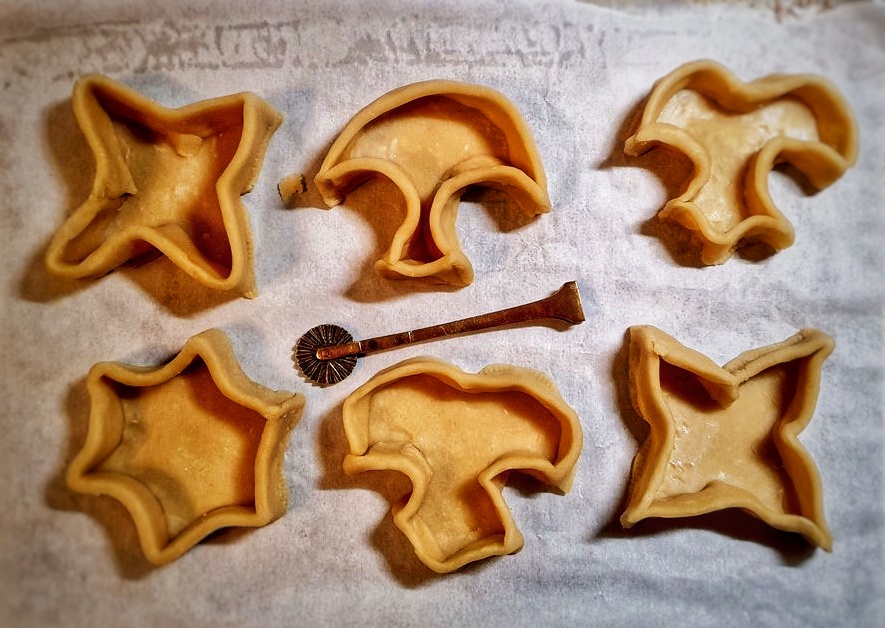
Now you can roll out a third of the pastry thinly – aim for the thickness of a pound coin, 2 to 3 millimetres – and cut out your bases. Now roll out another third into a long strip, long enough to go around the perimeter of your shapes. To do this, use a piece of string to trace around the shape. When the appropriate length, use a ruler to cut your strips at your desired thickness. I went for 2 cm, but I could have gone thicker than that, I think.
Now the fiddly bit: brush the edges of the bases with plain water and glue the sides on. Use your finger and thumb to pinch them together, and then crimp them with a crimper tool if you have one. Repeat with all of your shapes and place in the fridge for a few hours to firm up. When firm, roll out the final third of the pastry and cut out your lids.
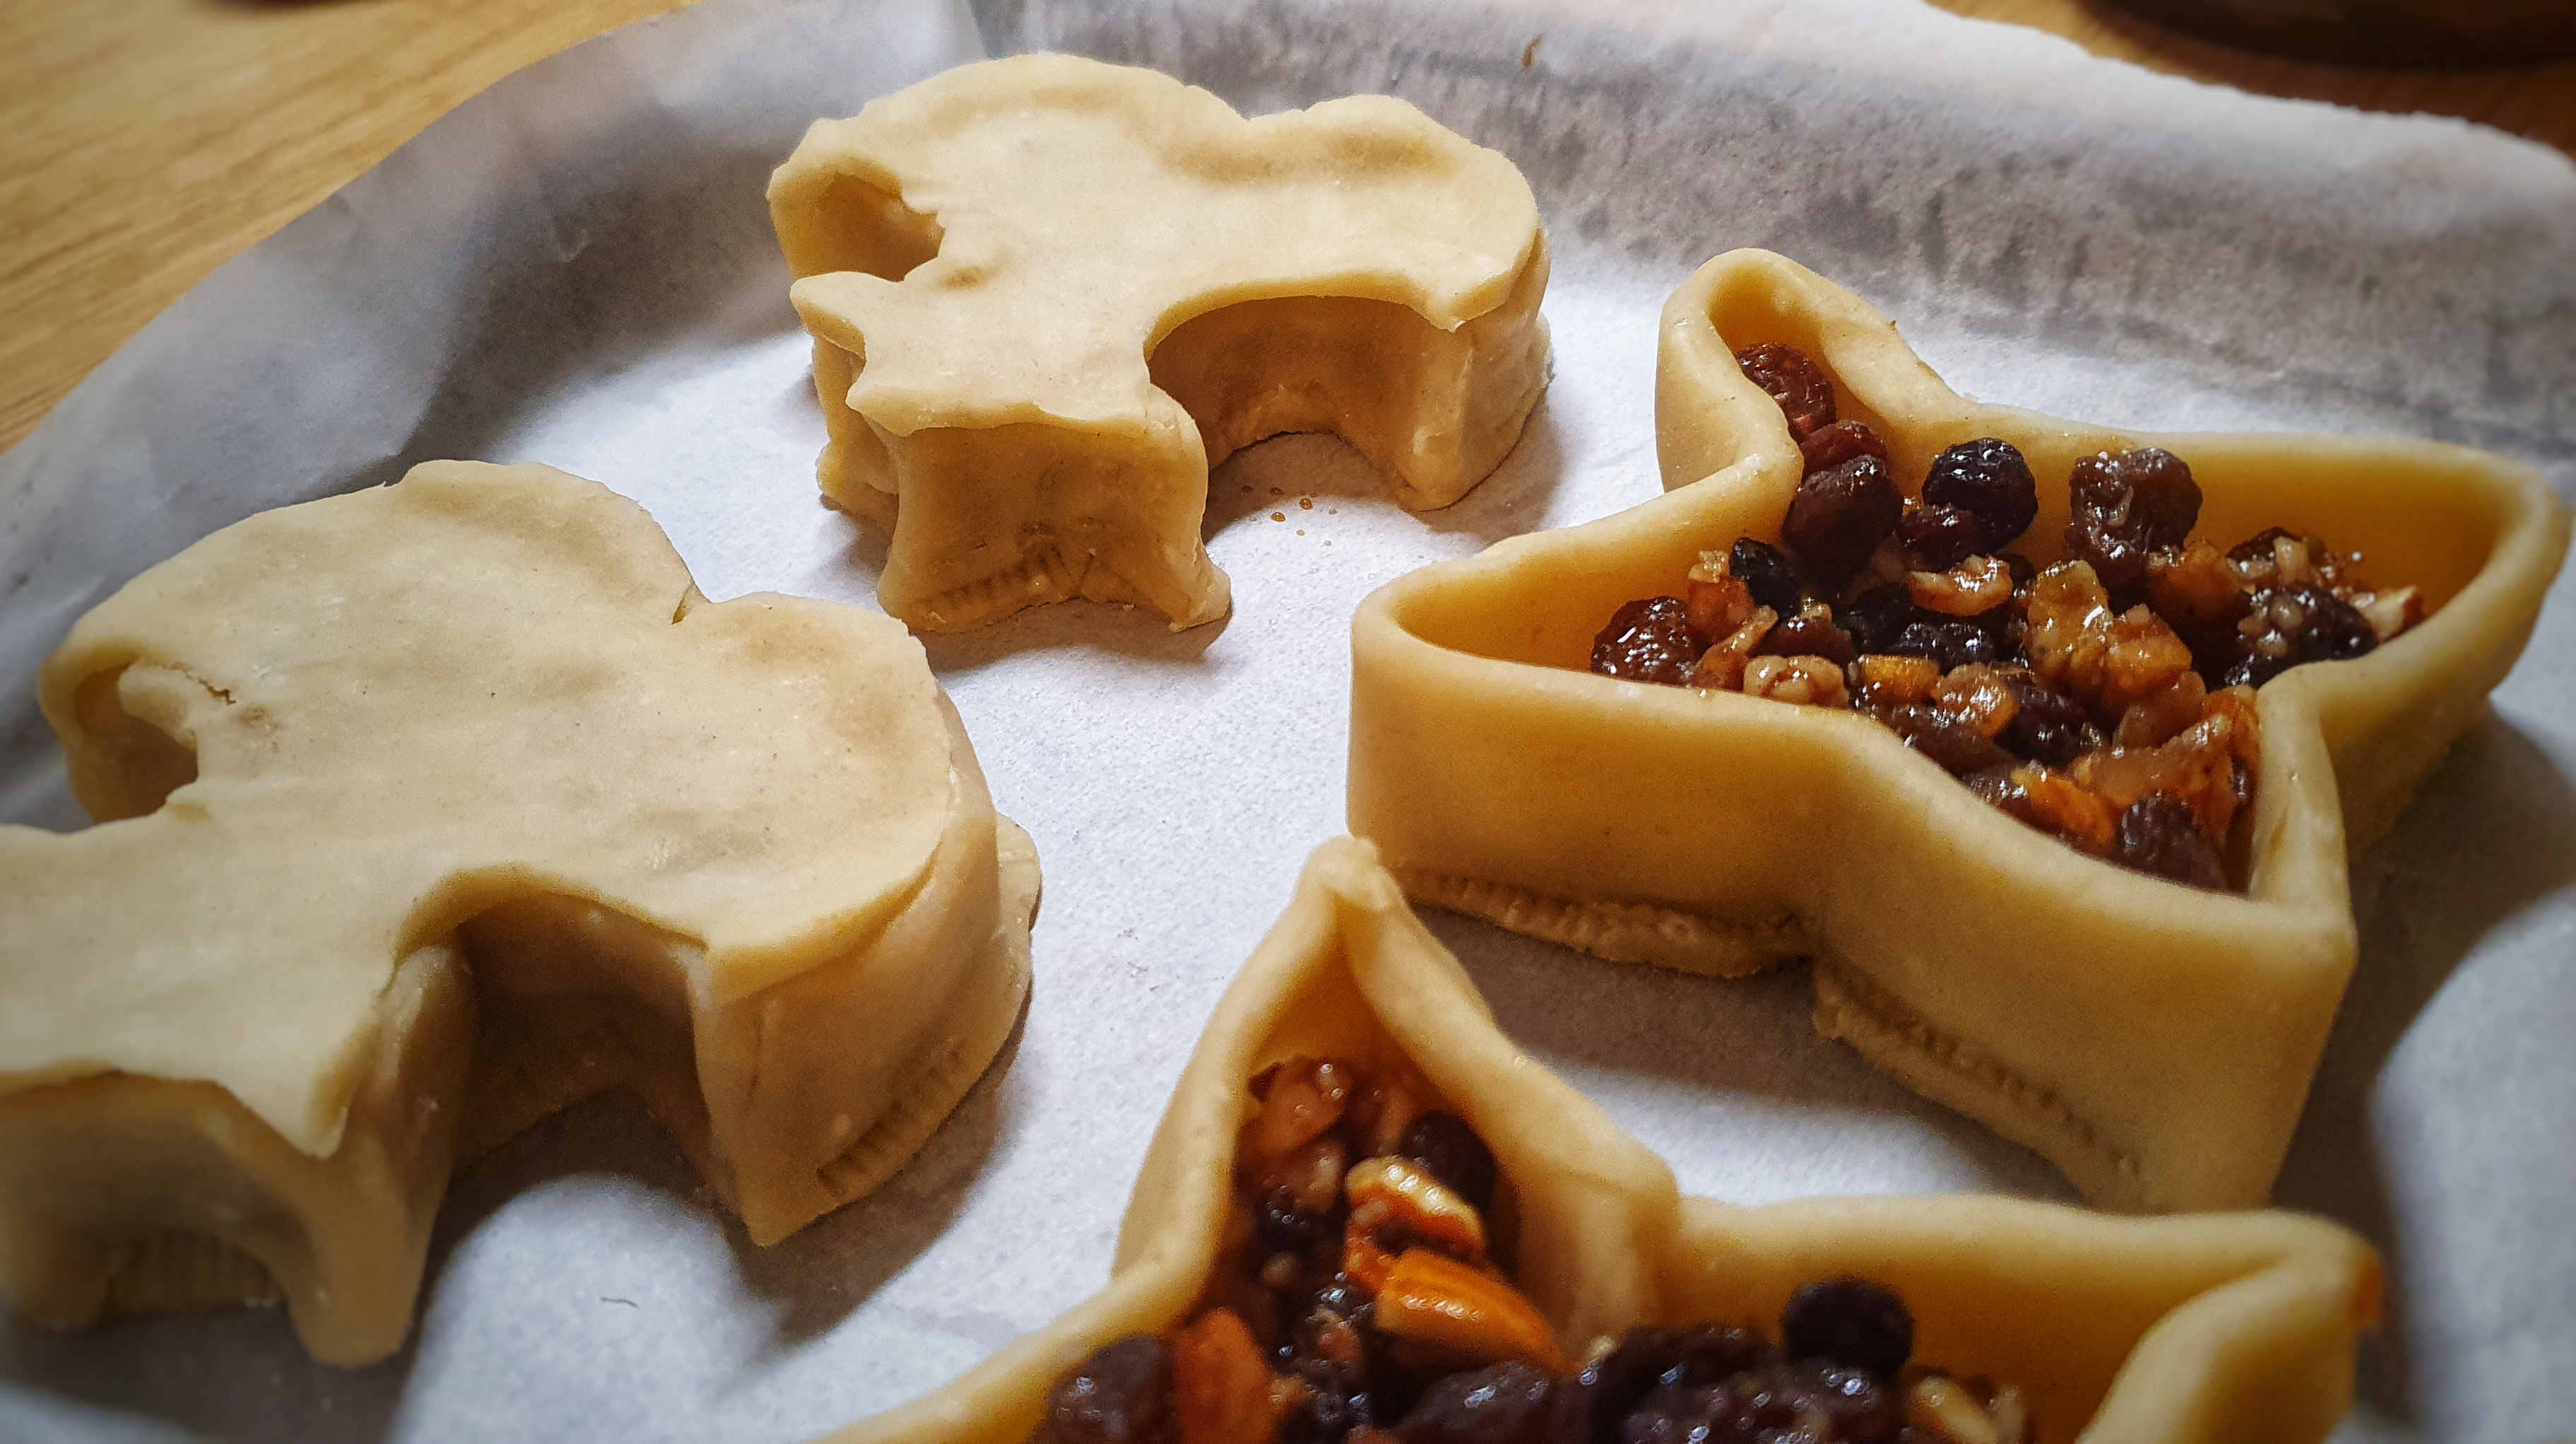
Fill your pies with your chosen mincemeat, brush the rims of your pies with water and fix on the lids in the same way as you did the bases. Make a steam hole and place back in the fridge for 30 minutes to firm up again. Meanwhile, preheat your oven to 200°C.
If you like, brush your pies with an egg wash before you bake them for 25 minutes, or until a good golden-brown colour. If you are making large pies, turn the heat down to 175°C and cook longer: you should see or hear the filling bubbling, telling you it is ready!
This post complements the 2023 Christmas special of The British Food History Podcast called ‘Mince Pies’:
I have written several times about mince pies and mincemeat over the years on the blog. There are my two go-to mincemeat recipes: Jane Grigson’s Orange mincemeat, and Mrs Beeton’s traditional mincemeat, along with instructions on how to make small, individual mince pies. This year, however, I wanted to make an old-fashioned sweet lamb pie, once eaten in Westmorland in the Northwest of England, a defunct county now making up parts of Cumbria and North Yorkshire. It was one of the last areas of the country to carry on putting meat in its mincemeat mixtures.[1] Like all mince pies of the past, they were not eaten only at Christmas, but much of the year, though because of the dried fruit content, they were associated with wintertime.
I was first introduced to this pie by Jane Grigson, and I made it many moons ago, for the Neil Cooks Grigson blog, I really liked it and have been meaning to revisit it.[2] These pies were not of the small individual type, but large plate pies, baked in a pie plate made of earthenware, tin or enamel.[3]
I’ve based the recipe on hers, but I did make some changes inspired by other recipes found on the Foods of England Project website.[4] The mincemeat isn’t cooked, but because of the booze and sugar content, it keeps very well. Don’t be put off by the meat content, it makes the filling succulent – and you can taste it, but this blurring of sweet and savoury is most delicious, something I have come to embrace after so many years of making historical British food.
If you like the blogs and podcast I produce and would to start a £3 monthly subscription, or would like to treat me to virtual coffee or pint: follow this link for more information.Thank you.
The filling:
This makes around 2 ¼ litres of well-packed filling, but I do intend to make two large pies at least and lots of smaller ones, so scale down if need be. It keeps for months if left somewhere dark, dry and cool; and remember mince pies are for life, not just for Christmas.
500 g lean lamb
200 g lamb or beef suet, membrane and sinew removed (packet stuff is acceptable if fresh is unavailable)
350 g apples, peeled and cored
120 g almonds
250 g each currants, raisins and sultanas
300 g soft, dark brown sugar
100 g chopped candied peel
Juice and zest of 2 oranges
120 ml dark rum
1 tsp salt
½ tsp ground black pepper
1 tsp each ground mace and cinnamon
½ freshly grated nutmeg
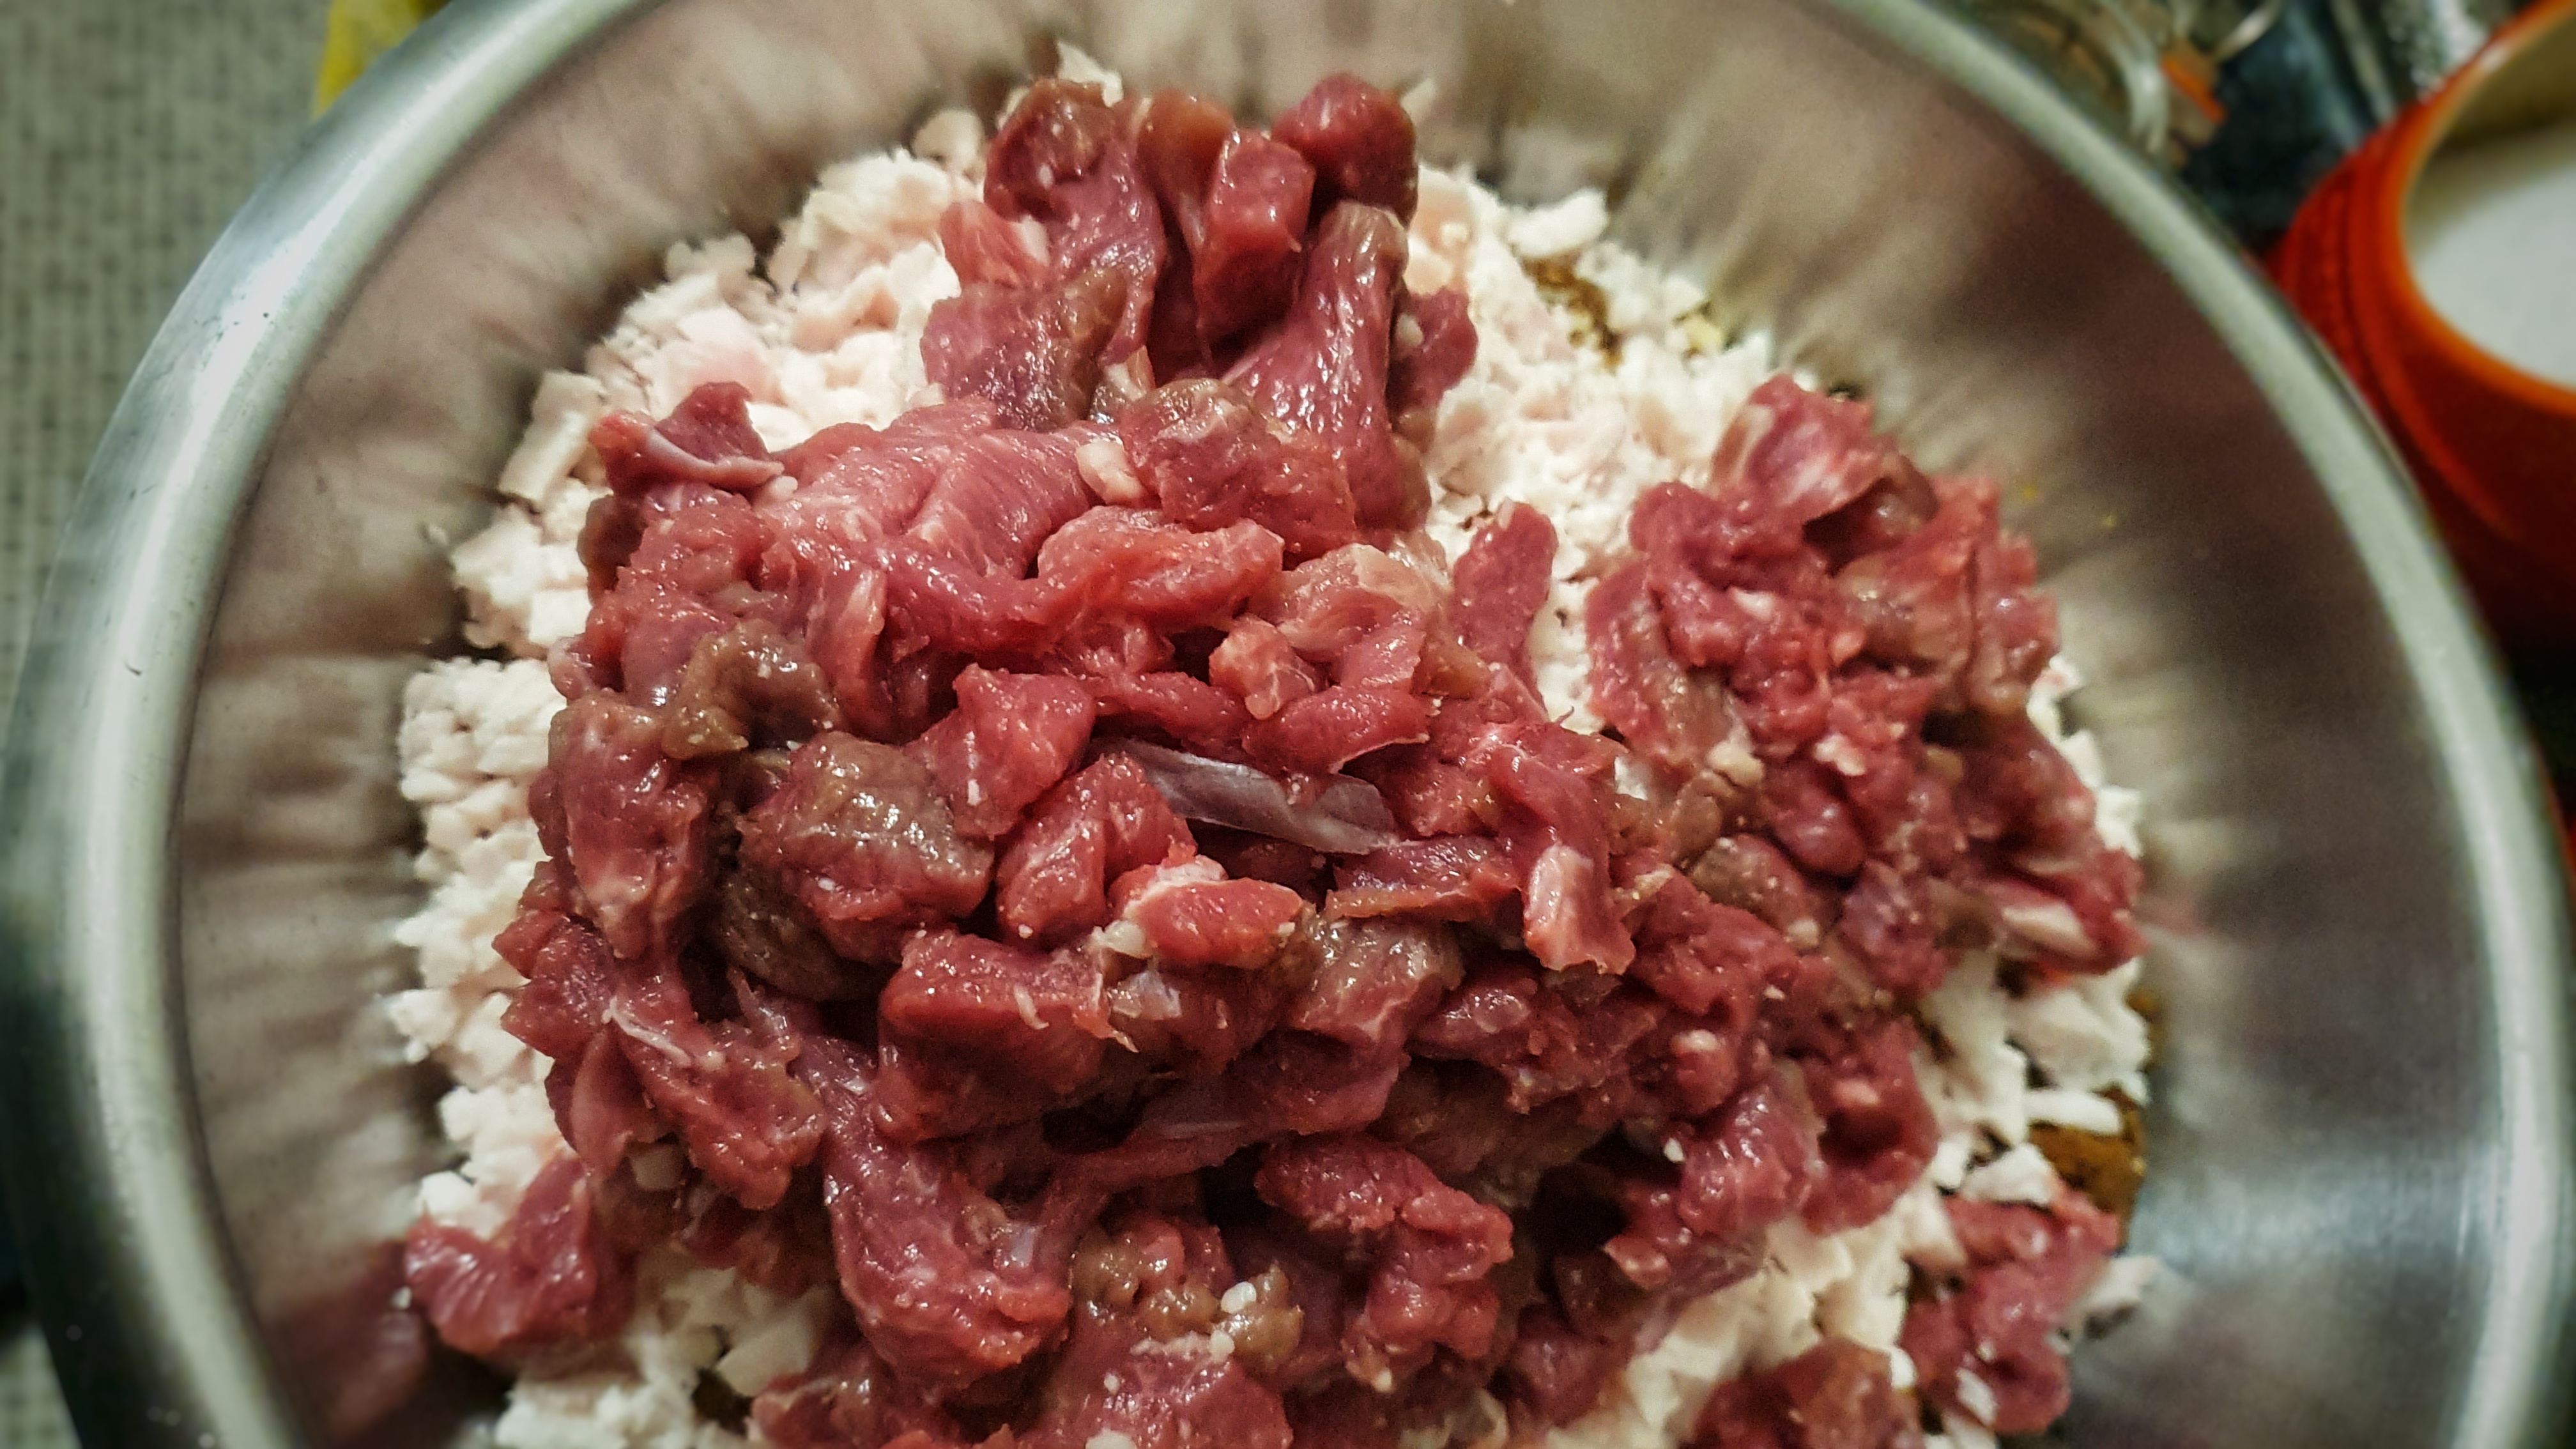
To make a truly ‘minced’ meat, you need to chop the meat, suet, apples and almonds quite finely. (You can, of course, use minced lamb, slivered almonds and grated apple and suet).
My ‘minced’ lamb and suet
Mix everything together in a large bowl and pack tightly into sterilised jars.[5] Leave to mature for at least a week before using.
The pie:
These pies were made on pie plates, but you can make them in any flan or pie tin you like. For my 26 cm diameter pie plate I used the following amounts, though the pastry was quite thin, so you may want to proportion things up in line with perhaps 360 g flour. I will leave it to you to judge size and thinness. There are instructions on how to make small, individual mince pies here.
300 g plain flour
150 g butter, or 75 g each butter and lard
75 g caster or icing sugar
80-100 ml cold water
Egg wash: 1 egg beaten with ½ tsp salt
Dice the fat and rub into the flour until breadcrumbs are formed (or use the flat beater on a machine, set to slow), then add the sugar, mix, and add the water slowly mixing and stirring. Bring everything together to form a firm dough. You might not need all of the water. Knead briefly to smooth the dough, cover and then leave to rest in the fridge for around 30 minutes.
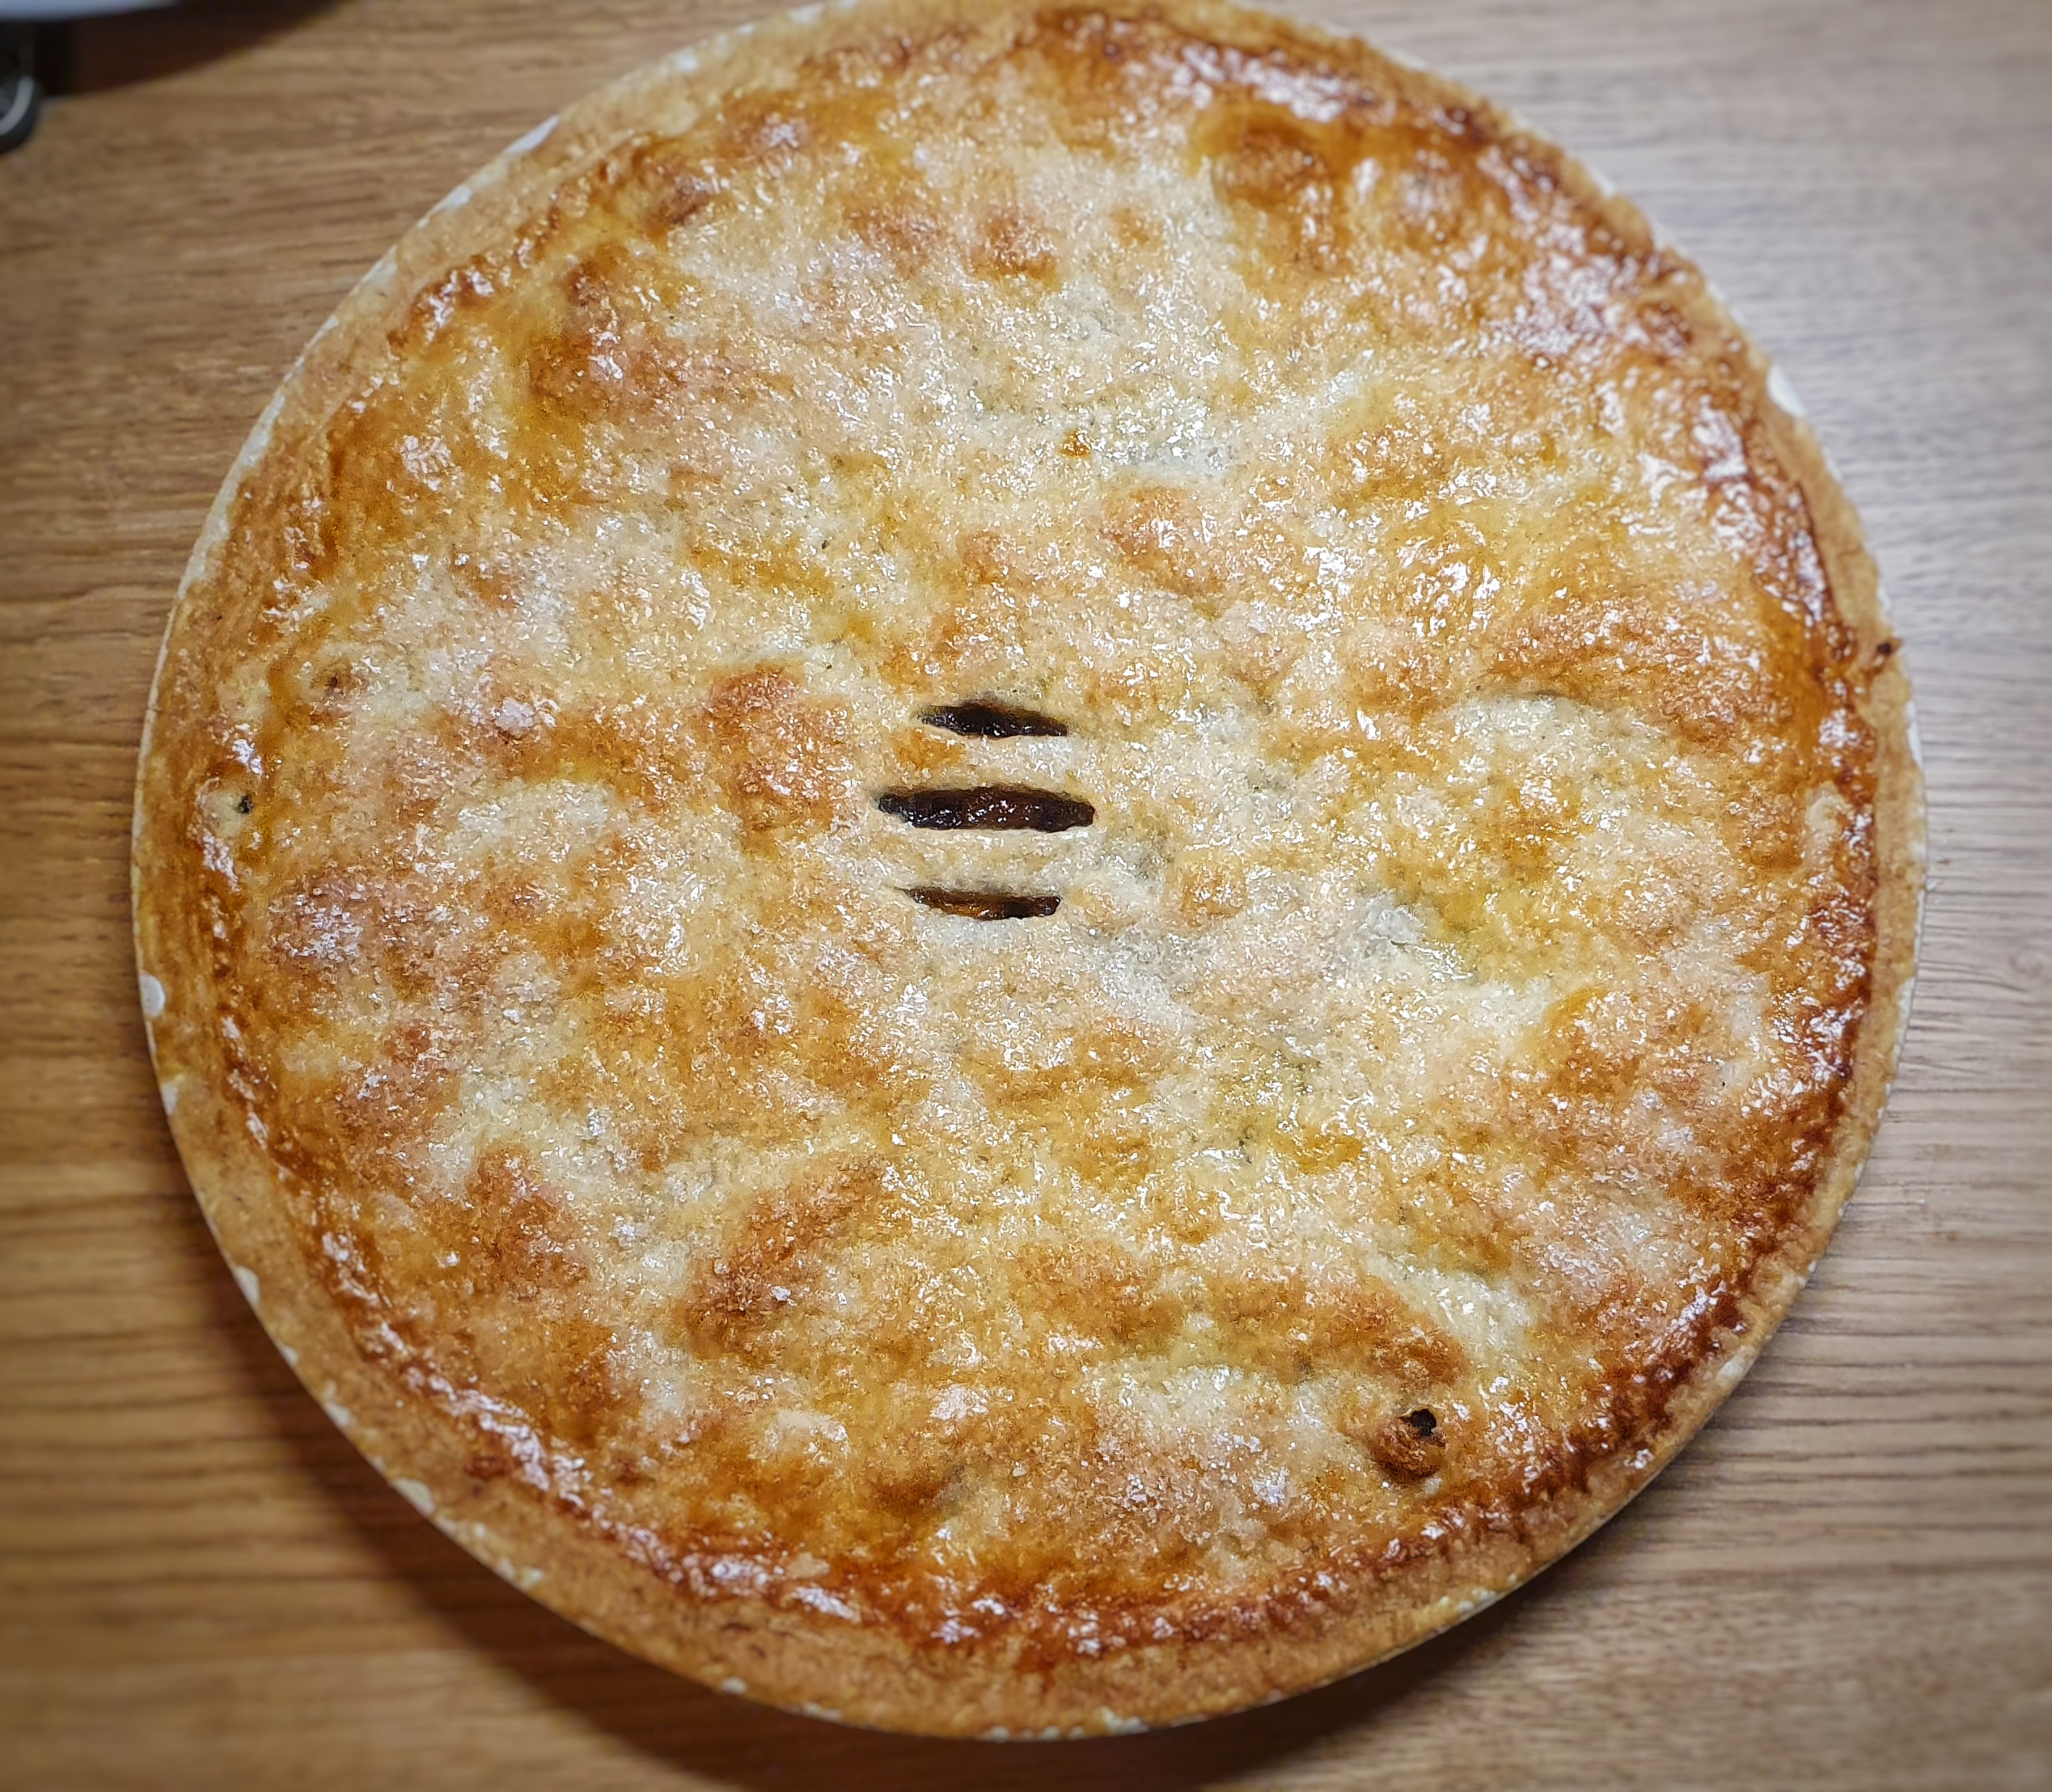
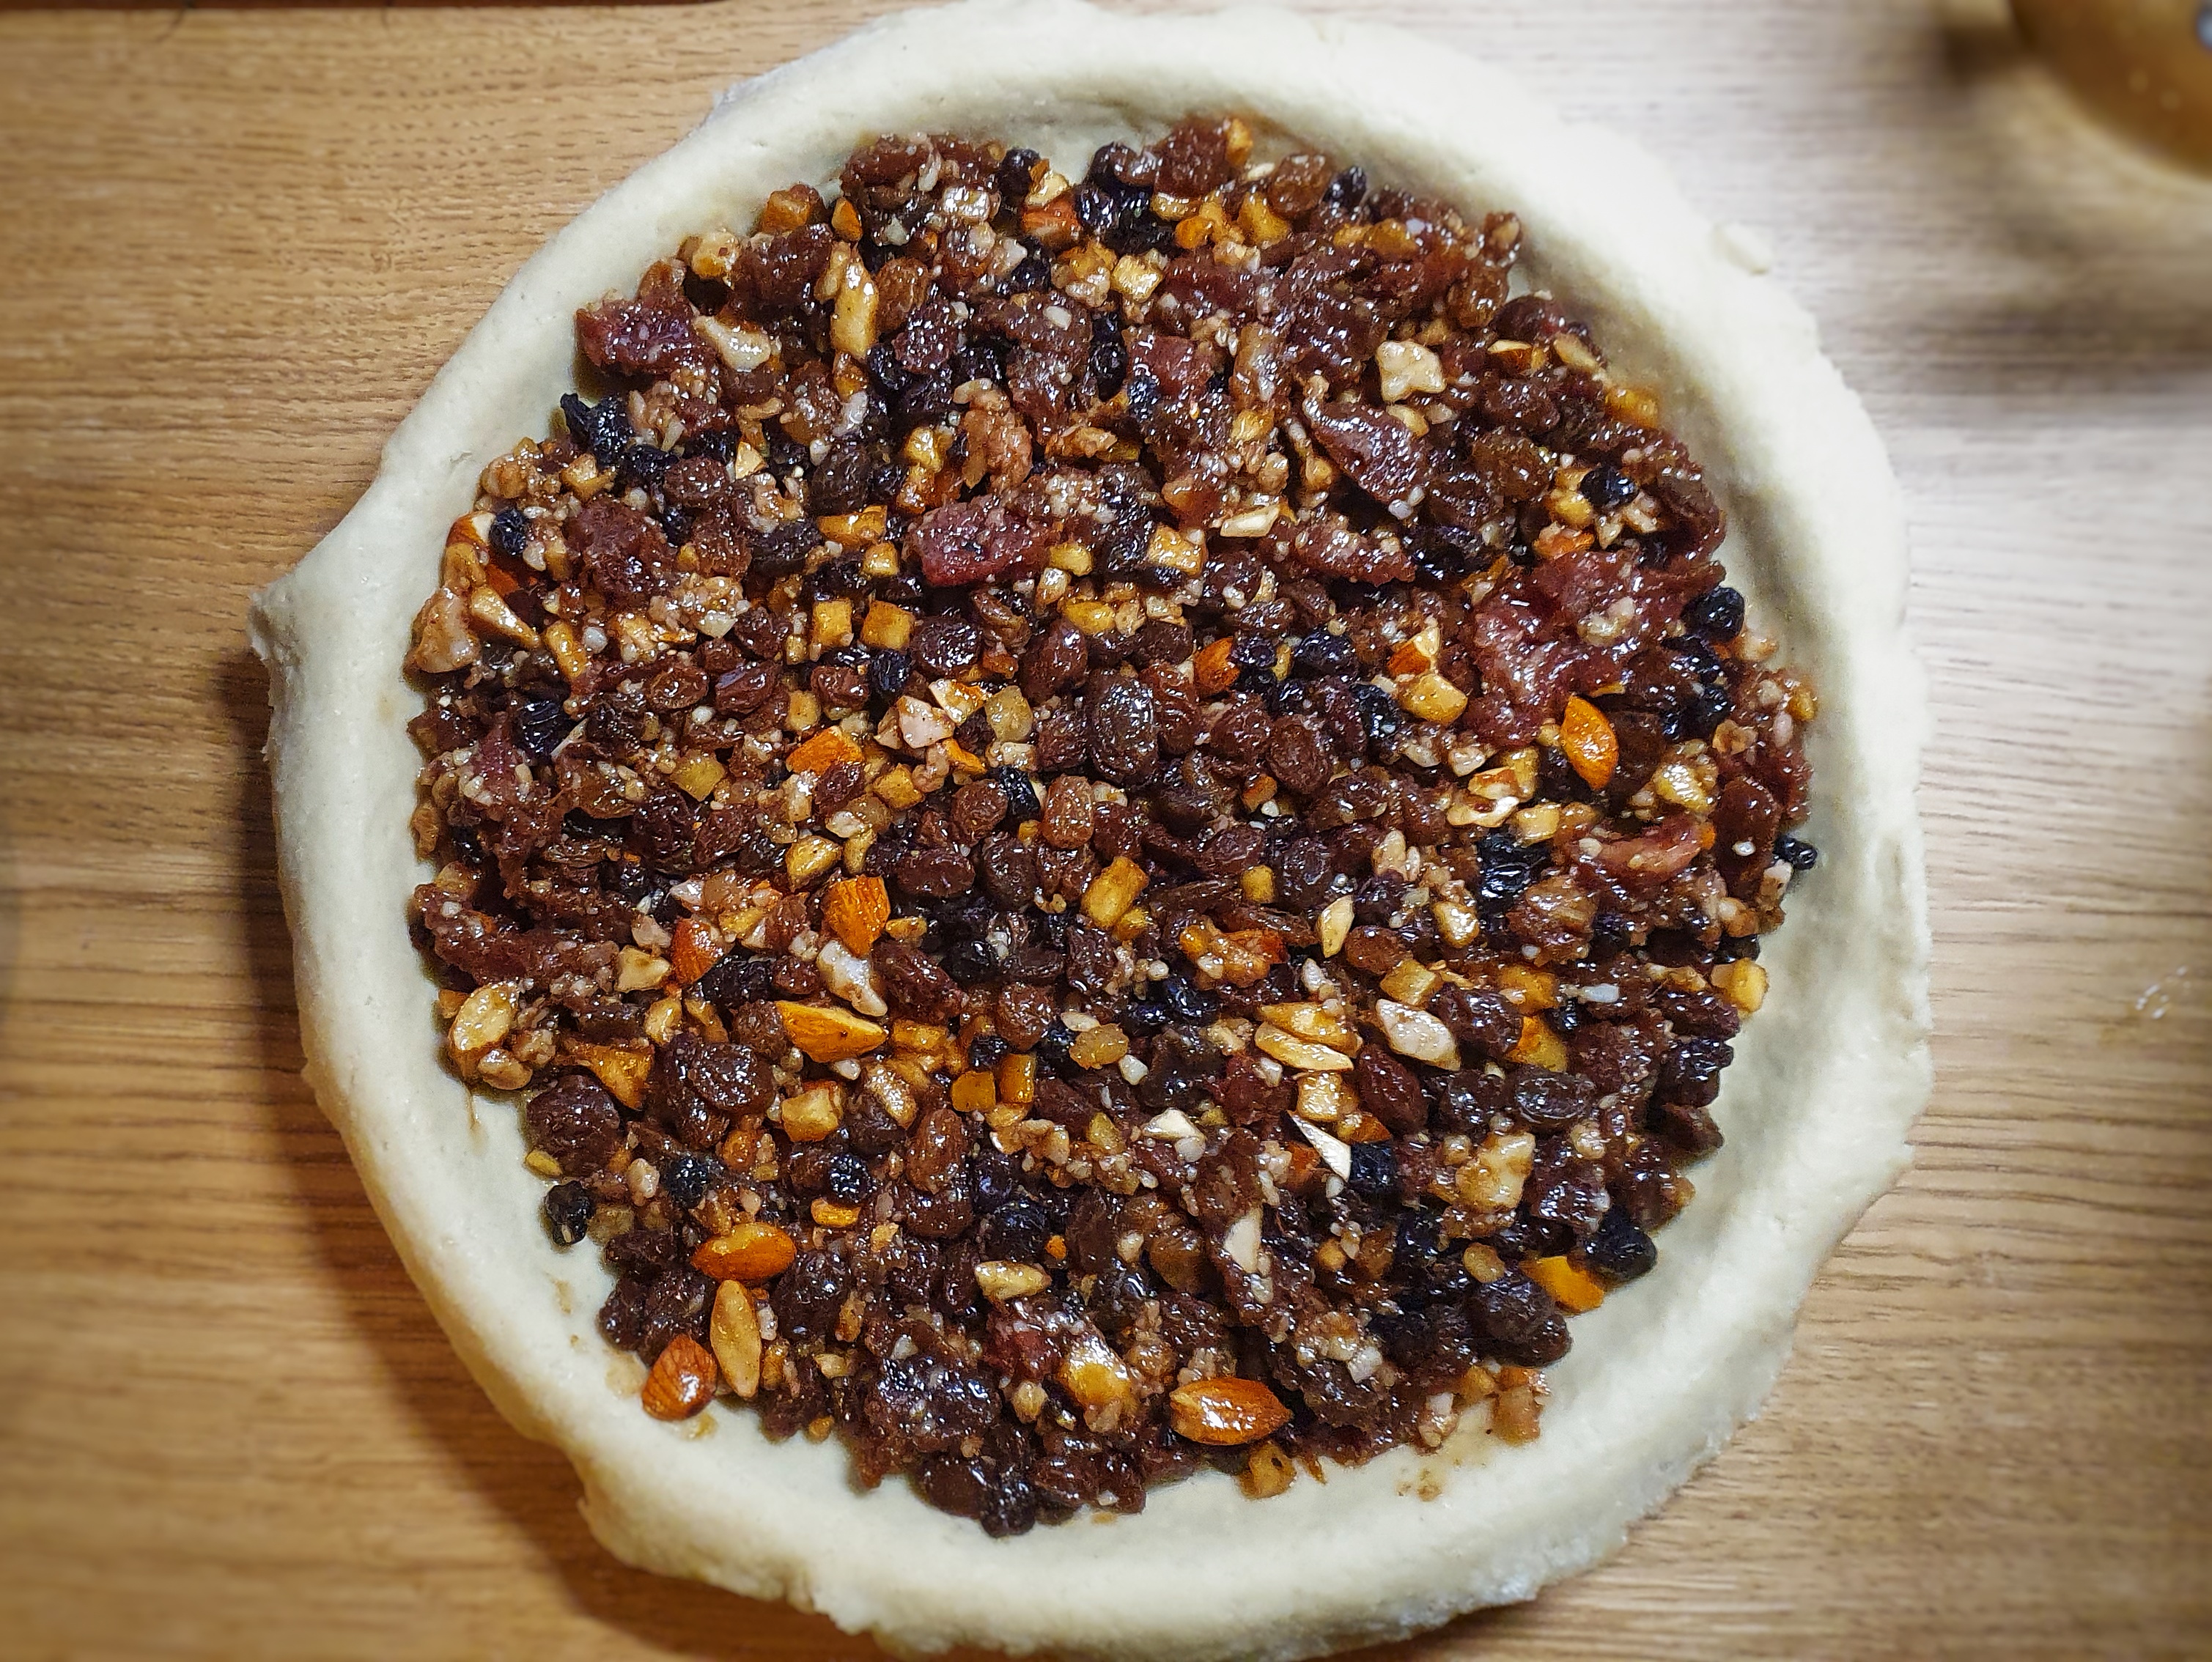
Roll out two-thirds of the dough into a round, lift and lay it over the plate neatly. Prick the base with a fork. Spoon the filling in. Again, go with your gut – do you want a thin amount or loads? I added enough to come up to the lip of my plate.
Roll the remaining third of the pastry out into a round. As it rests, wash the rim of the pie plate and place the lid on top, securing it with a crimping tool or fork prongs or with your thumb or forefinger. Cut a steam hole and brush with egg. You can sprinkle a little sugar over the top if you fancy.
Place in the fridge to firm up and preheat the oven to 200°C. When the oven has come up to heat, slide the pie onto the centre shelf and cook for around 35 minutes, or until a good golden-brown colour and you can see the filling bubble through the steam hole.
[5] To sterilise jars, heat them in the oven for 25 minutes at 120°C. Any rubber seals – or lids with rubber seals, can be sterilised in very hot water.
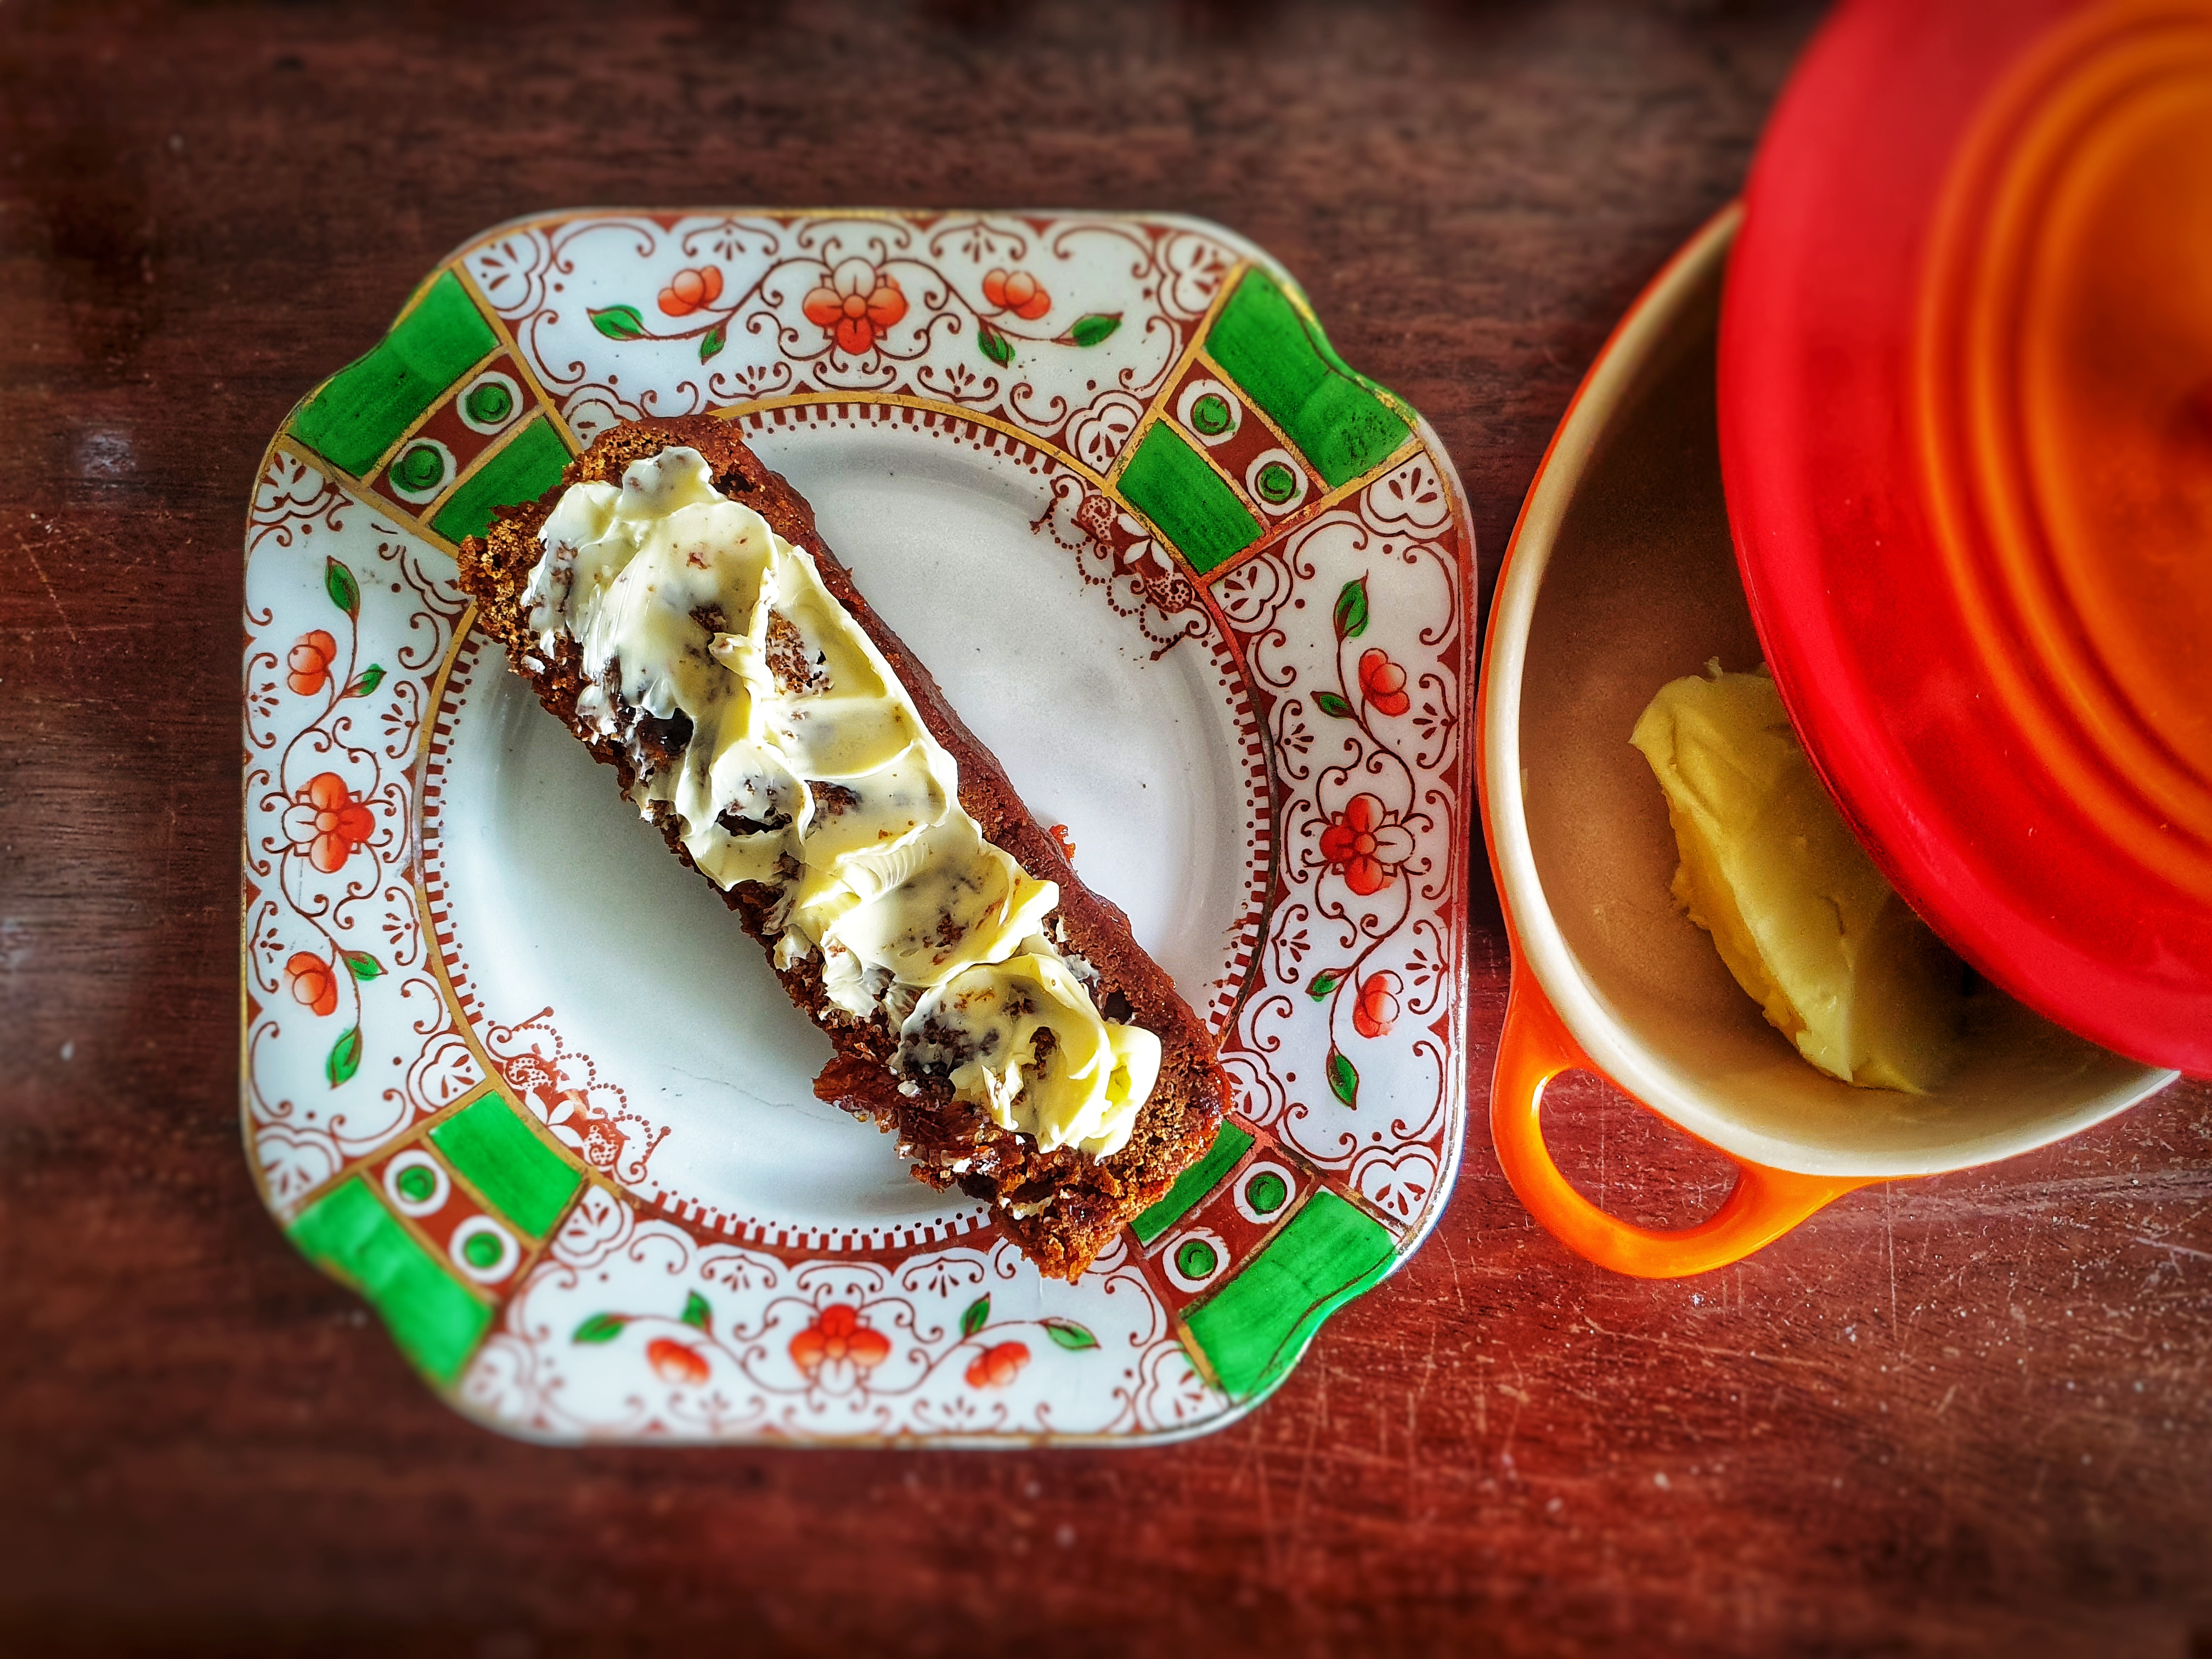
I have been meaning to give you this recipe for that most beloved of teatime treats, the humble malt loaf for ages; indeed, I have had a jar of malt syrup sitting in my food cupboard for at least three years I bought especially for this post. Well, hopefully, it’s a case of ‘the best things come to those who wait’.
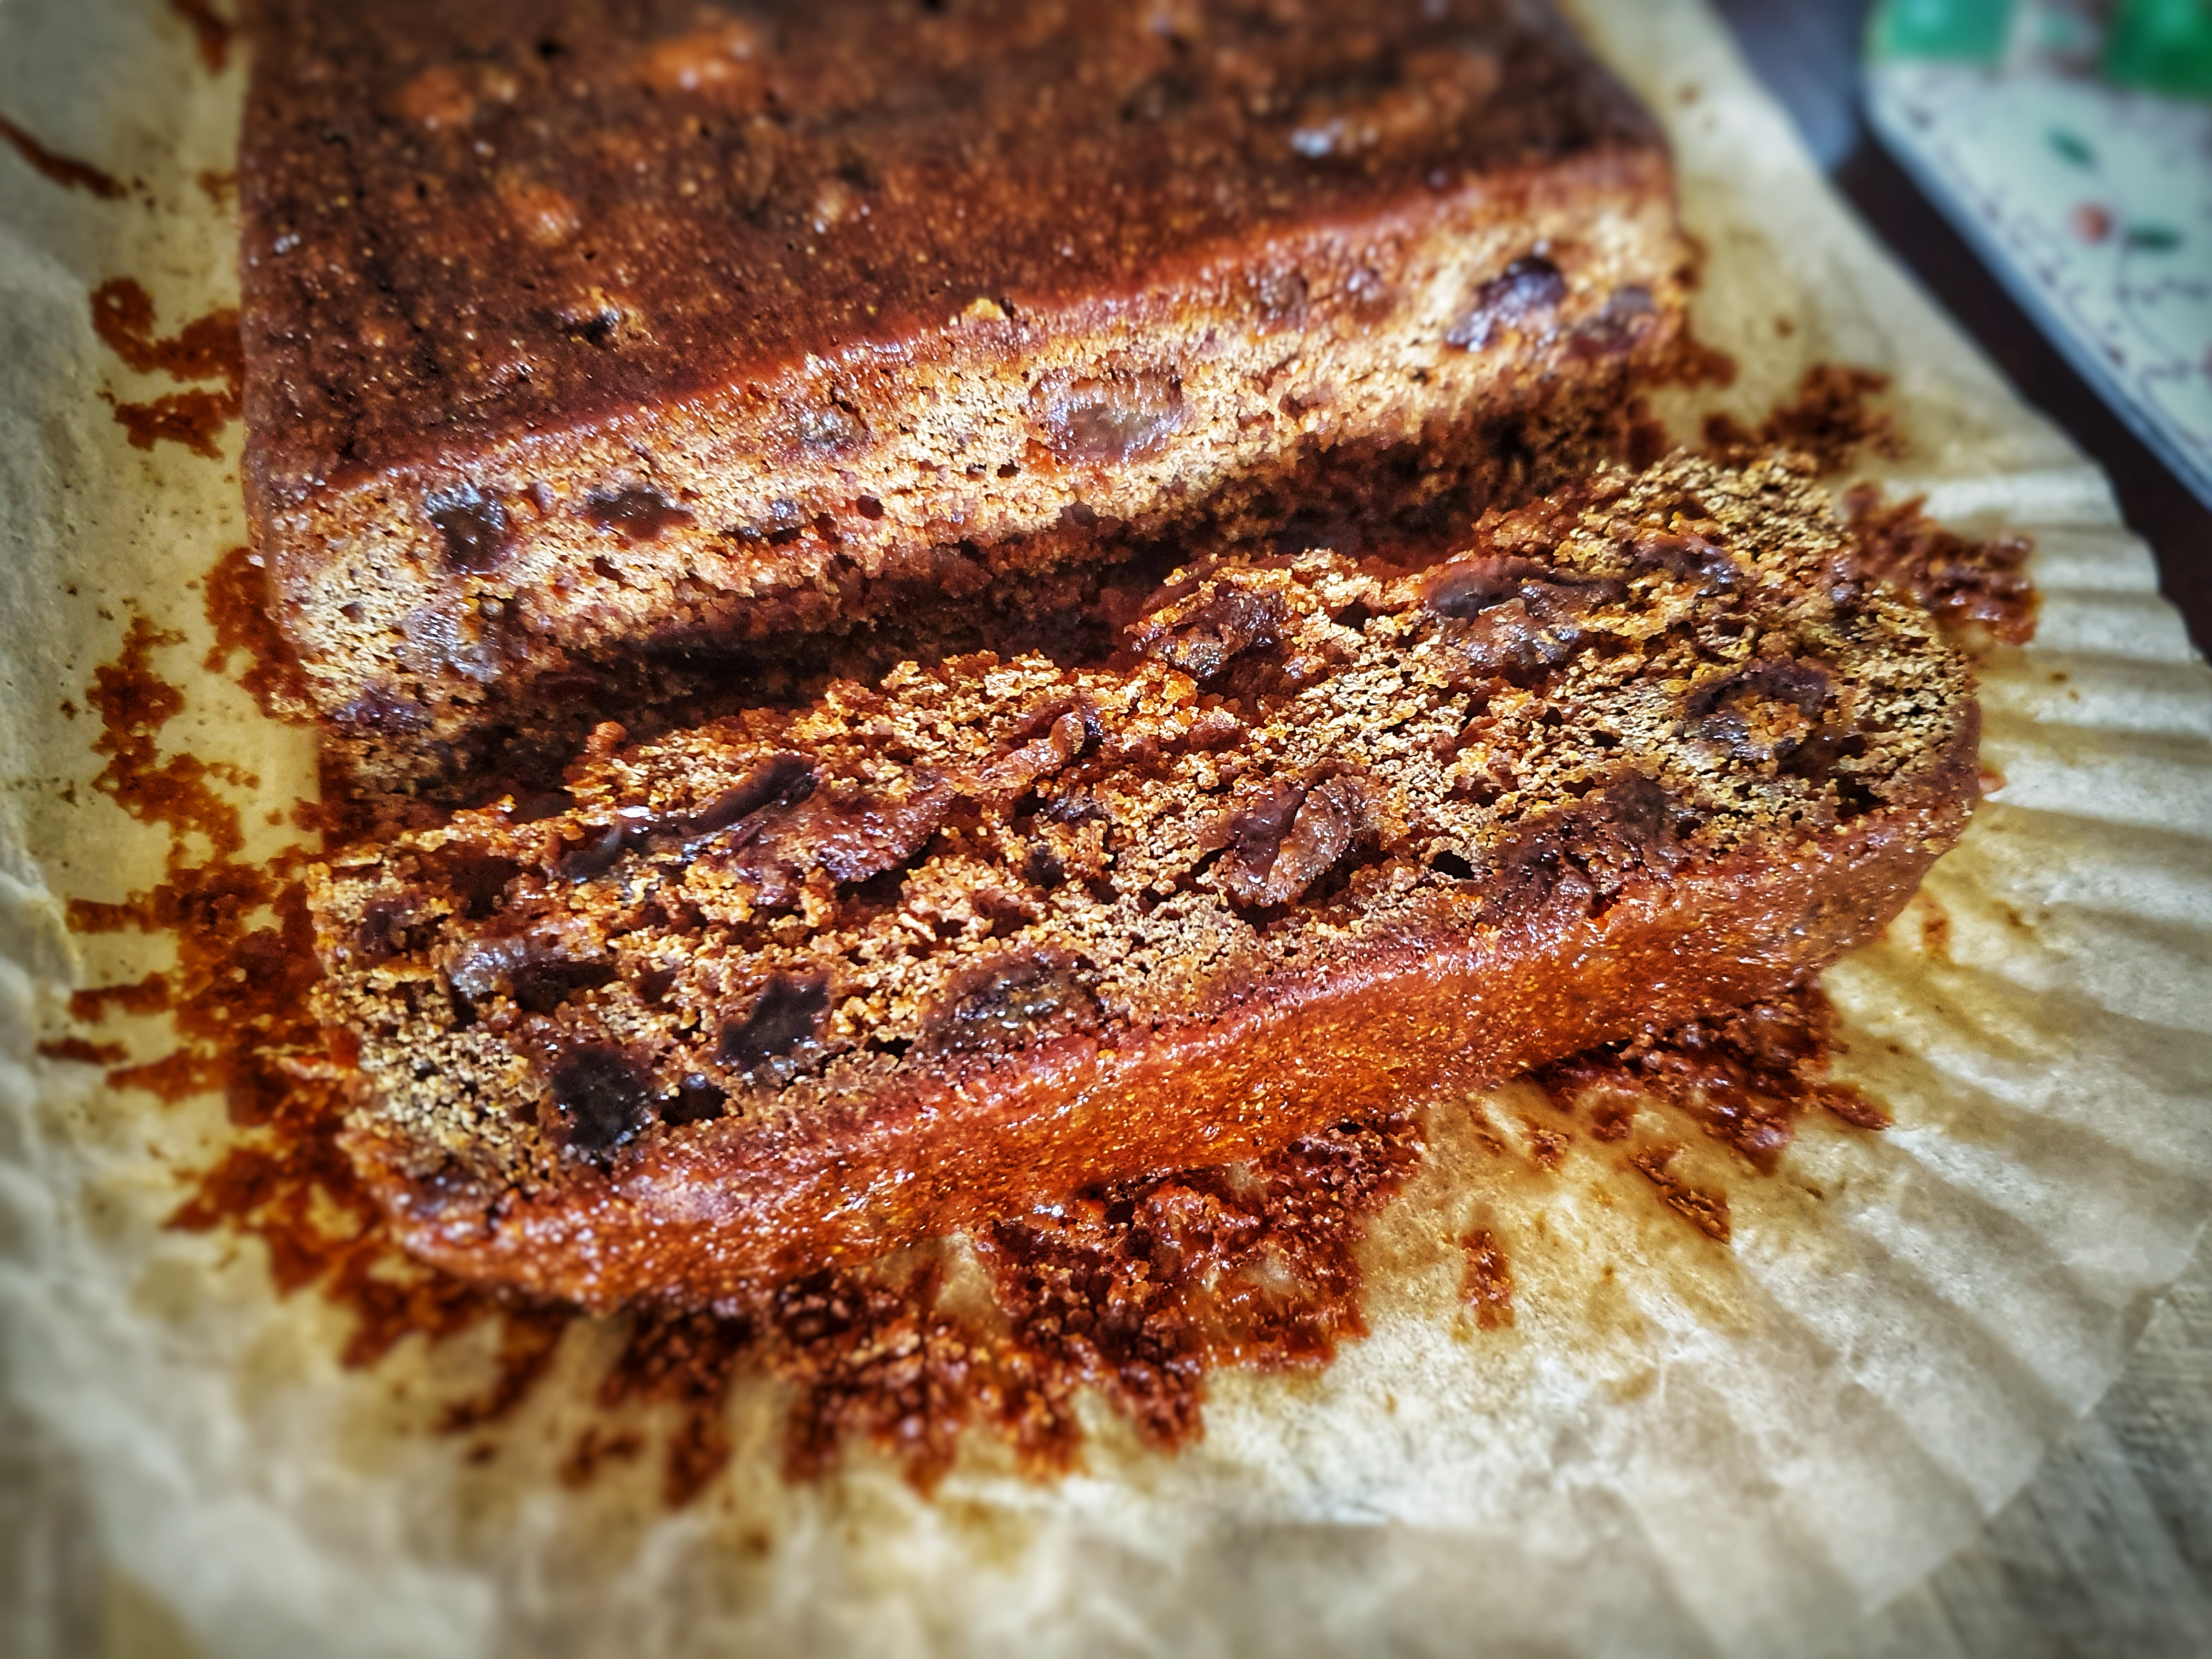
For those of you unaware of this stalwart of the British teatime spread, let me explain what it is. It is a member of a tribe of baked goods known as tea loaves. They are tea loaves because they’re eaten at teatime, but also because they contain tea. They are easy to make and also contain dried fruit, and usually do not contain any butter, and should instead be eaten spread liberally with it. They are loaf-shaped but are a type of cake. A malt loaf specifically is made with malt syrup and black treacle, and like Yorkshire parkin, it needs to be left awhile to turn nice and sticky. Before we get to the recipe, let’s have a look at the history.
Looking into the origins of the malt loaf has been rather difficult; I can find a recipe for malt loaf in the June 1930 edition of the Derbyshire Times and Cheshire Herald. It sounds like a malt loaf: dark and sticky, but black treacle is used not malt syrup.1 It seems to be called a ‘malt’ loaf because of the brown, malted flour used, which is not the same. Other malt loaves certainly contained malt syrup; beloved British brands Hovis and Allinson made them. However, these loaves were of the regular sort: loaves of white bread ‘improved’ by the addition of malt syrup.2,3 The malt syrup improved the colour and flavour and produced a moister loaf. Again, not the same.
John Sorenson’s original Beswick shop (pic: Manchester Libraries)
And so, we must turn to the iconic Soreen malt loaf, which has been baked in Manchester since the 1930s. The recipe, which has supposedly never changed, was invented by Danish immigrant John Rahbak Sorenson who lived in Hulme, Manchester. He first opened a business selling bakery equipment, before starting his own bakery in Beswick, where he sold his ‘Sorenson Malt Loaf’. He sold the business in 1938, but the loaf continued to be baked, the only thing that changed was its name.4 Today, the factory resides in Trafford Park (home to Manchester United FC), where it cranks out 300,000 loaves of Soreen per day.5
Their recipe is a secret, but we do know that they use wholemeal flour; in fact, it is because of the inclusion of wholemeal flour that Soreen is marketed as a health food.4 That it is sticky with sugary syrups undoes this claim somewhat, but the combination of easily digested sugars and slow-release complex carbohydrates apparently make Soreen a favourite food for athletes.
Well, their recipe is a secret, but mine is not and it’s a tried-and-tested one. I used to make these sticky loaves for my little traditional market stall back in the day, and the recipe is based on one which appears in Gary Rhodes’ excellent book New British Classics.6 It is easy to make, but I must advise you about the flour: it must be sifted. It’s one of my most hated kitchen tasks, and I avoid it whenever possible, but in this case it is necessary. Wholemeal flour does tend to clump in the bag and seeing that the wet and dry ingredients need only the briefest of mixing, you need to be sure your flour is lump-free. That said, don’t forget to tip the bran left behind in the sieve back into the sifted flour.
Subscribe to get access
This recipes is for my £3 monthly subscribers. Read more of this content when you subscribe today and support the blogs and podcast. Subscribers get access to special blog posts, Easter eggs from my podcast, and a monthly newsletter. You can become a subscriber by following this link.
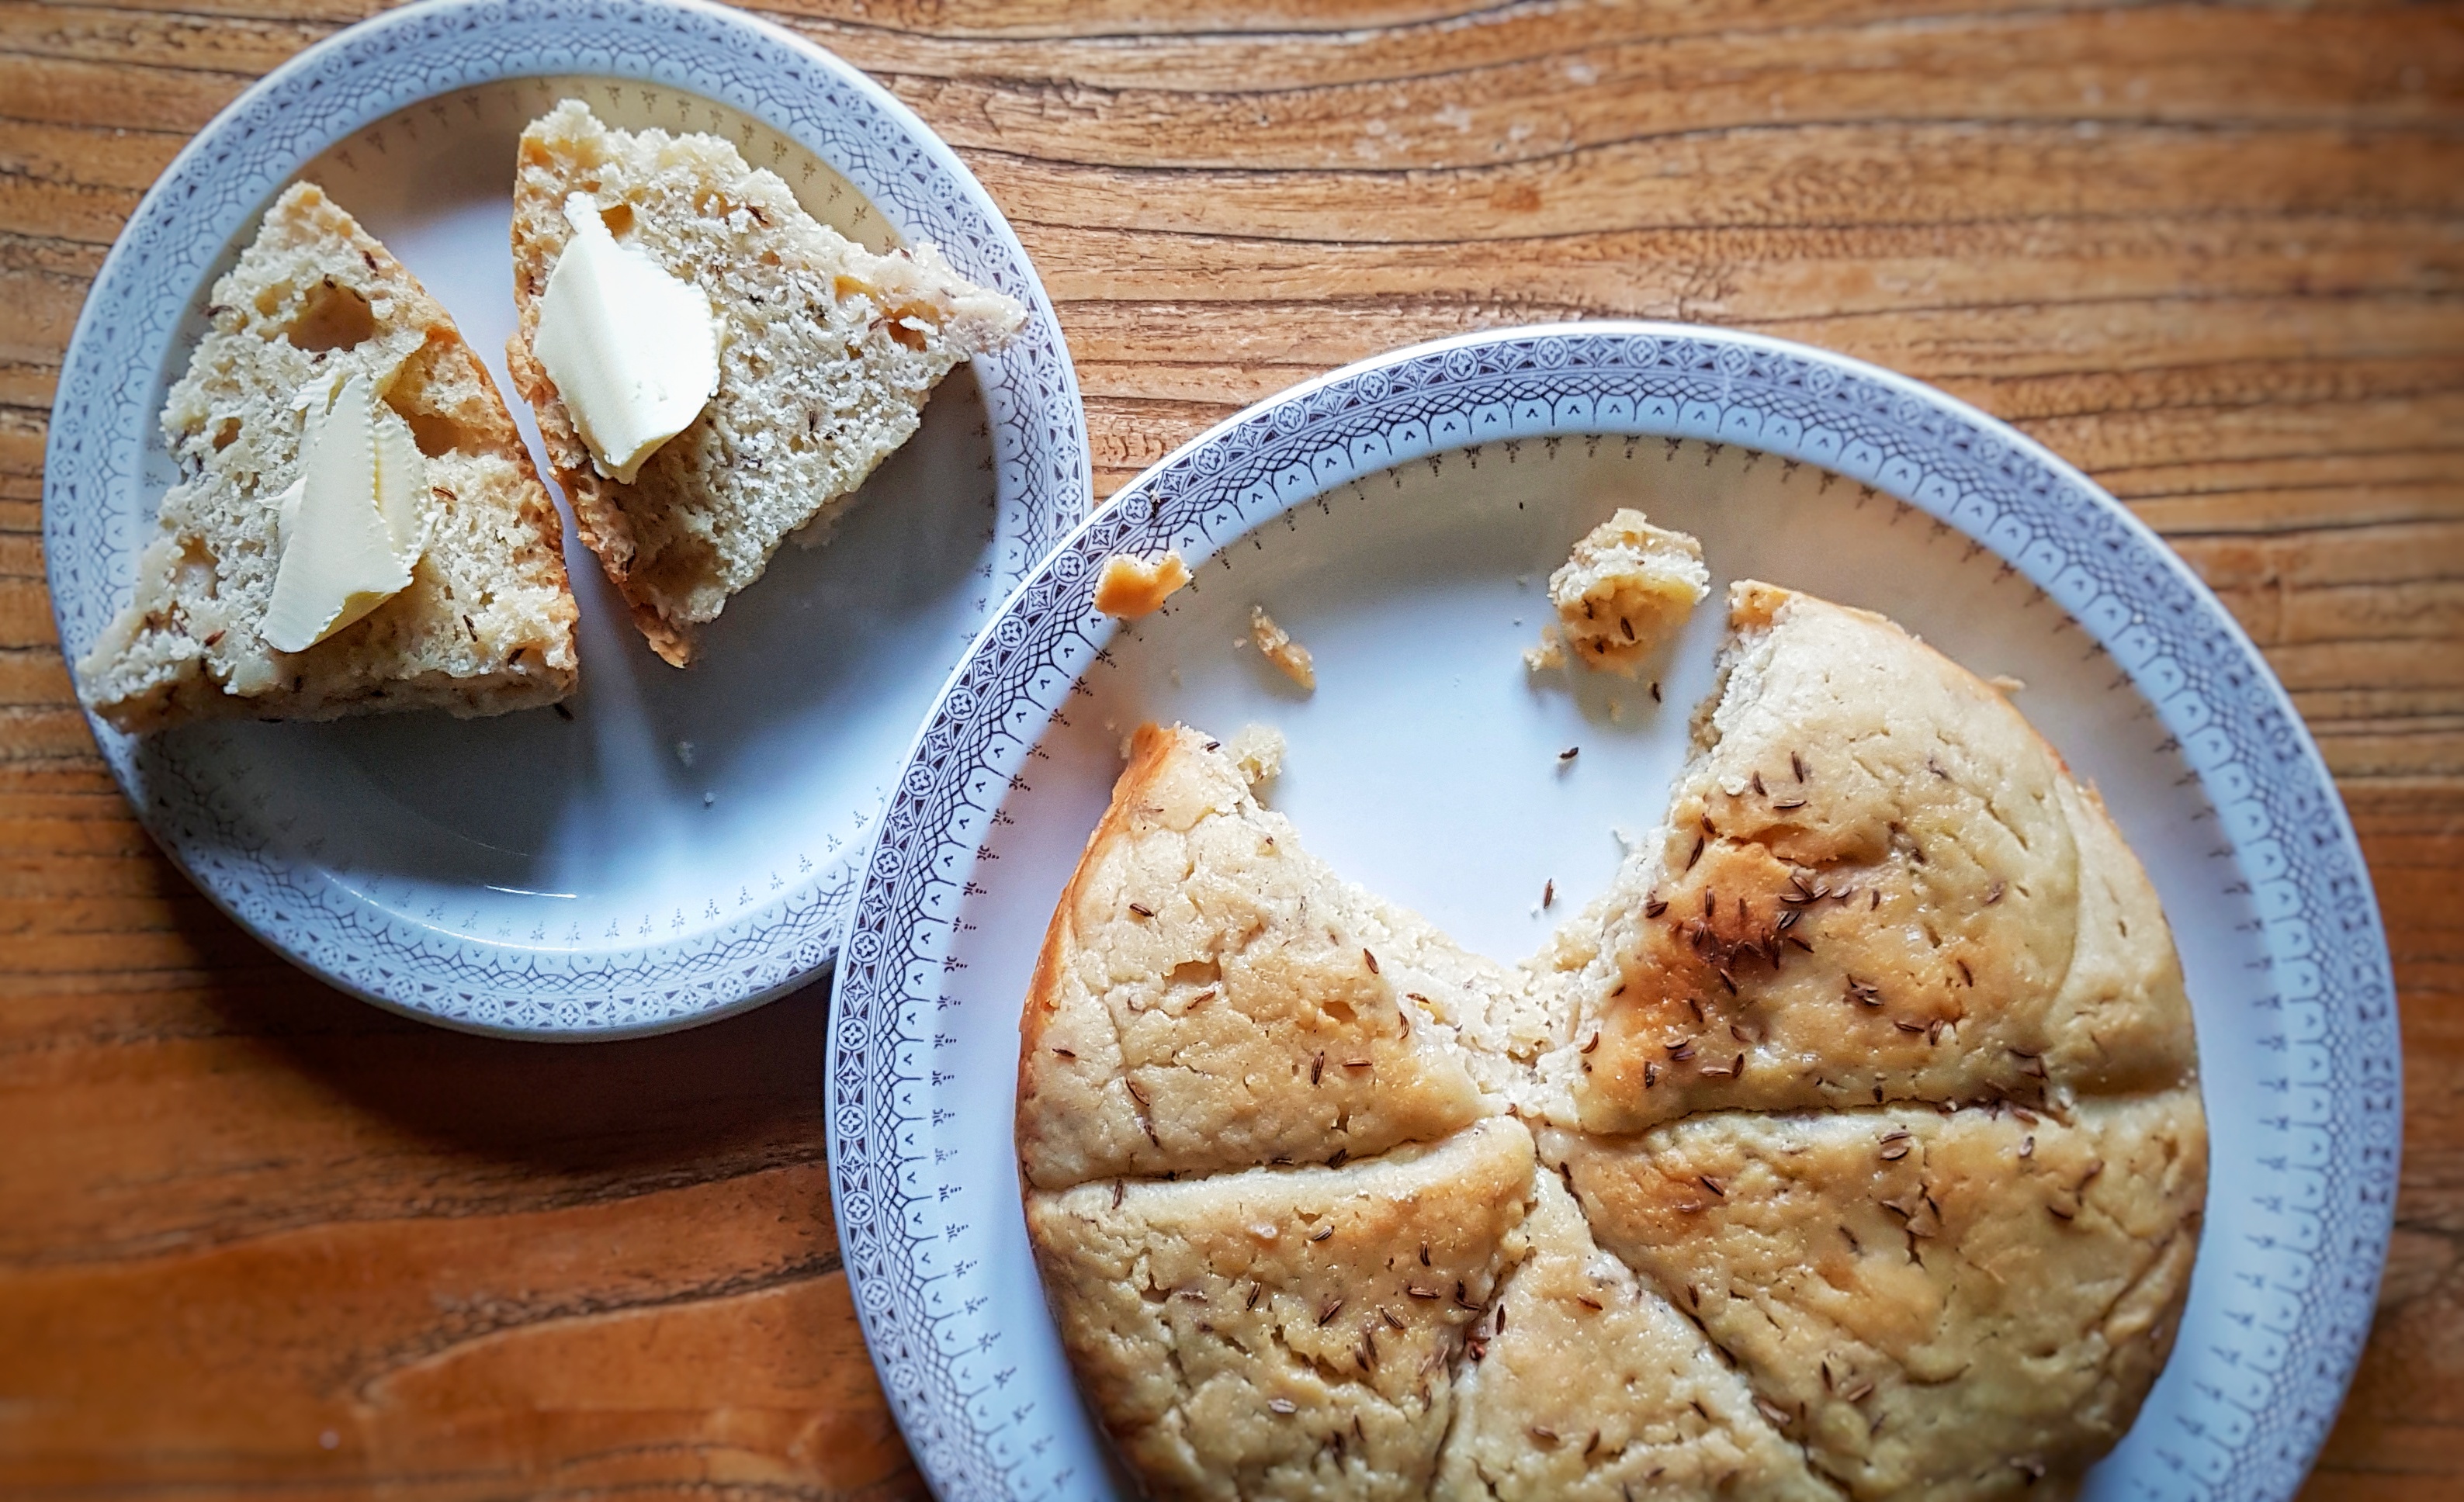
Wigs – whichever way you spell them – were a type of enriched, leavened teacake. They reached a peak in popularity in the eighteenth century but may have been cooked up as early as the fifteenth.[1] It seems that they were eaten up until 1900,[2] though as with many foods, they changed their form somewhat.
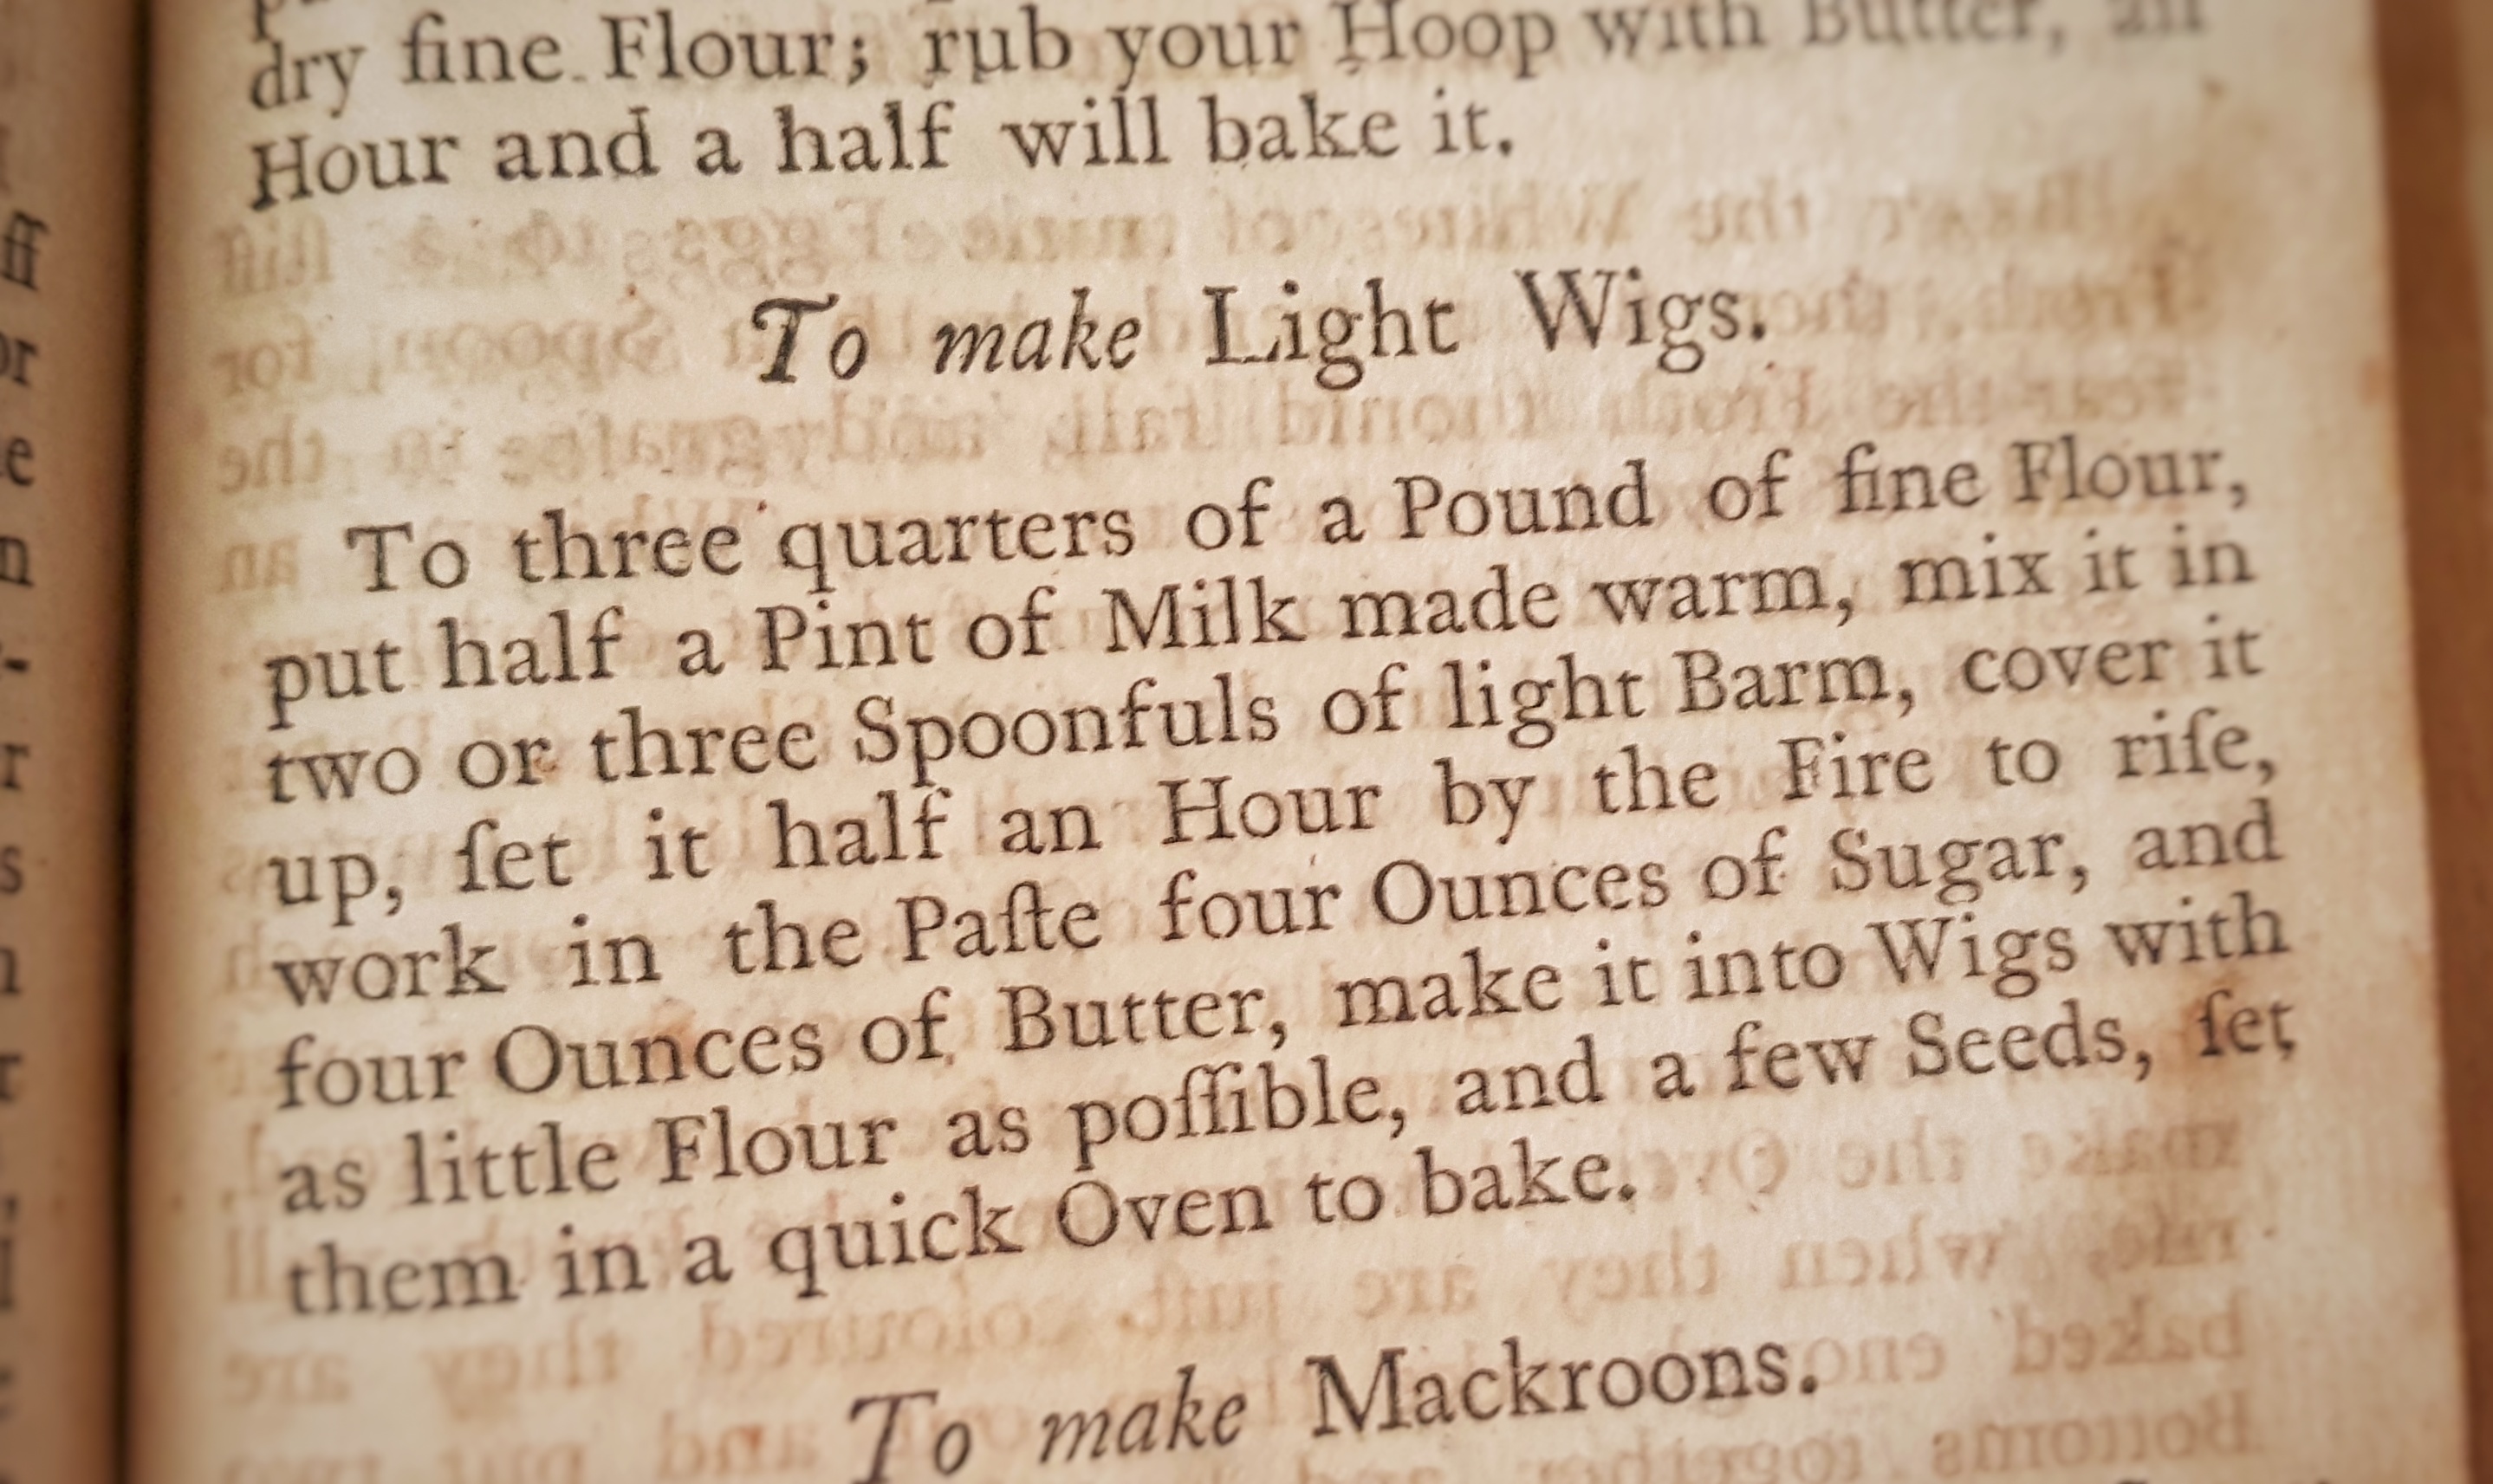
Elizabeth Raffald included a recipe ‘To make Light Wigs’ in her 1769 book The Experienced English Housekeeper,[3] so I thought I would devise an updated recipe for them using modern kitchen equipment, weights and measures.
This is her recipe taken from the first edition:
As is often the case, her recipes are a mixed bag of precision and vagueness, and this one is no different: we have proportions – the most important thing, I suppose – but little else concerning mixing, shaping and baking. And what are the seeds she mentions? Luckily, by cross-referencing other recipes and others’ research, we can build up a good idea of what they were like.
Let’s dissect the recipe sentence by sentence:
First of all, we have to make a simple dough of flour, milk and barm and prove it somewhere warm. Barm is the frothy yeast skimmed from fermenting vats of beer; it is from here we get our leaven. The bubbles of gas in low-gluten flour doughs with little elasticity (as would have been the case here) tend to pop quickly, so we have to assume that the dough was kneaded to develop what gluten was present.
Once proved, add the butter and sugar. It’s very common, even in modern recipes, to add the enriching ingredients after the first prove. Ingredients such as these get in the way of entangling gluten strands, and their heaviness slow proving even further. These days however with our robust fast-action yeasts, I find dough rises well with all of the ingredients mixed right from the start – though I hedge my bets a little by using a mix of plain and strong white flours.
Elizabeth tells us to ‘make it into Wigs’ which isn’t useful for those of us in the twenty-first century. It does inform us that they were common enough in 1769 for Elizabeth to assume we would all know the correct shape. Another recipe given in Florence white’s Good Things in England says to make wigs ‘into any shape you please’.[4] Elizabeth David helps us out here by spotting that the word wig comes from the Dutch weig, meaning wedge-shaped.[5] She thinks the round of dough would be split into sixteenths, but I think sixths or eighths would be better.
As for the seeds; all other recipes state caraway seeds for wigs. I like them so much I put them in and on the dough before baking.
There are richer versions of this basic recipe. Hannah Glasse’s ‘light Wigs’ are very similar to Elizabeth’s, but she also includes a richer version (‘very good Wigs’) containing egg, cream, spices and sack.[6] Some recipes ask you to egg wash the wigs and sprinkle coarsely crushed lumps of sugar over them.[7] I opt for a milk wash and granulated sugar.
If you like the blogs and podcast I produce and would to start a £3 monthly subscription, or would like to treat me to virtual coffee or pint: follow this link for more information.Thank you.
Wigs can be eaten buttered, and when cold eat like very sweet scones, when warm they are softer and stodgier, though not in a bad way. Elizabeth suggests toasting them and pouring stewed cheese over them – a recipe for which can be found in my book Before Mrs Beeton.
My recipe makes 1 round that can be divided into 6 or 8 wigs:
5g/1 tsp yeast
5g/1 level tsp salt
180g strong white flour
180g plain white flour
120g caster sugar
1 tbs caraway seeds
120g softened salted butter
200ml warm milk, plus extra for brushing
A smear of sunflower oil
Granulated sugar for sprinkling
In a bowl, mix the yeast, salt, flours, caster sugar, and most of the caraway seeds (keep a few behind to sprinkle on the top). Make a well in the centre and add the butter and milk. Mix preferably with the dough hook of a food mixer, if not a wooden spoon – the mixture is very sticky indeed, a good 7 or 8 minutes, or until the dough is smooth.
Oil a clean bowl and place the dough inside. Cover and allow to prove in a warm place for between 60 and 90 minutes. The dough is so enriched that it doesn’t double in volume like regular bread or bun dough, but it does need to have increased in volume noticeably.
As you wait, line a 21 cm/8 inch cake tin with greaseproof paper. Elizabeth asks us to shape the wigs ‘with as little Flour as possible’, but I find that a good strewing of flour is best. The dough needs to be brought into a tight dough ball; again not as tight as is usually possible, due to all of that sugar and butter. I find a couple of dough scrapers helped a great deal at this point.
Once gathered, plop the dough into the lined tin, cover and allow to prove for 30 to 45 minutes. Using a well-floured dough scraper split the dough into 6 or 8 wedges.
It was tricky to make the cuts: flour your dough scraper very well
When the proving time is almost up, preheat your oven to 175°C and place an ovenproof dish at the bottom of the oven. When the wigs are ready to go in, put the kettle on. When boiled, finish preparing the wigs by brushing the top with milk and scattering the reserved caraway seeds and a little granulated sugar over the top, then place on a baking tray.
Open the oven door, slide the wigs onto the centre shelf, then gingerly pull out the hot ovenproof dish and pour in a good amount of hot water, then quickly but carefully slide it back in and close the oven door.
Bake for around 45 minutes until well-risen and golden brown on top. Cool on a wire rack in its tin. Serve cold or warm with butter and sliced or toasted cheese.
Notes
[1] David, E. English Bread and Yeast Cookery. (Grub Street, 1977).
[2] By this point, wigs had become a fruit cake or scone, leavened with baking powder and sweetened with candied angelica, citron peel and glacé cherries. Hartley, D. (1954) Food in England. Little, Brown & Company.
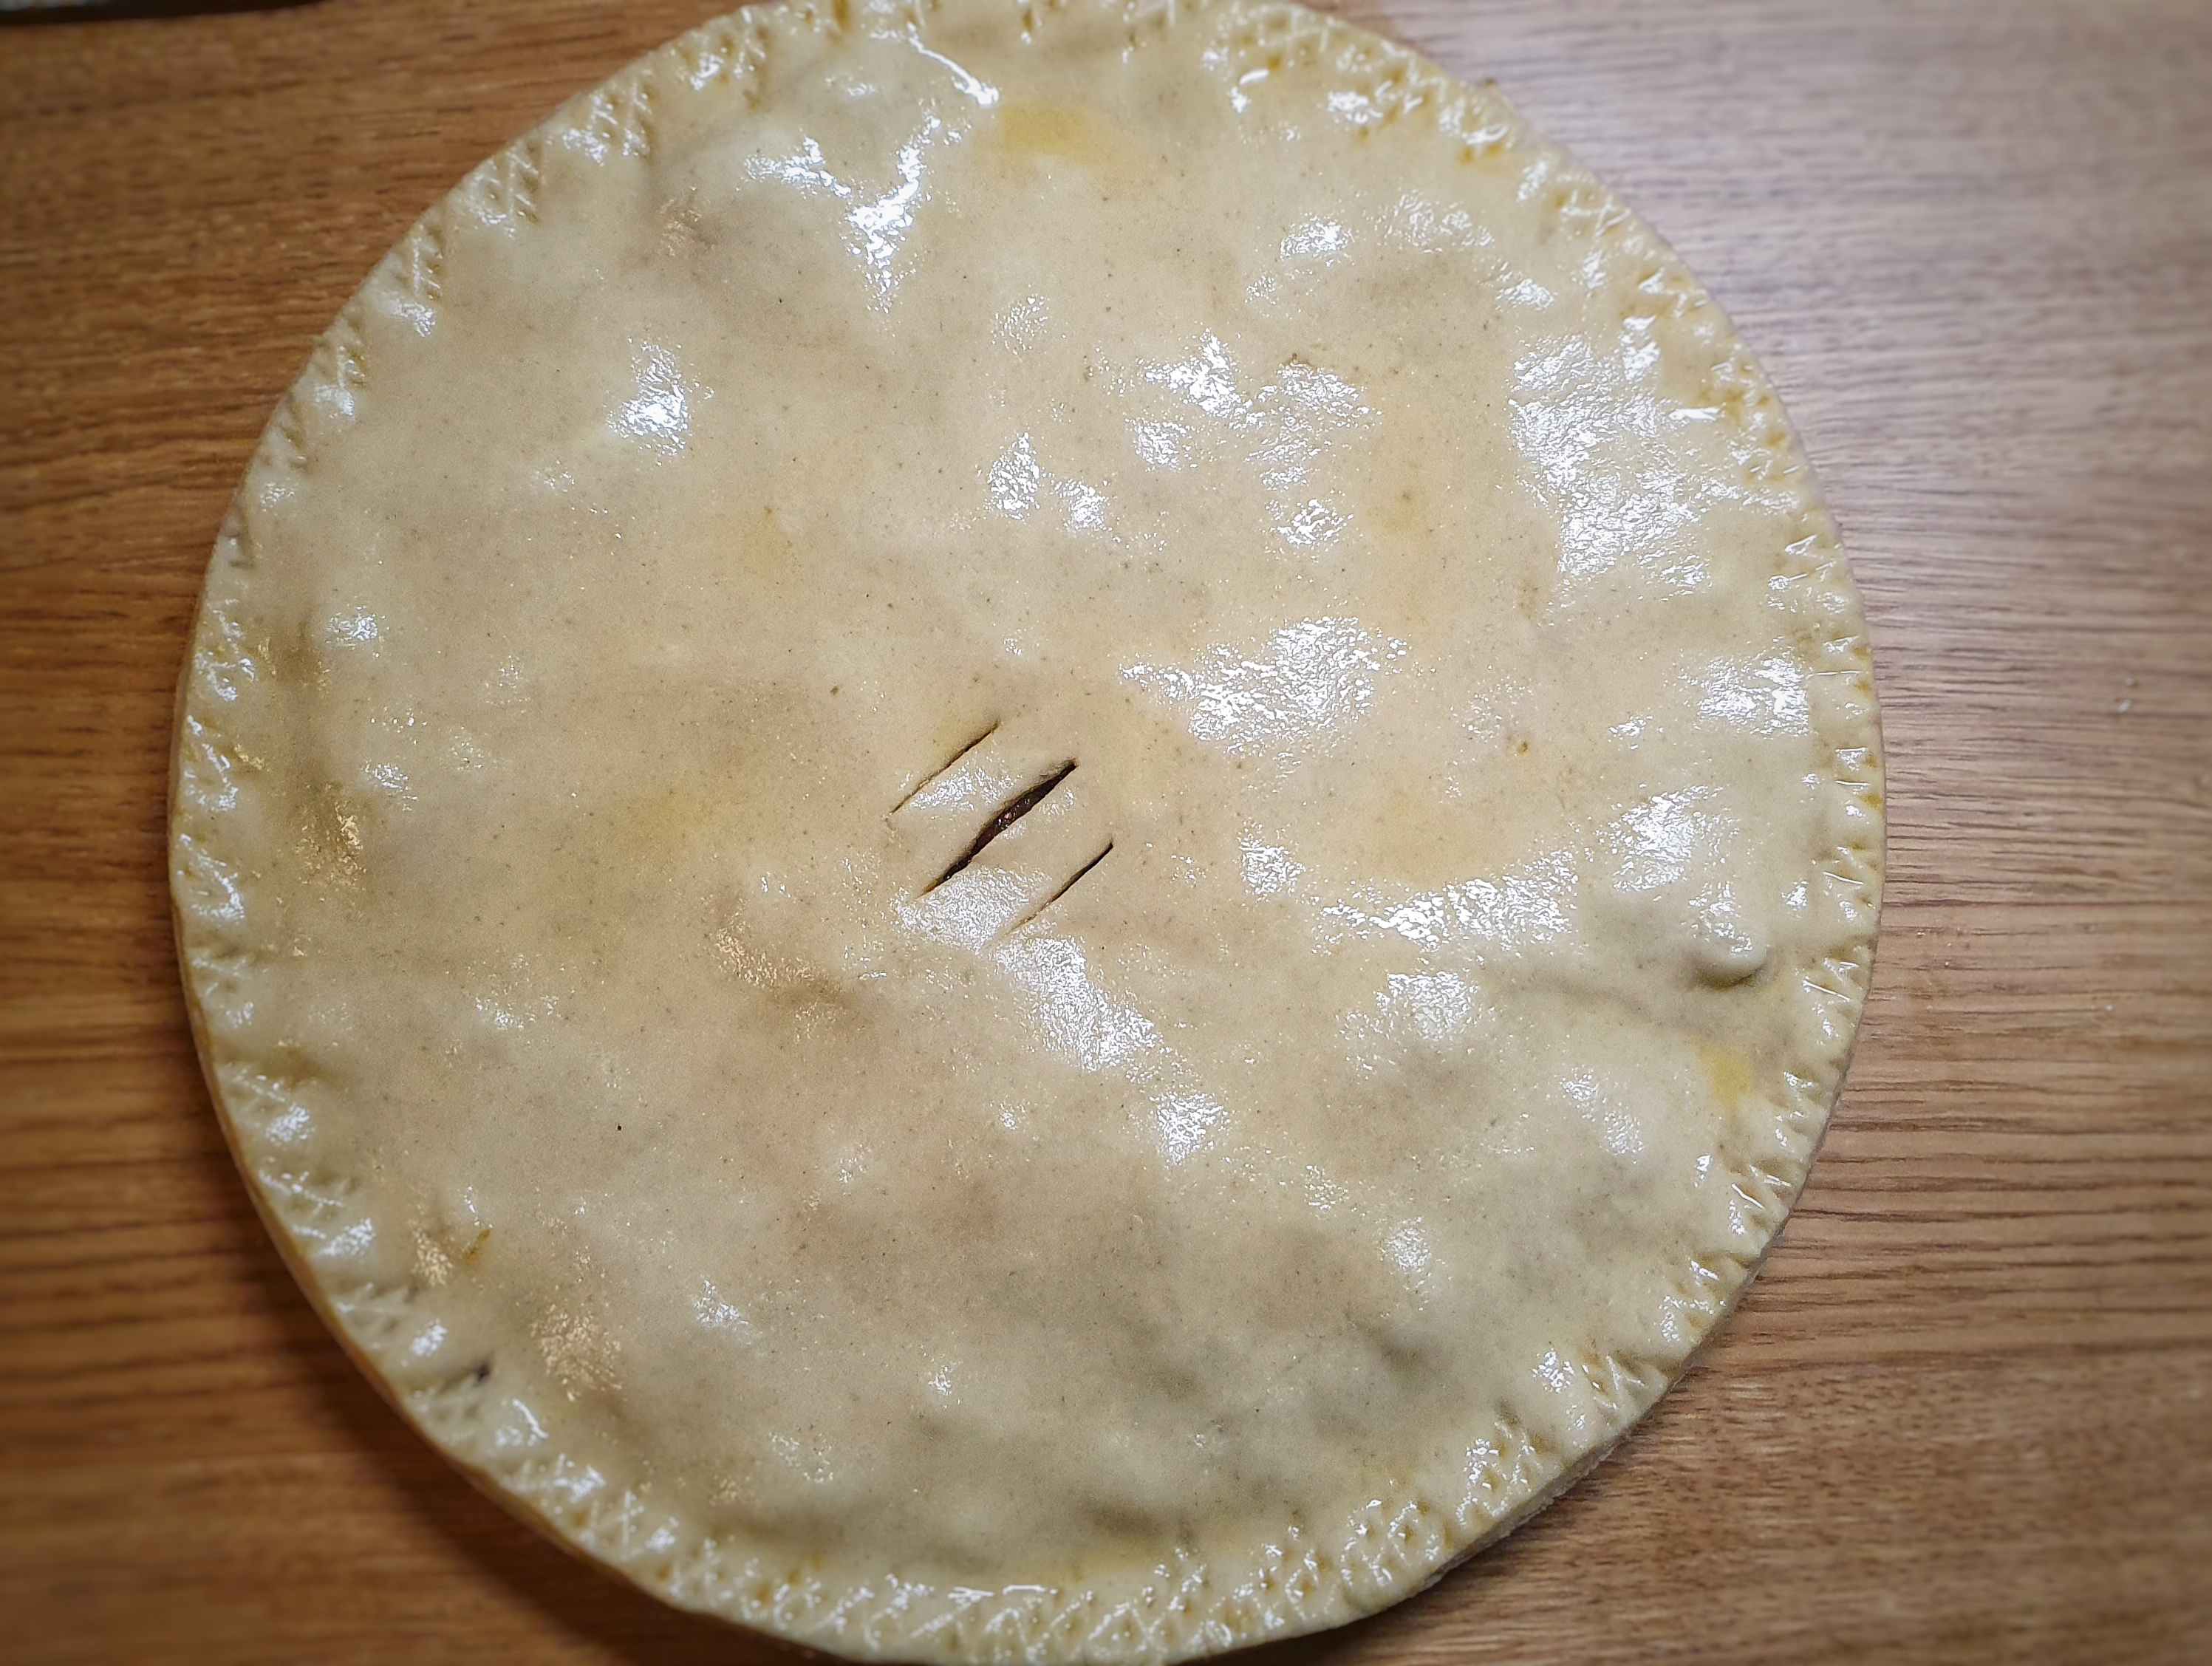
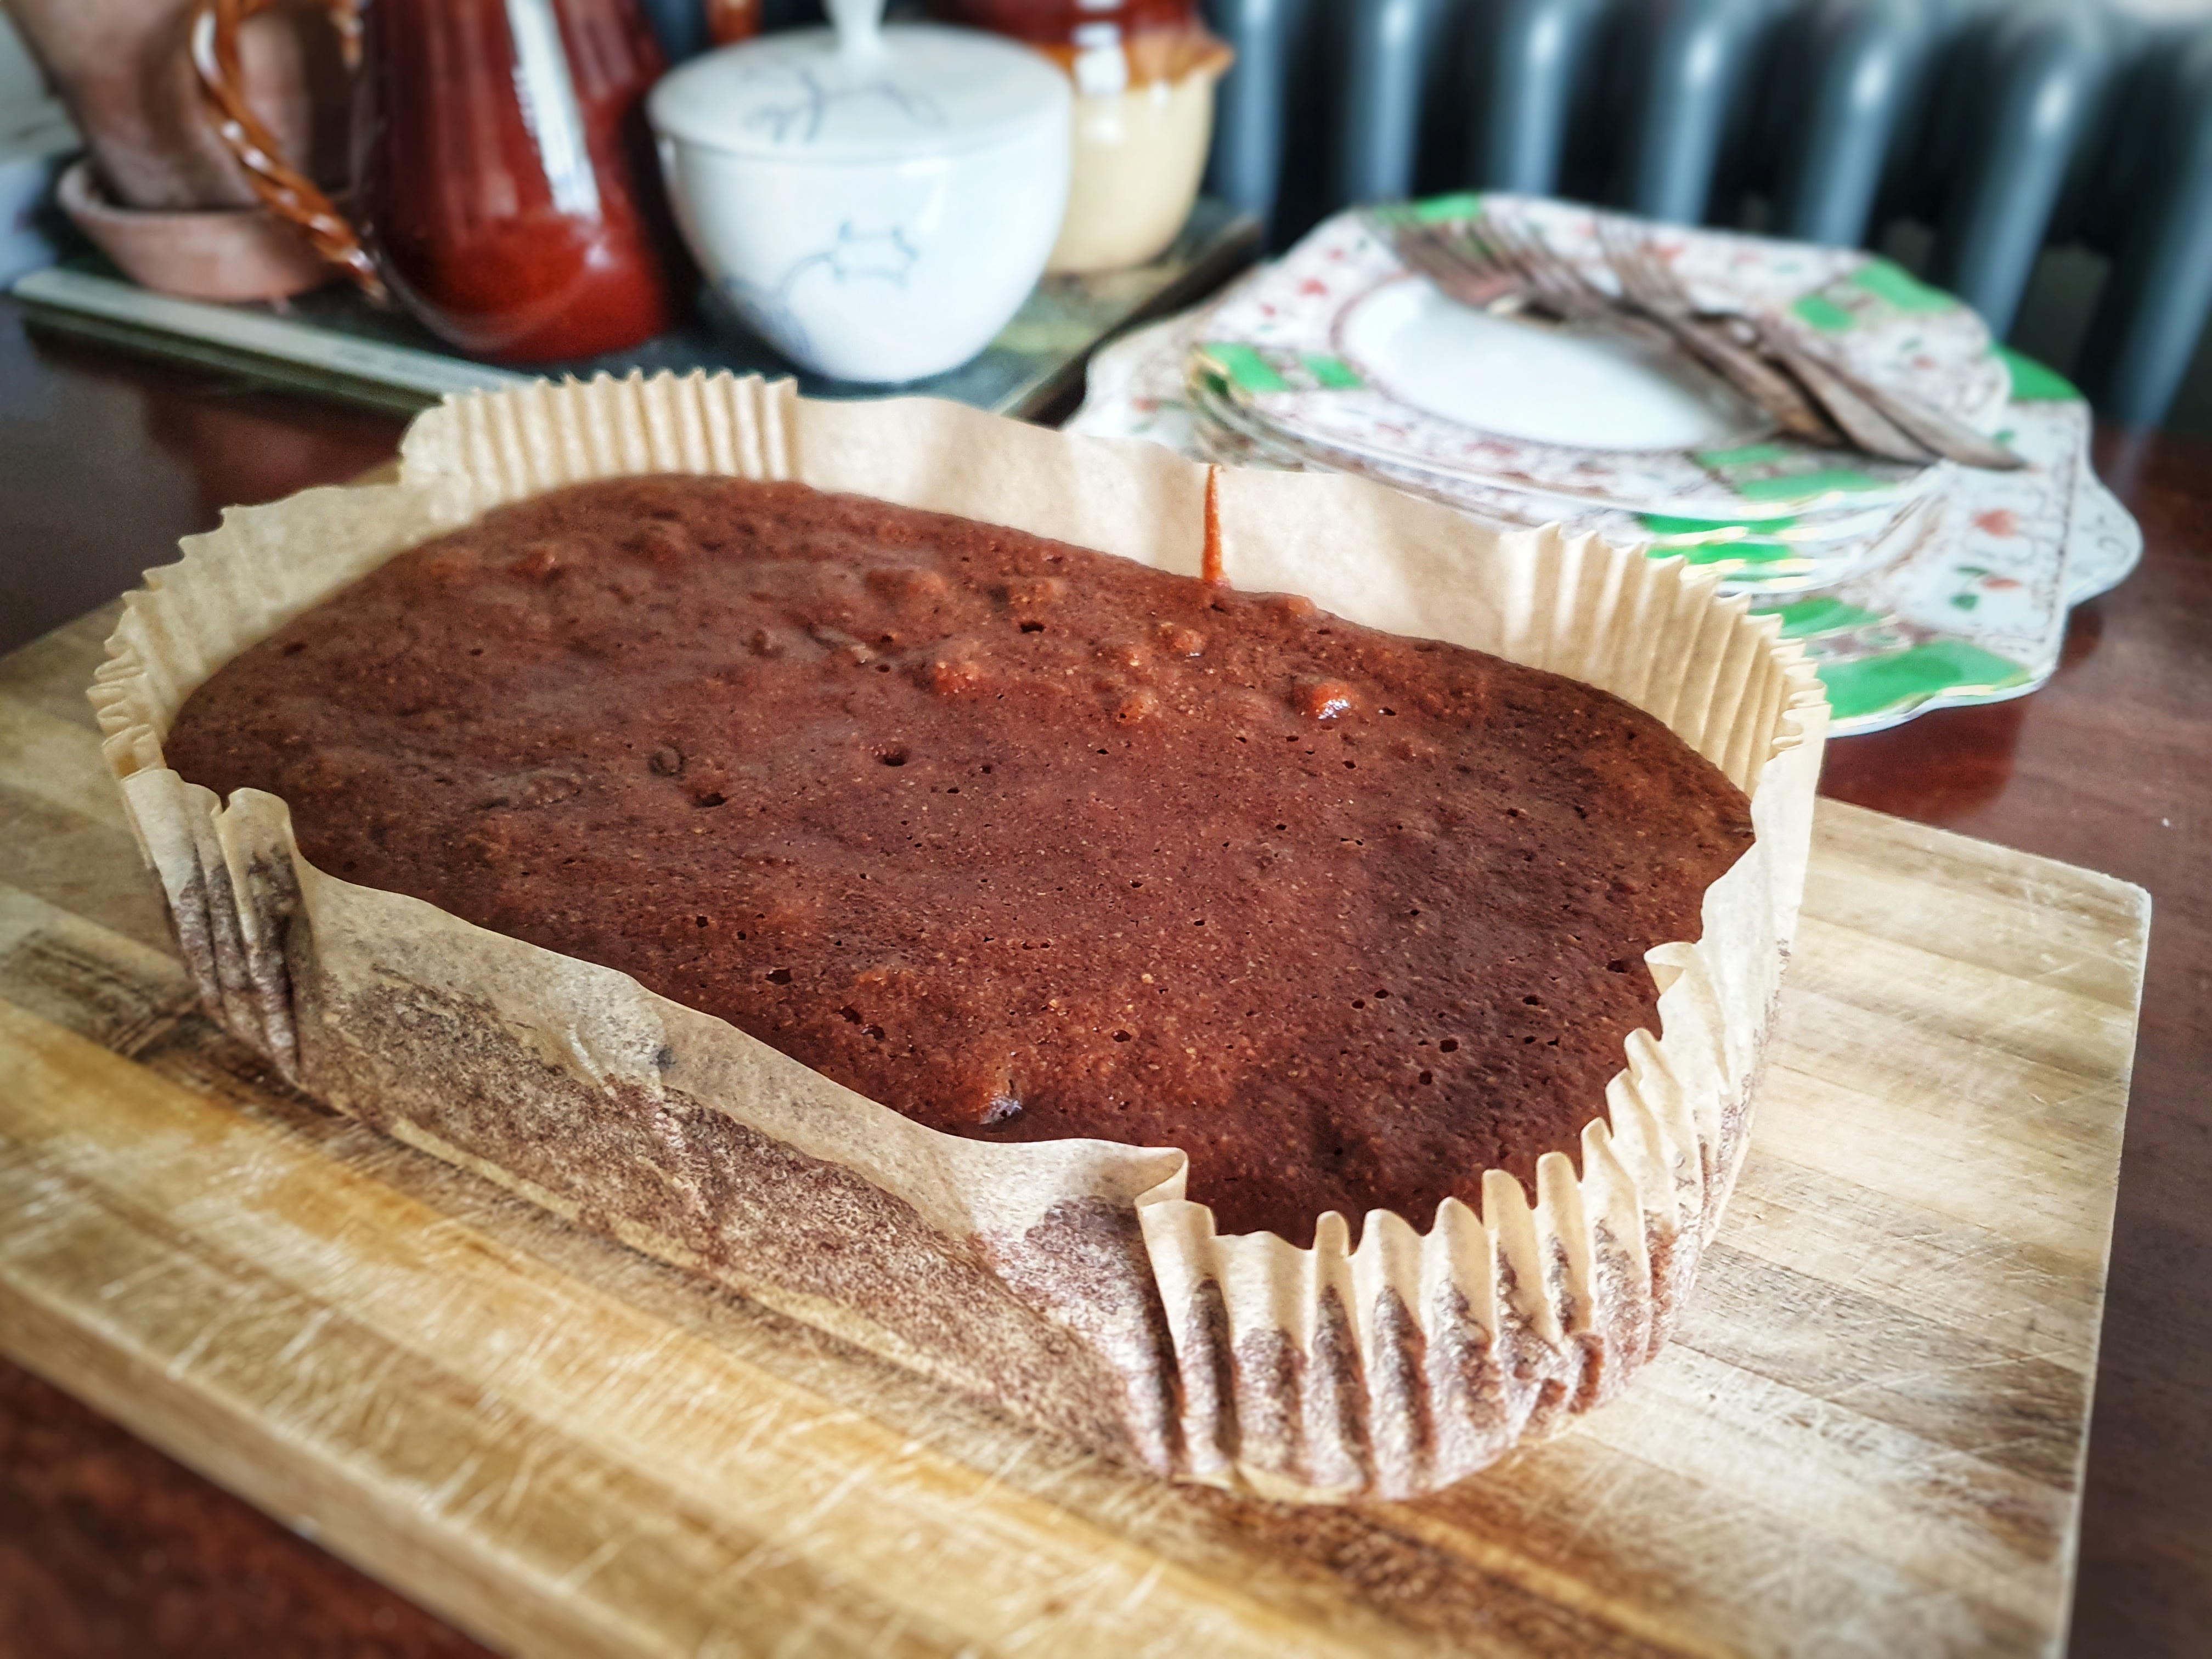
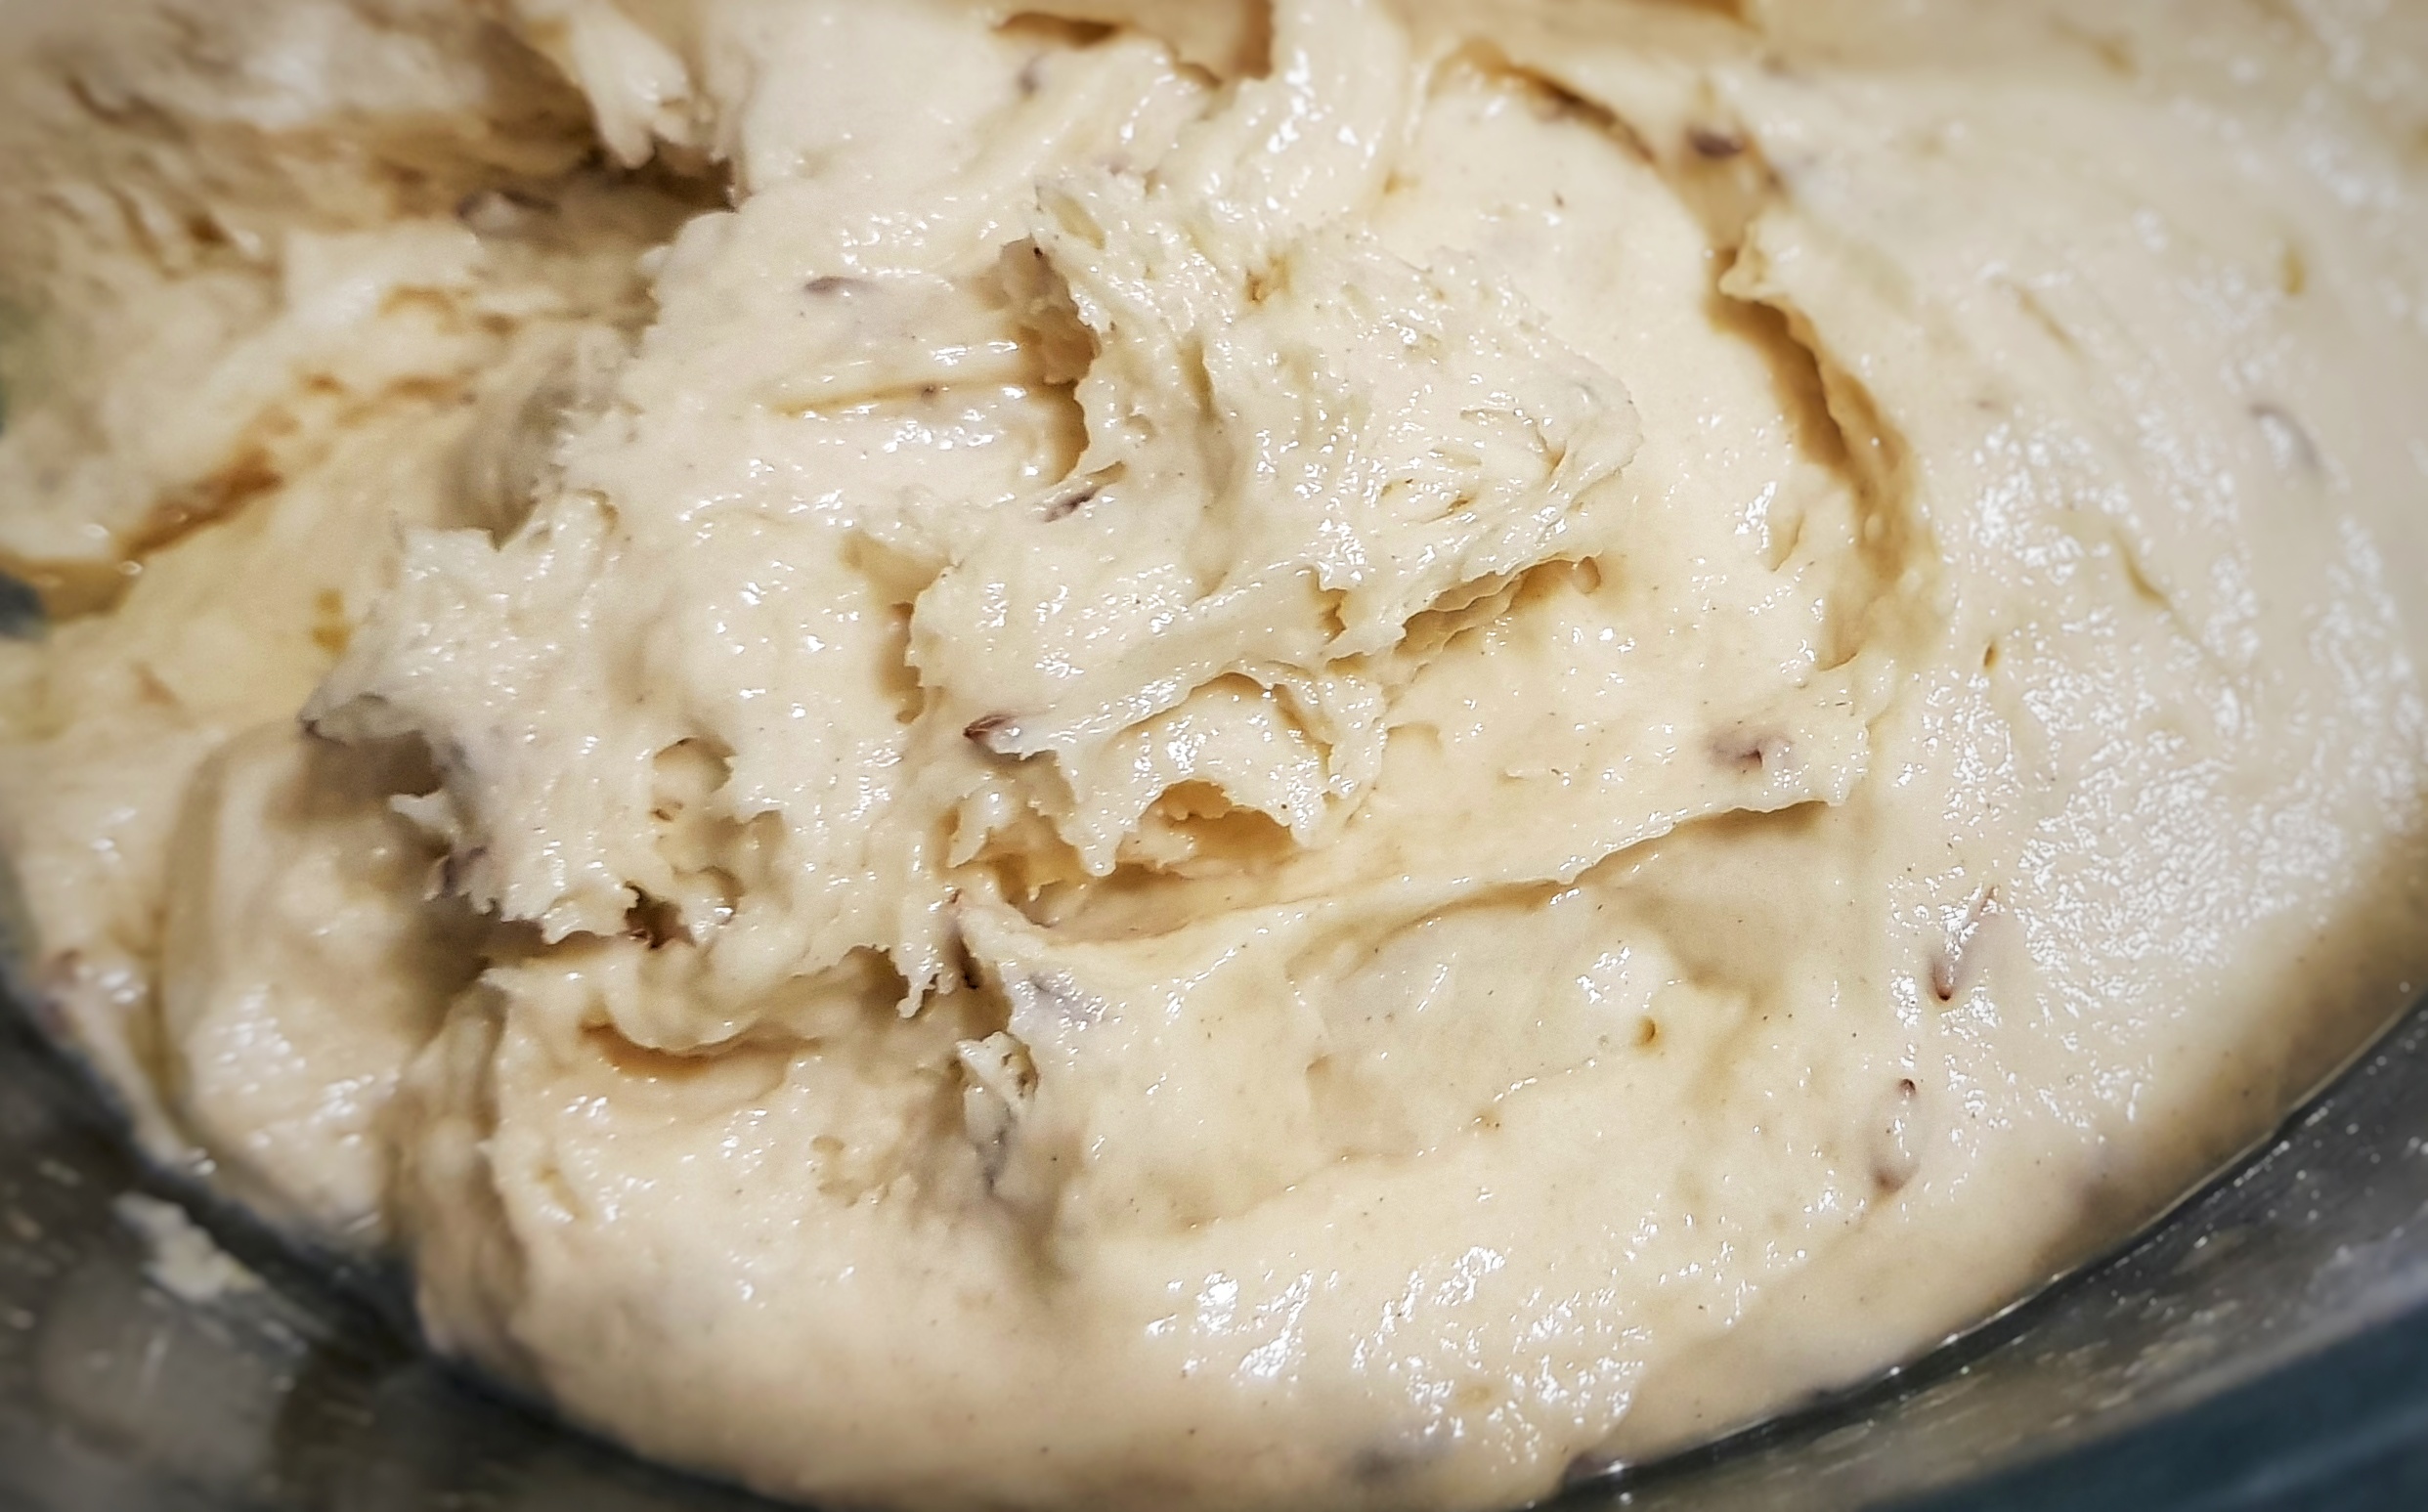
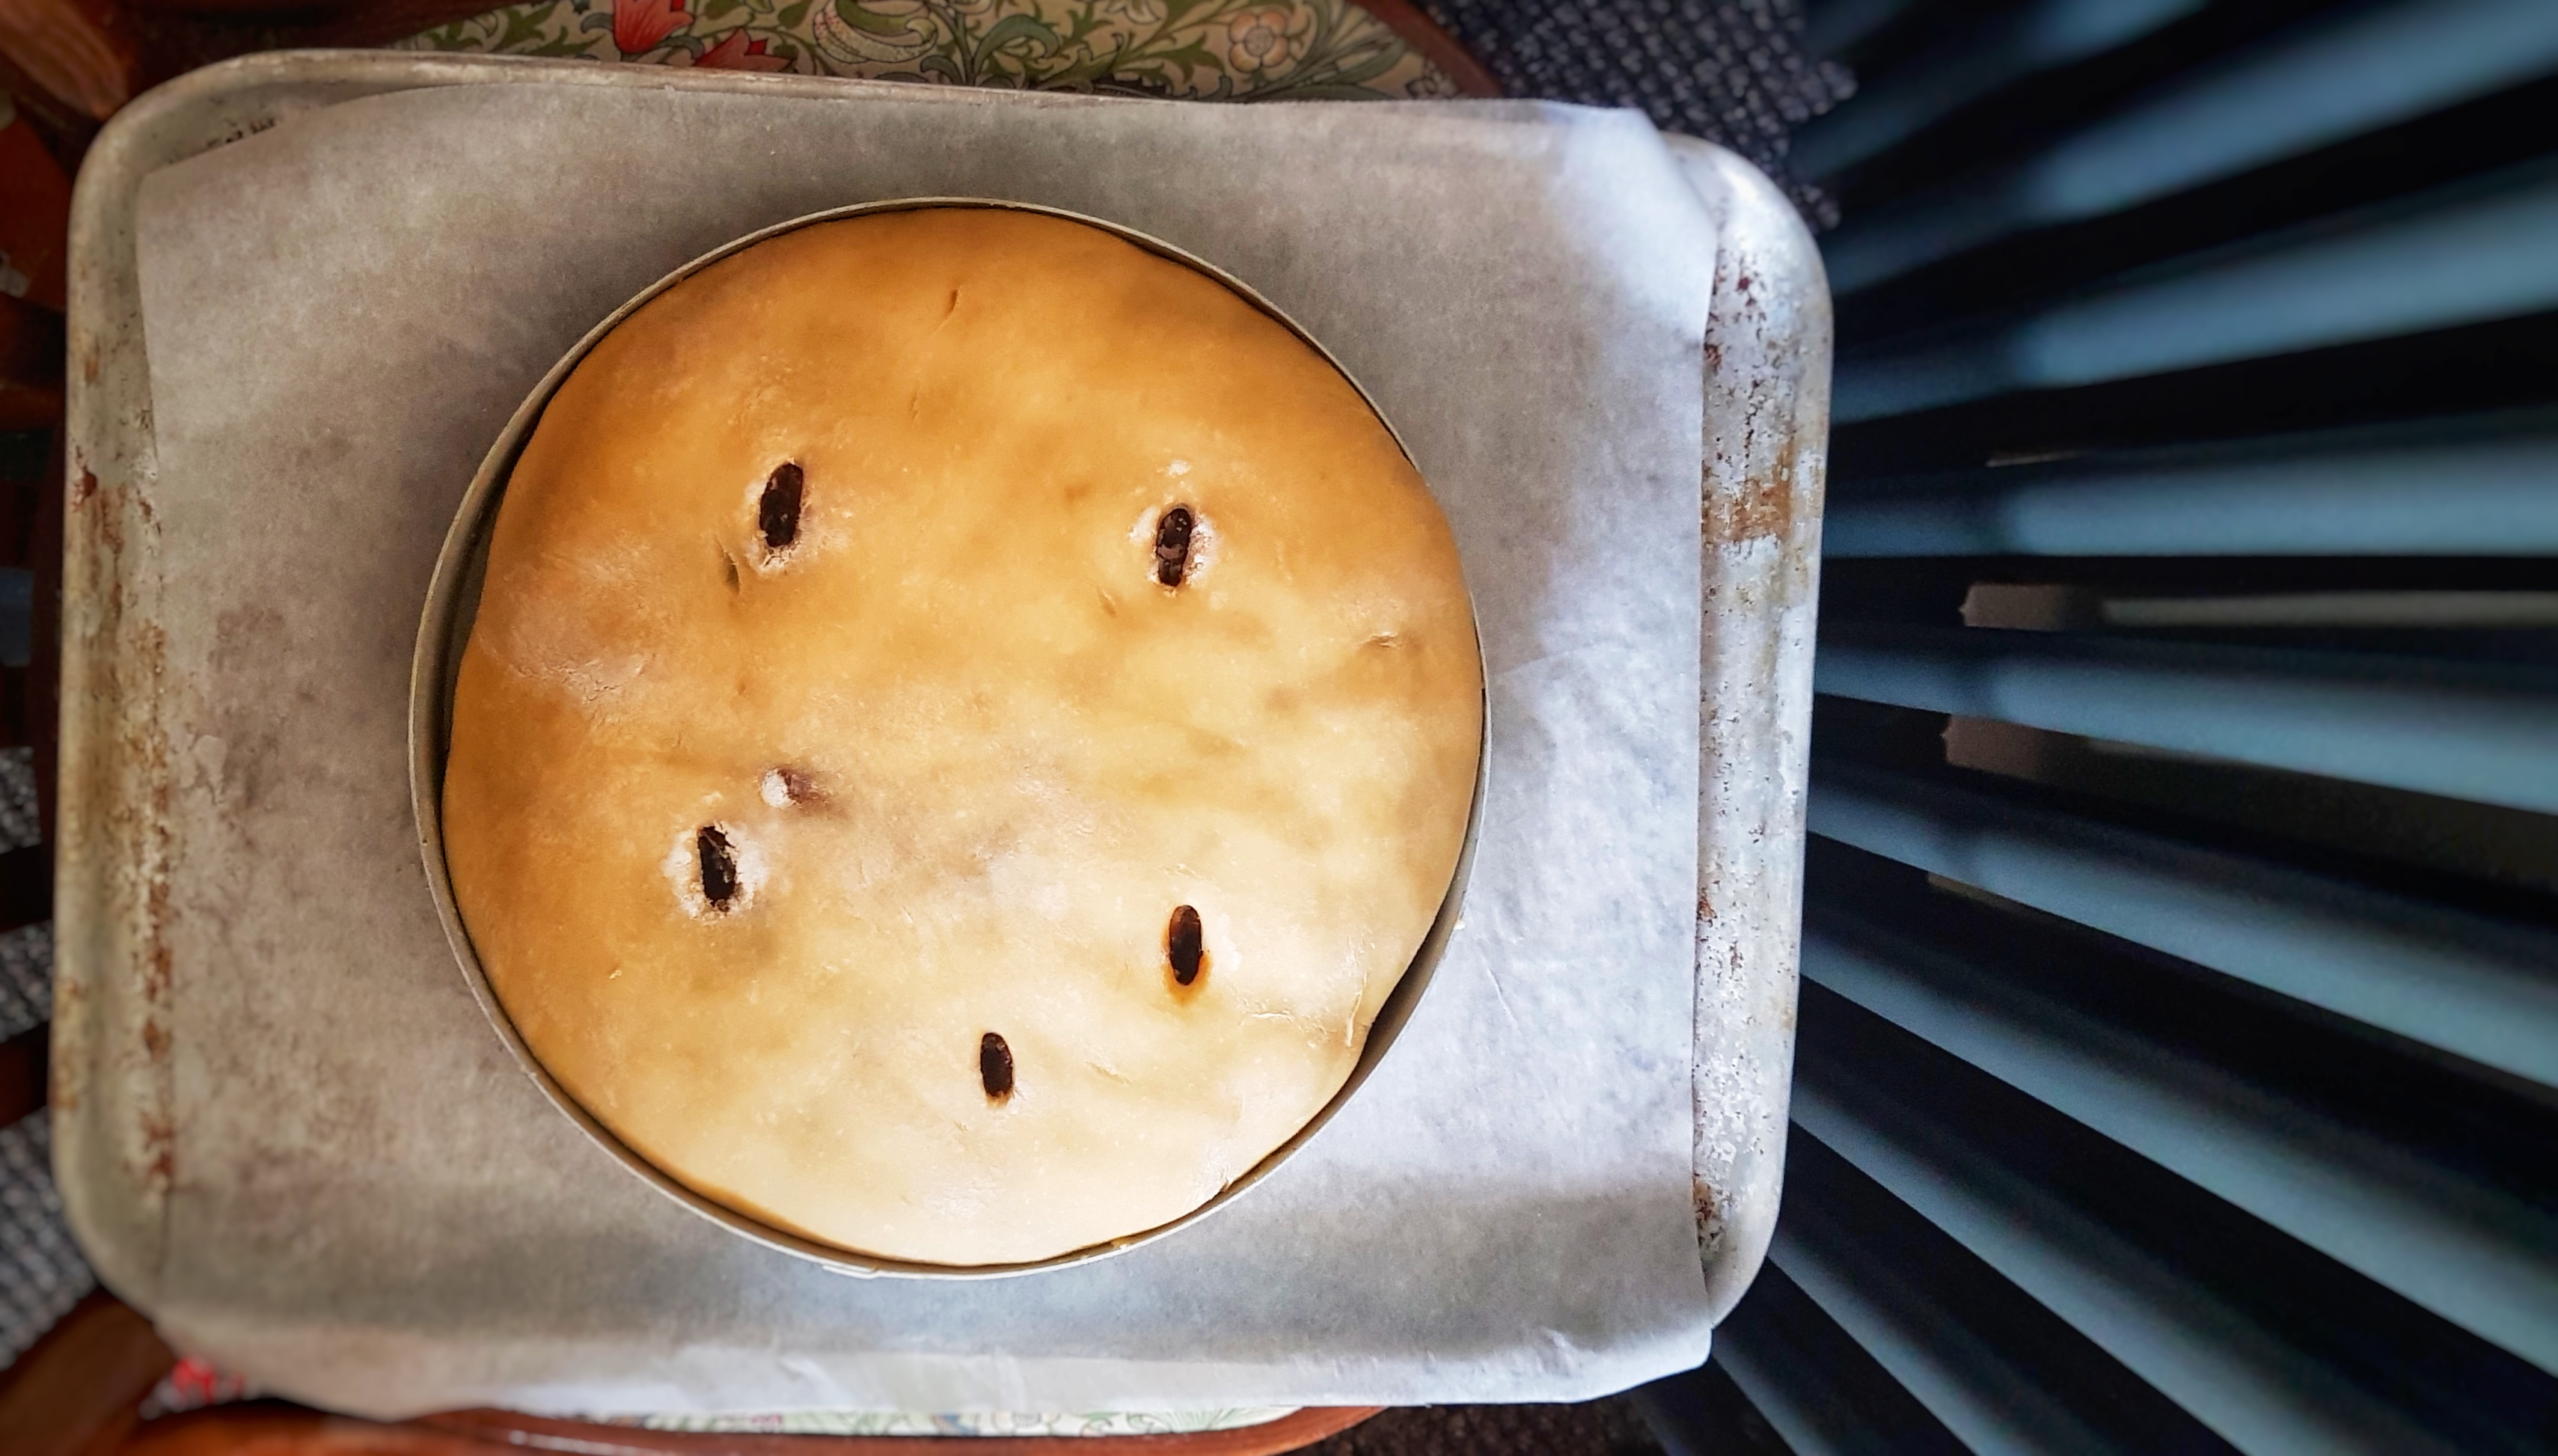
As promised, and carrying on from my last post, here is my recipe for the traditional yeast leavened black bun (Scotch bun). I must say I was really surprised with how well it turned out: it was enriched with so much stuff and was so huge, I thought the poor little yeast cells wouldn’t be able to do their job. I was wrong, but it did take two days to do two provings required before baking.
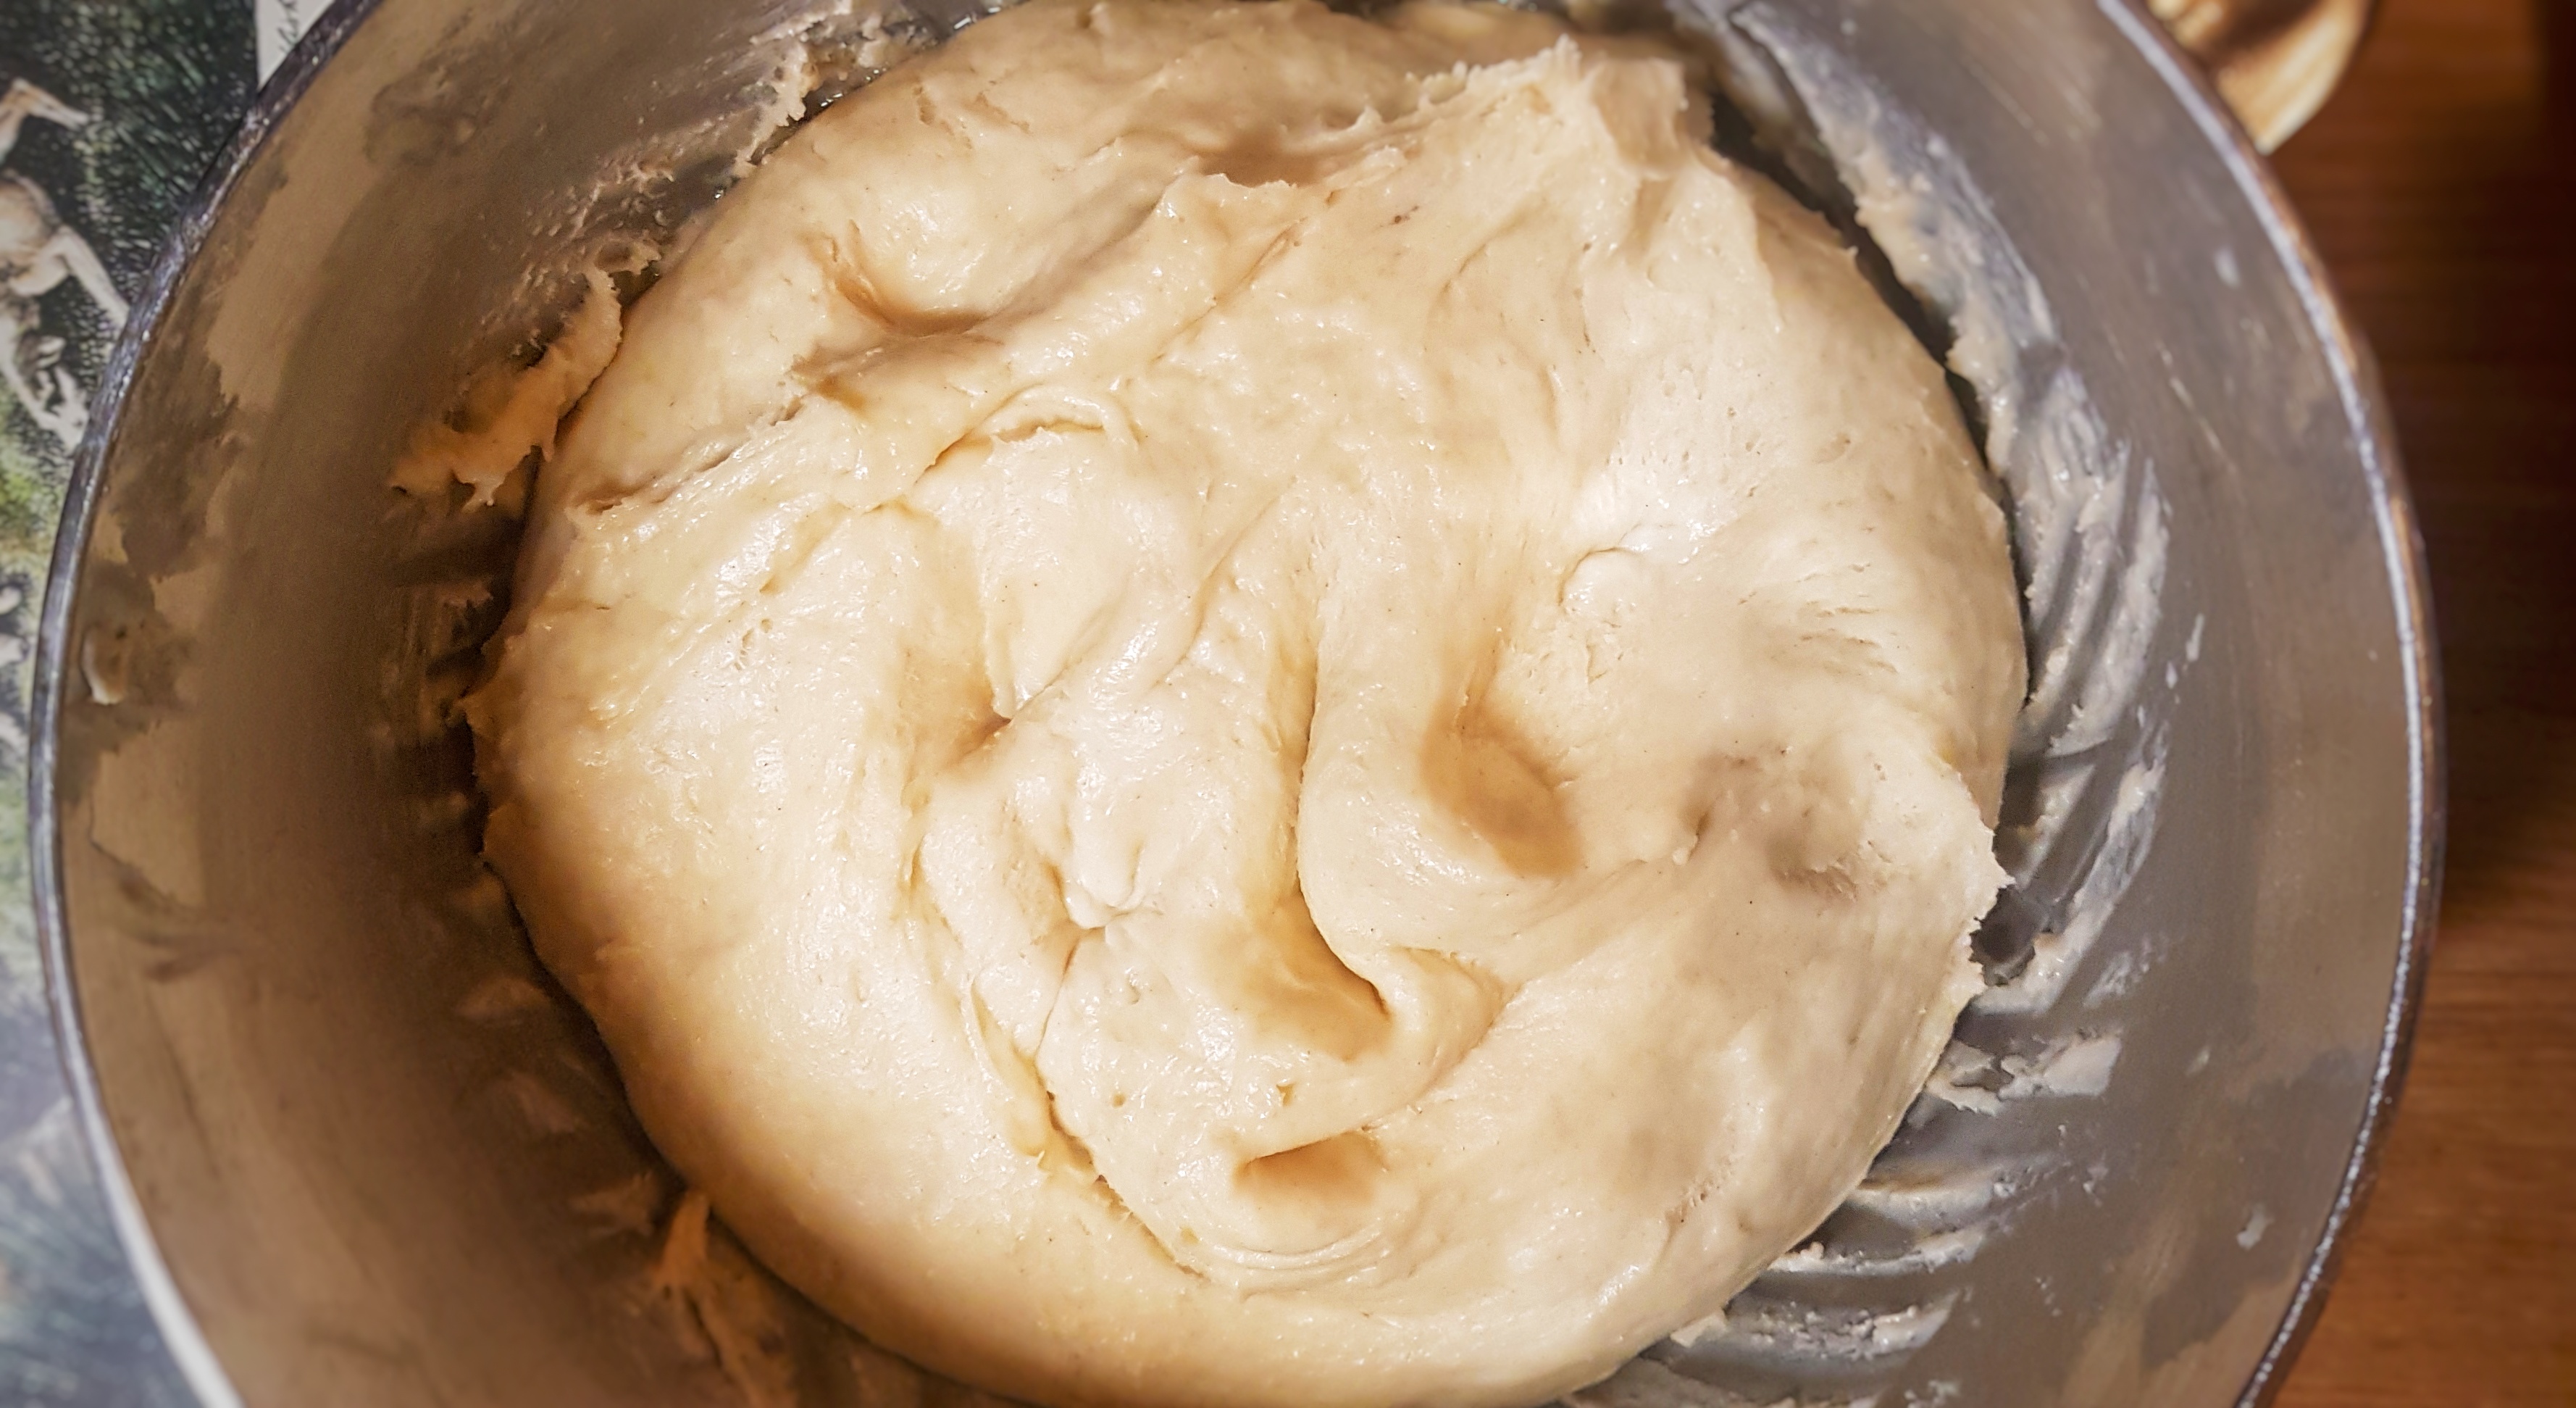
The white dough is essentially a sweet brioche made without eggs. When it was time to knock it back after its first rising, I was encouraged by the network of small yeasty bubbles that had formed inside the dough.
The tiny bubbles in my enriched basic dough
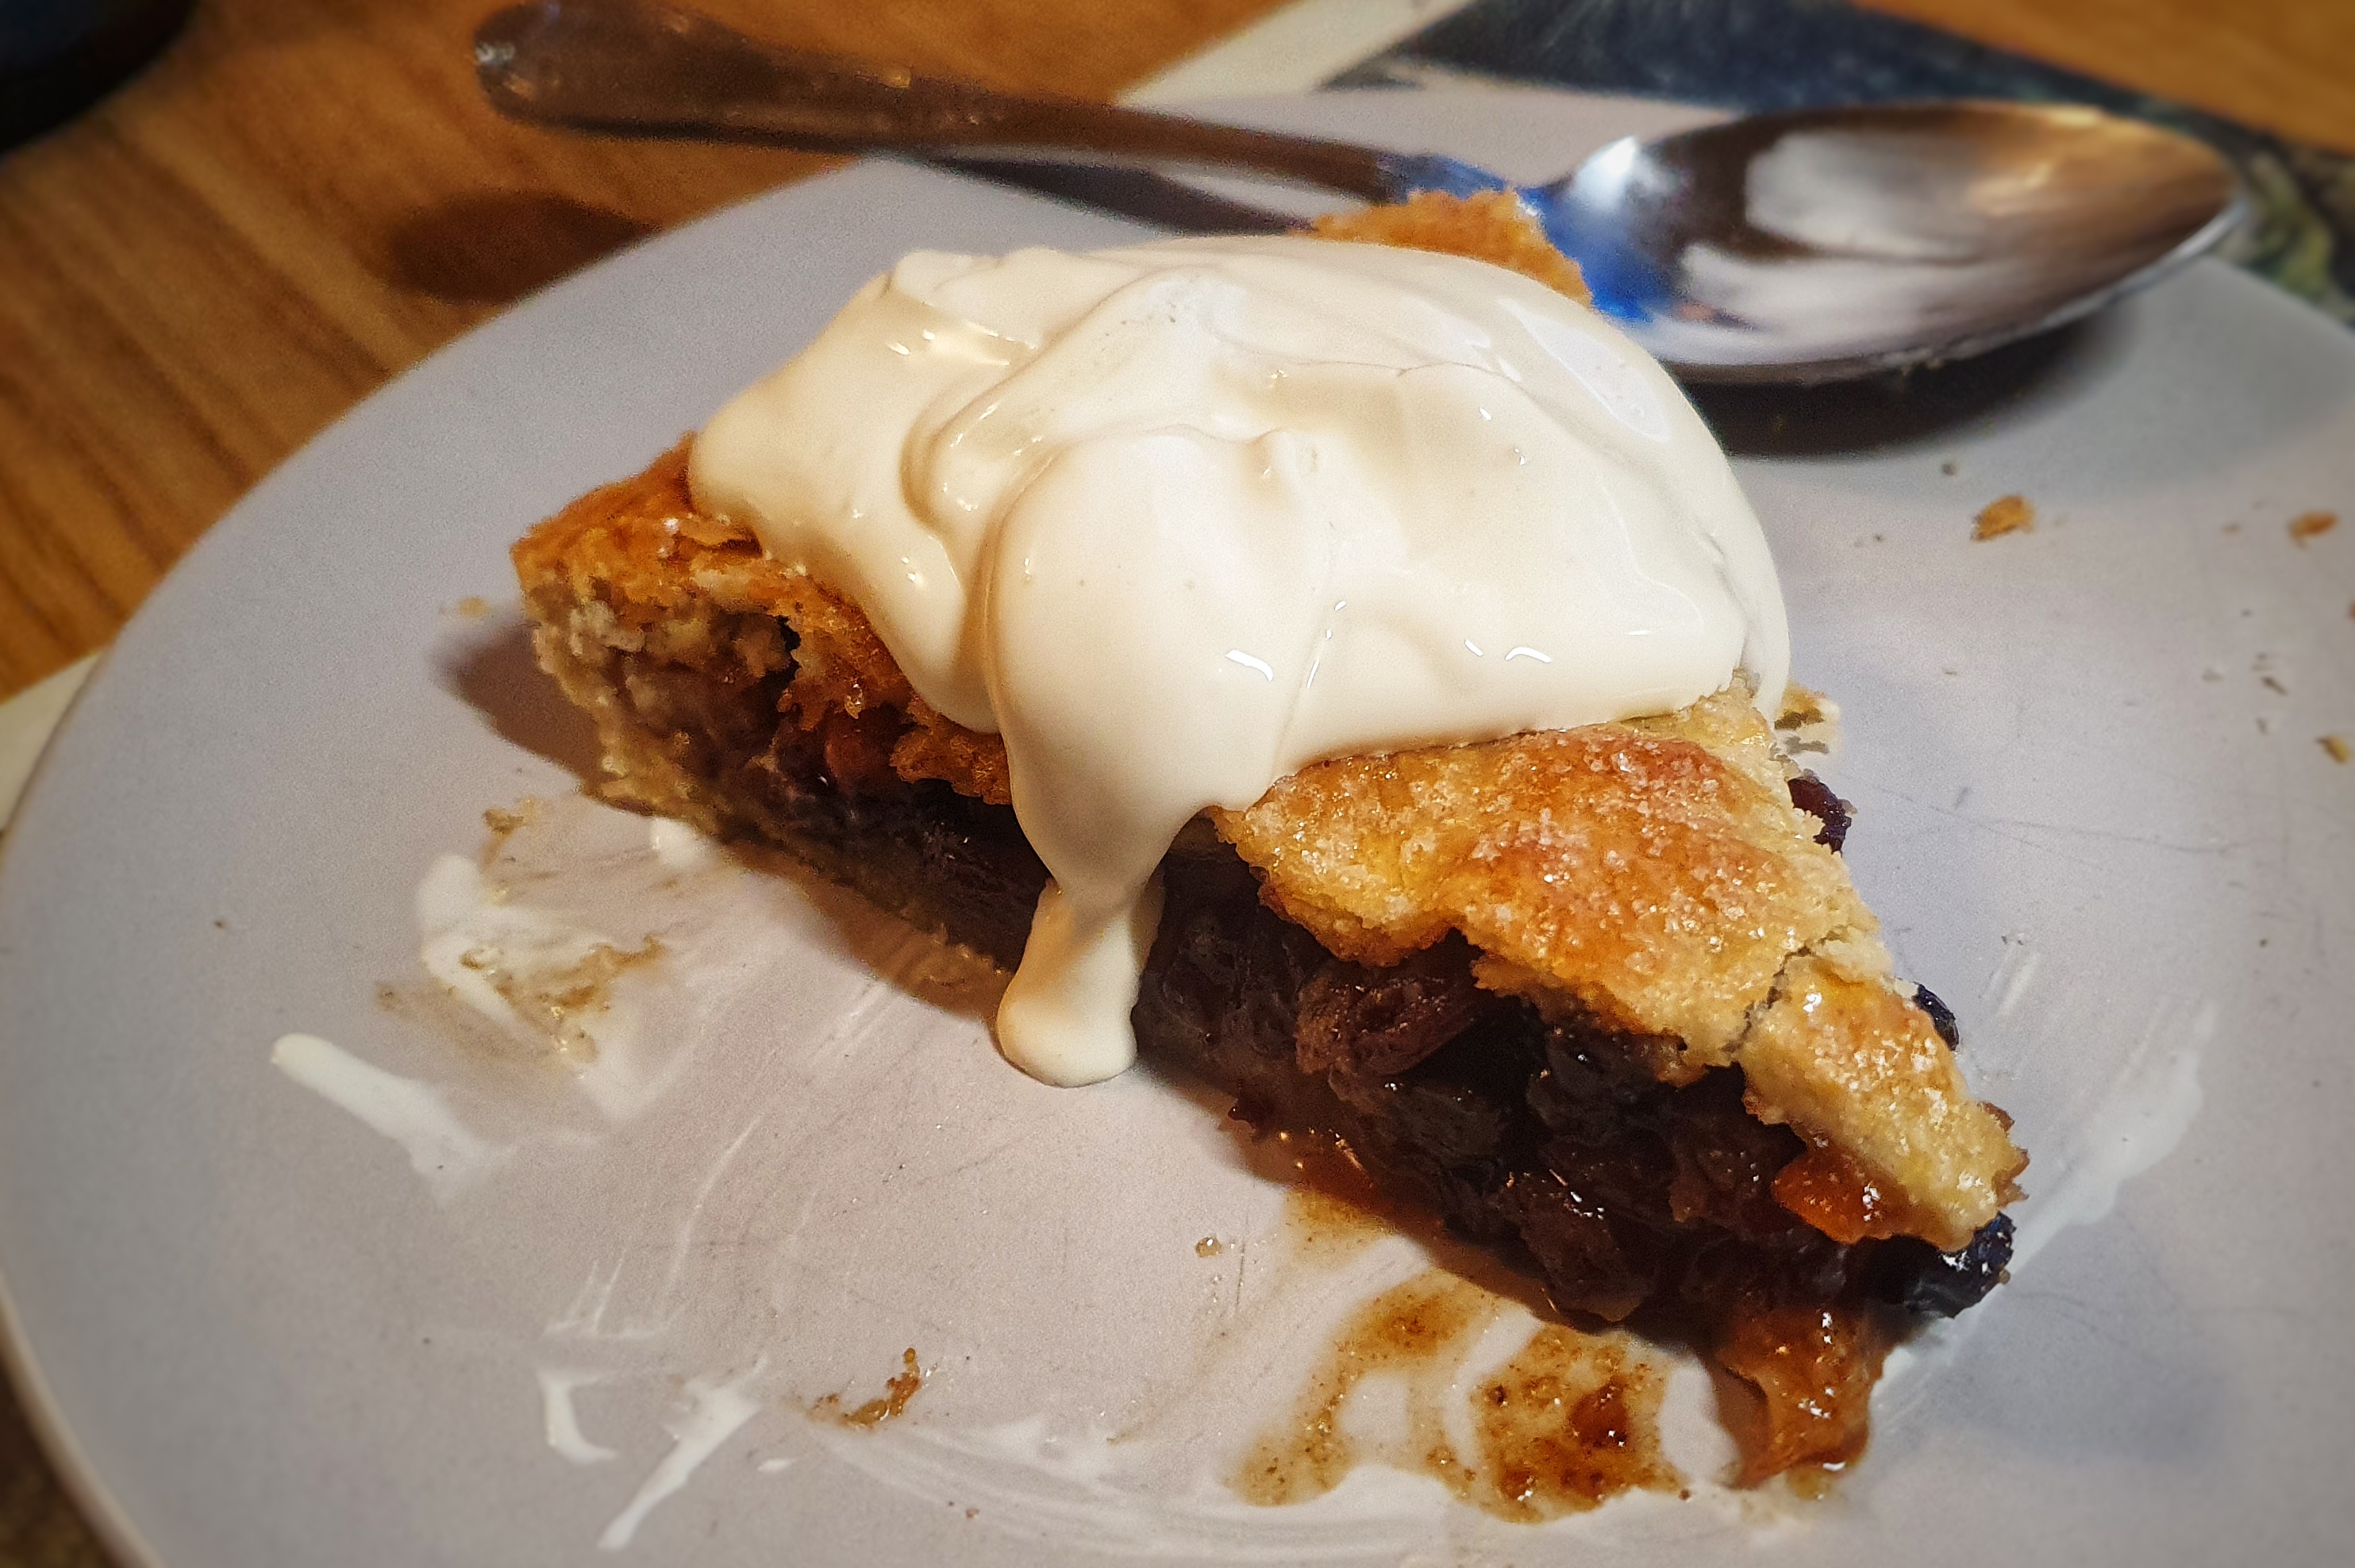
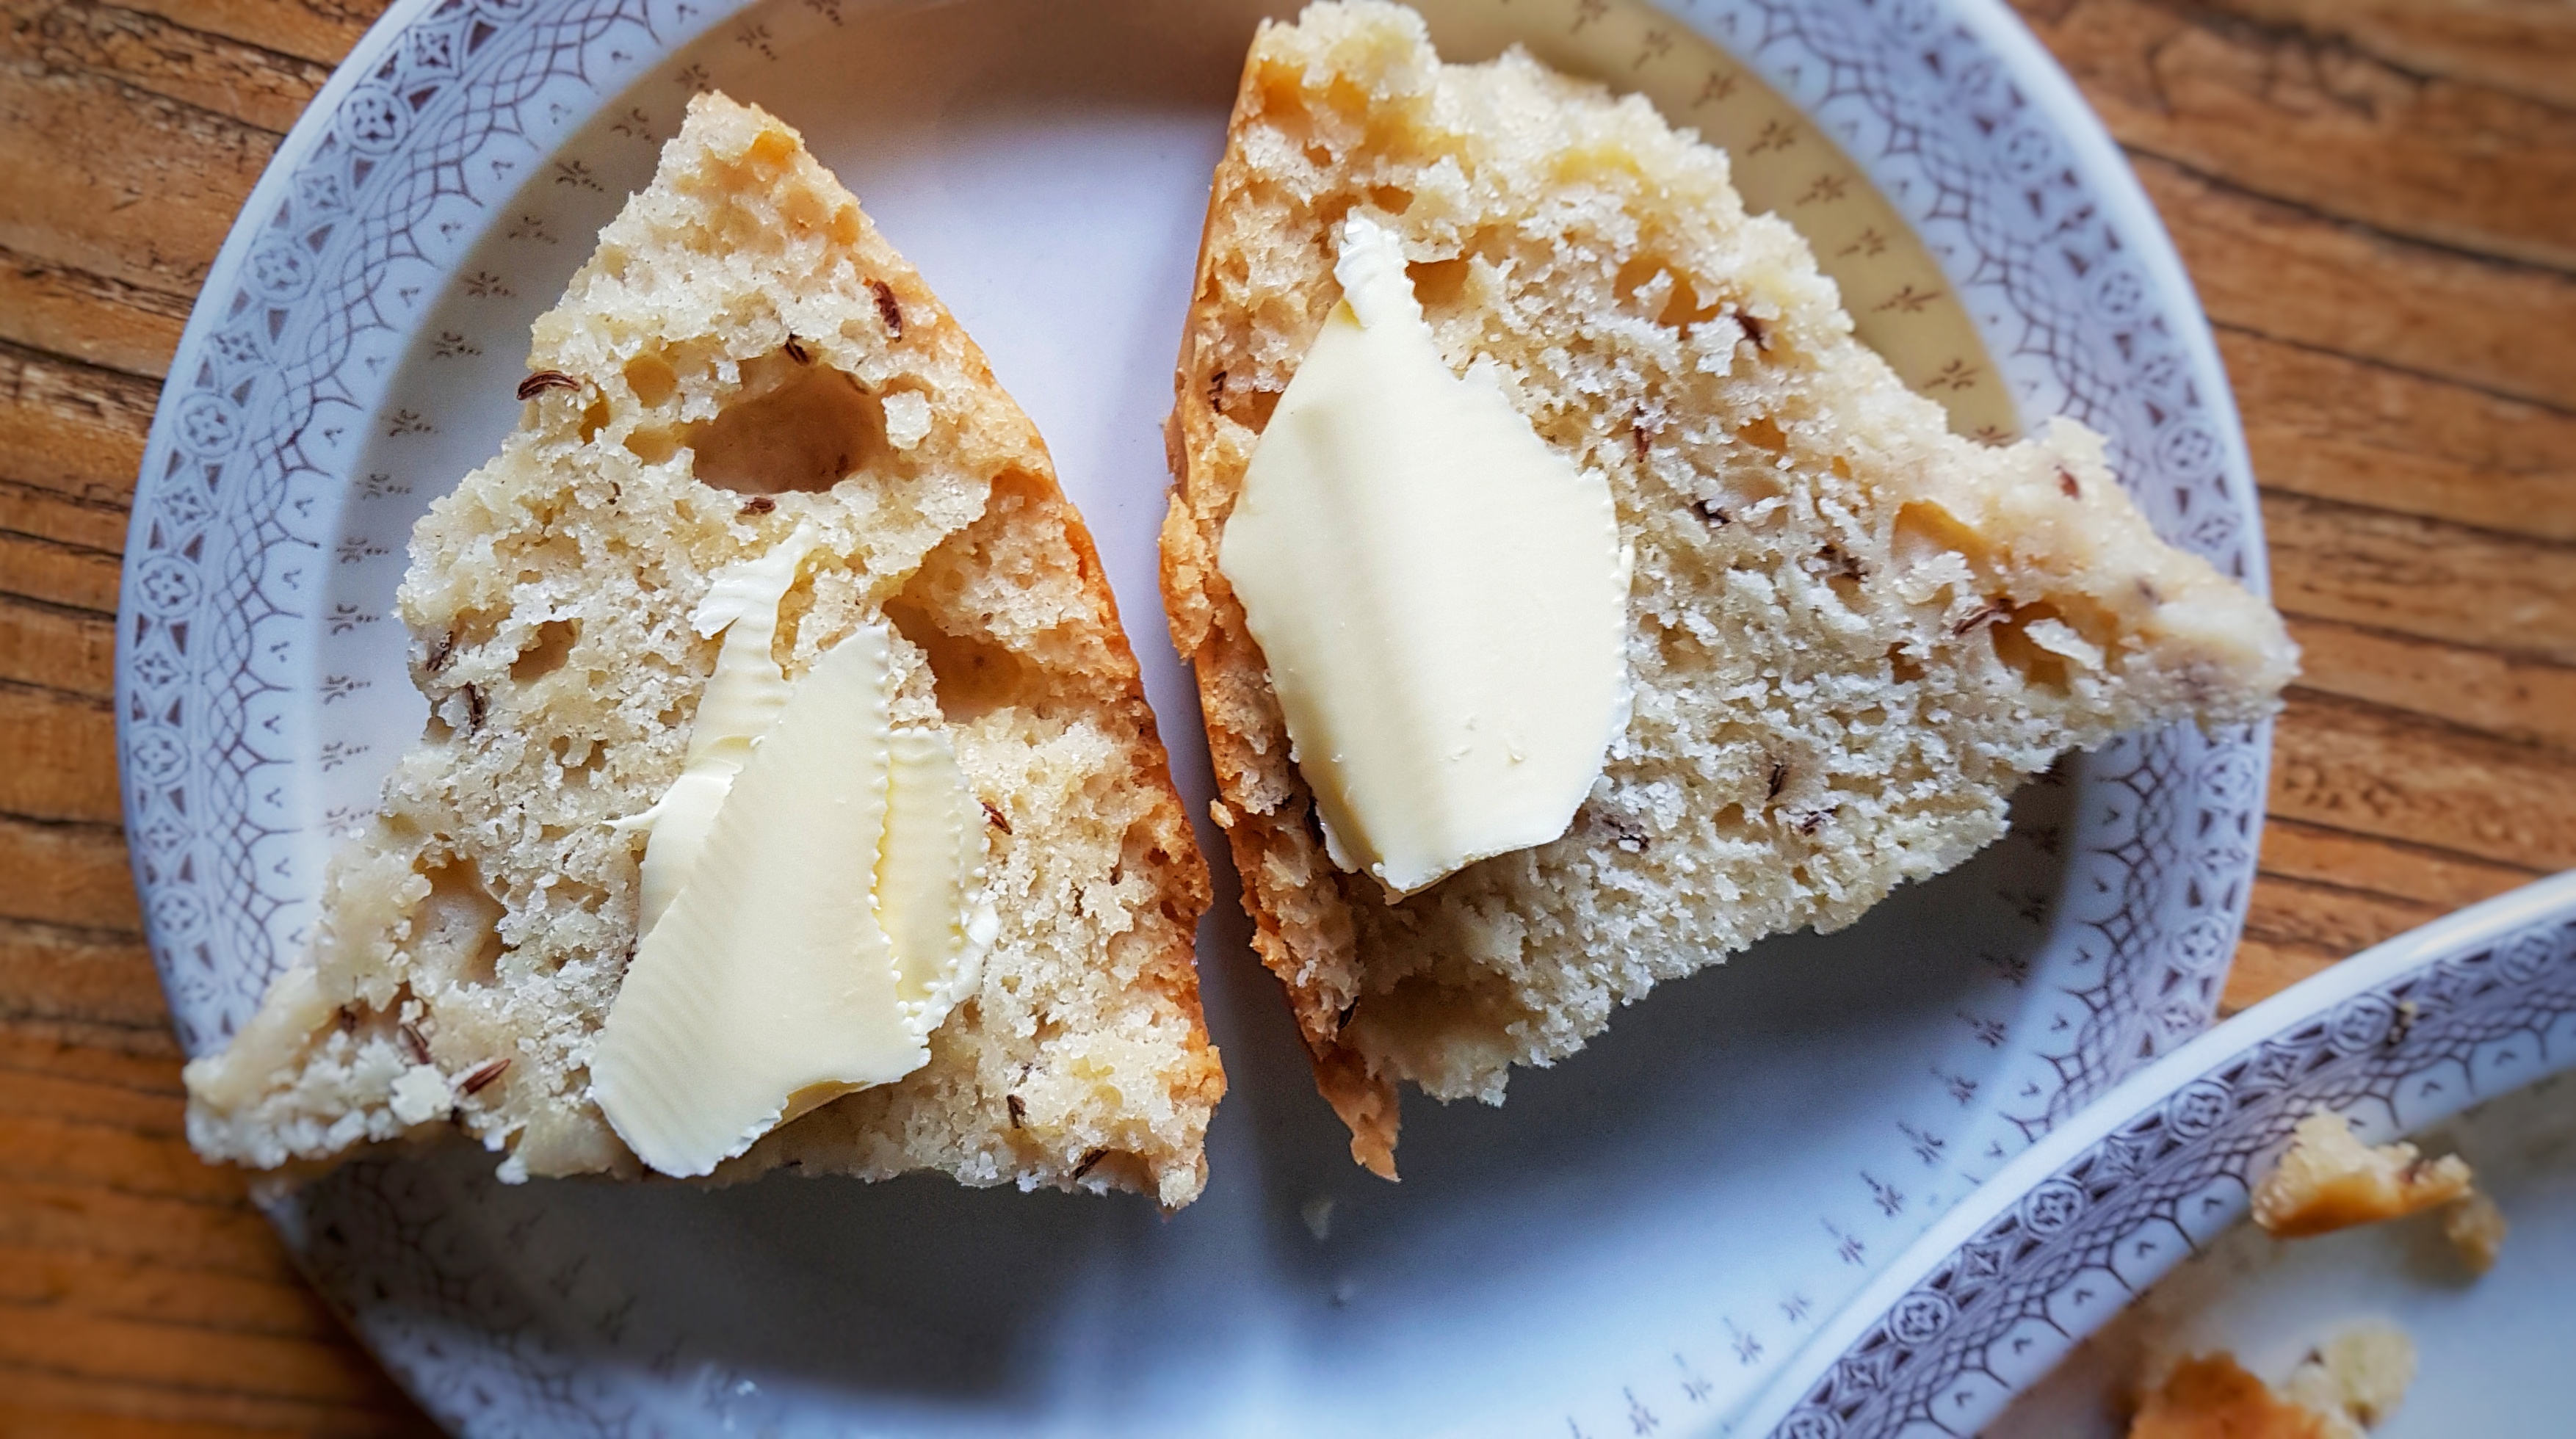
The bun was huge and made quite the centrepiece (though if you wanted to reduce the quantities and make a smaller one, go ahead). The cake inside was deliciously moist, and the brioche dough wonderfully buttery and thin and in such contrast with the treacle-black centre.
If you like the blogs and podcast I produce and would to start a £3 monthly subscription, or would like to treat me to virtual coffee or pint: follow this link for more information.Thank you.
It may have been big, but it kept well and was perfectly delicious well over a week after baking.
For the basic dough:
450 g plain white flour
450 g strong white bread flour
160 g caster sugar
10 g dried fast-action yeast
20 g salt
160 g softened butter
400 ml hand-hot full-fat milk
A smidge of flavourless oil
For the centre:
750 g basic dough
100 ml black treacle
400 g currants
400 g raisins
100 g candied peel
100 g slivered almonds
1 tsp mixed spice
½ tsp each ground cinnamon and allspice
2 eggs, plus 1 more for glazing
Butter for greasing
Granulated sugar
Two days before you want to bake your black bun, in the evening, make the basic dough. This is best done with an electric mixer, however don’t let me stop you attempting this by hand. Mix the dry ingredients – flours, yeast, sugar and salt – in your mixing bowl, make a well and add the butter and milk. Mix slowly with a dough hook until everything is mixed together, then turn the speed up a little and knead until smooth. Because it’s a low-gluten mixture and there’s all of that butter and sugar, it won’t be very elastic, but when it’s really smooth, you are done. It should take 8 to 10 minutes.
Paint the inside of a bowl with oil, then bundle up the sticky dough as best you can and cover with cling film. Leave to prove until around double in size. This took 18 hours: I use a low amount of yeast on purpose that the yeast ferments slowly. It may take less time for you if you used more yeast, and if your home is warmer than mine.
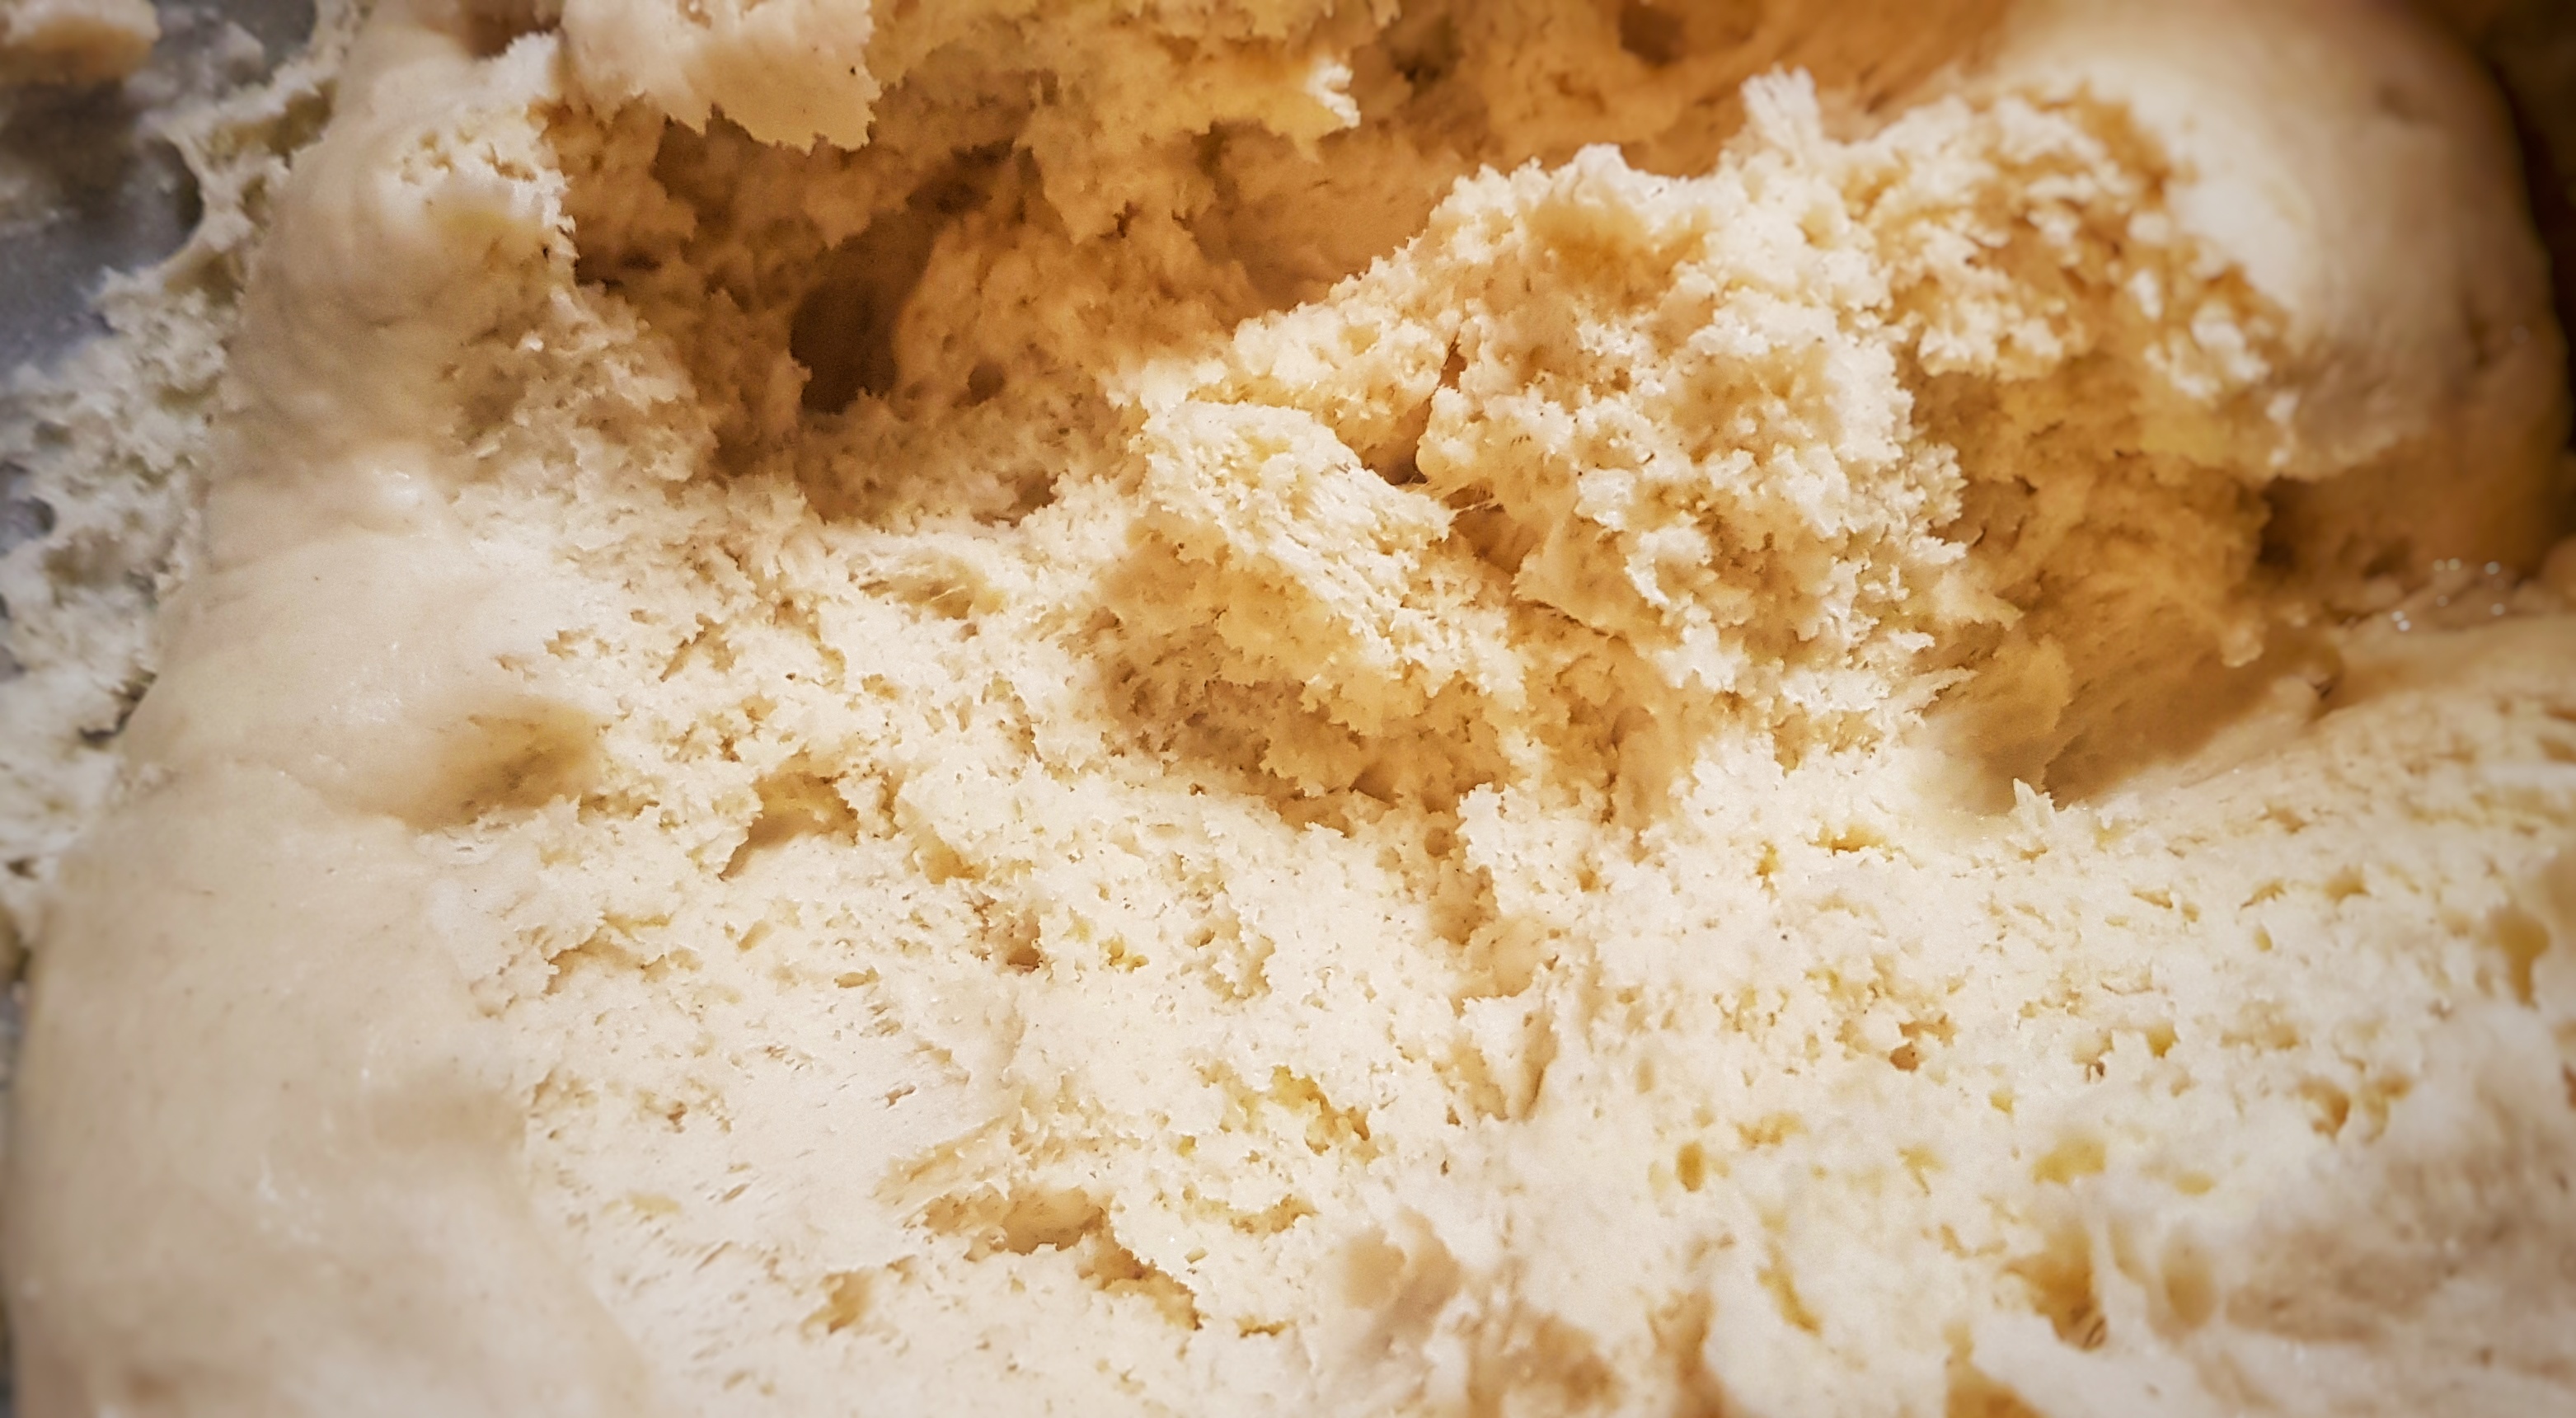
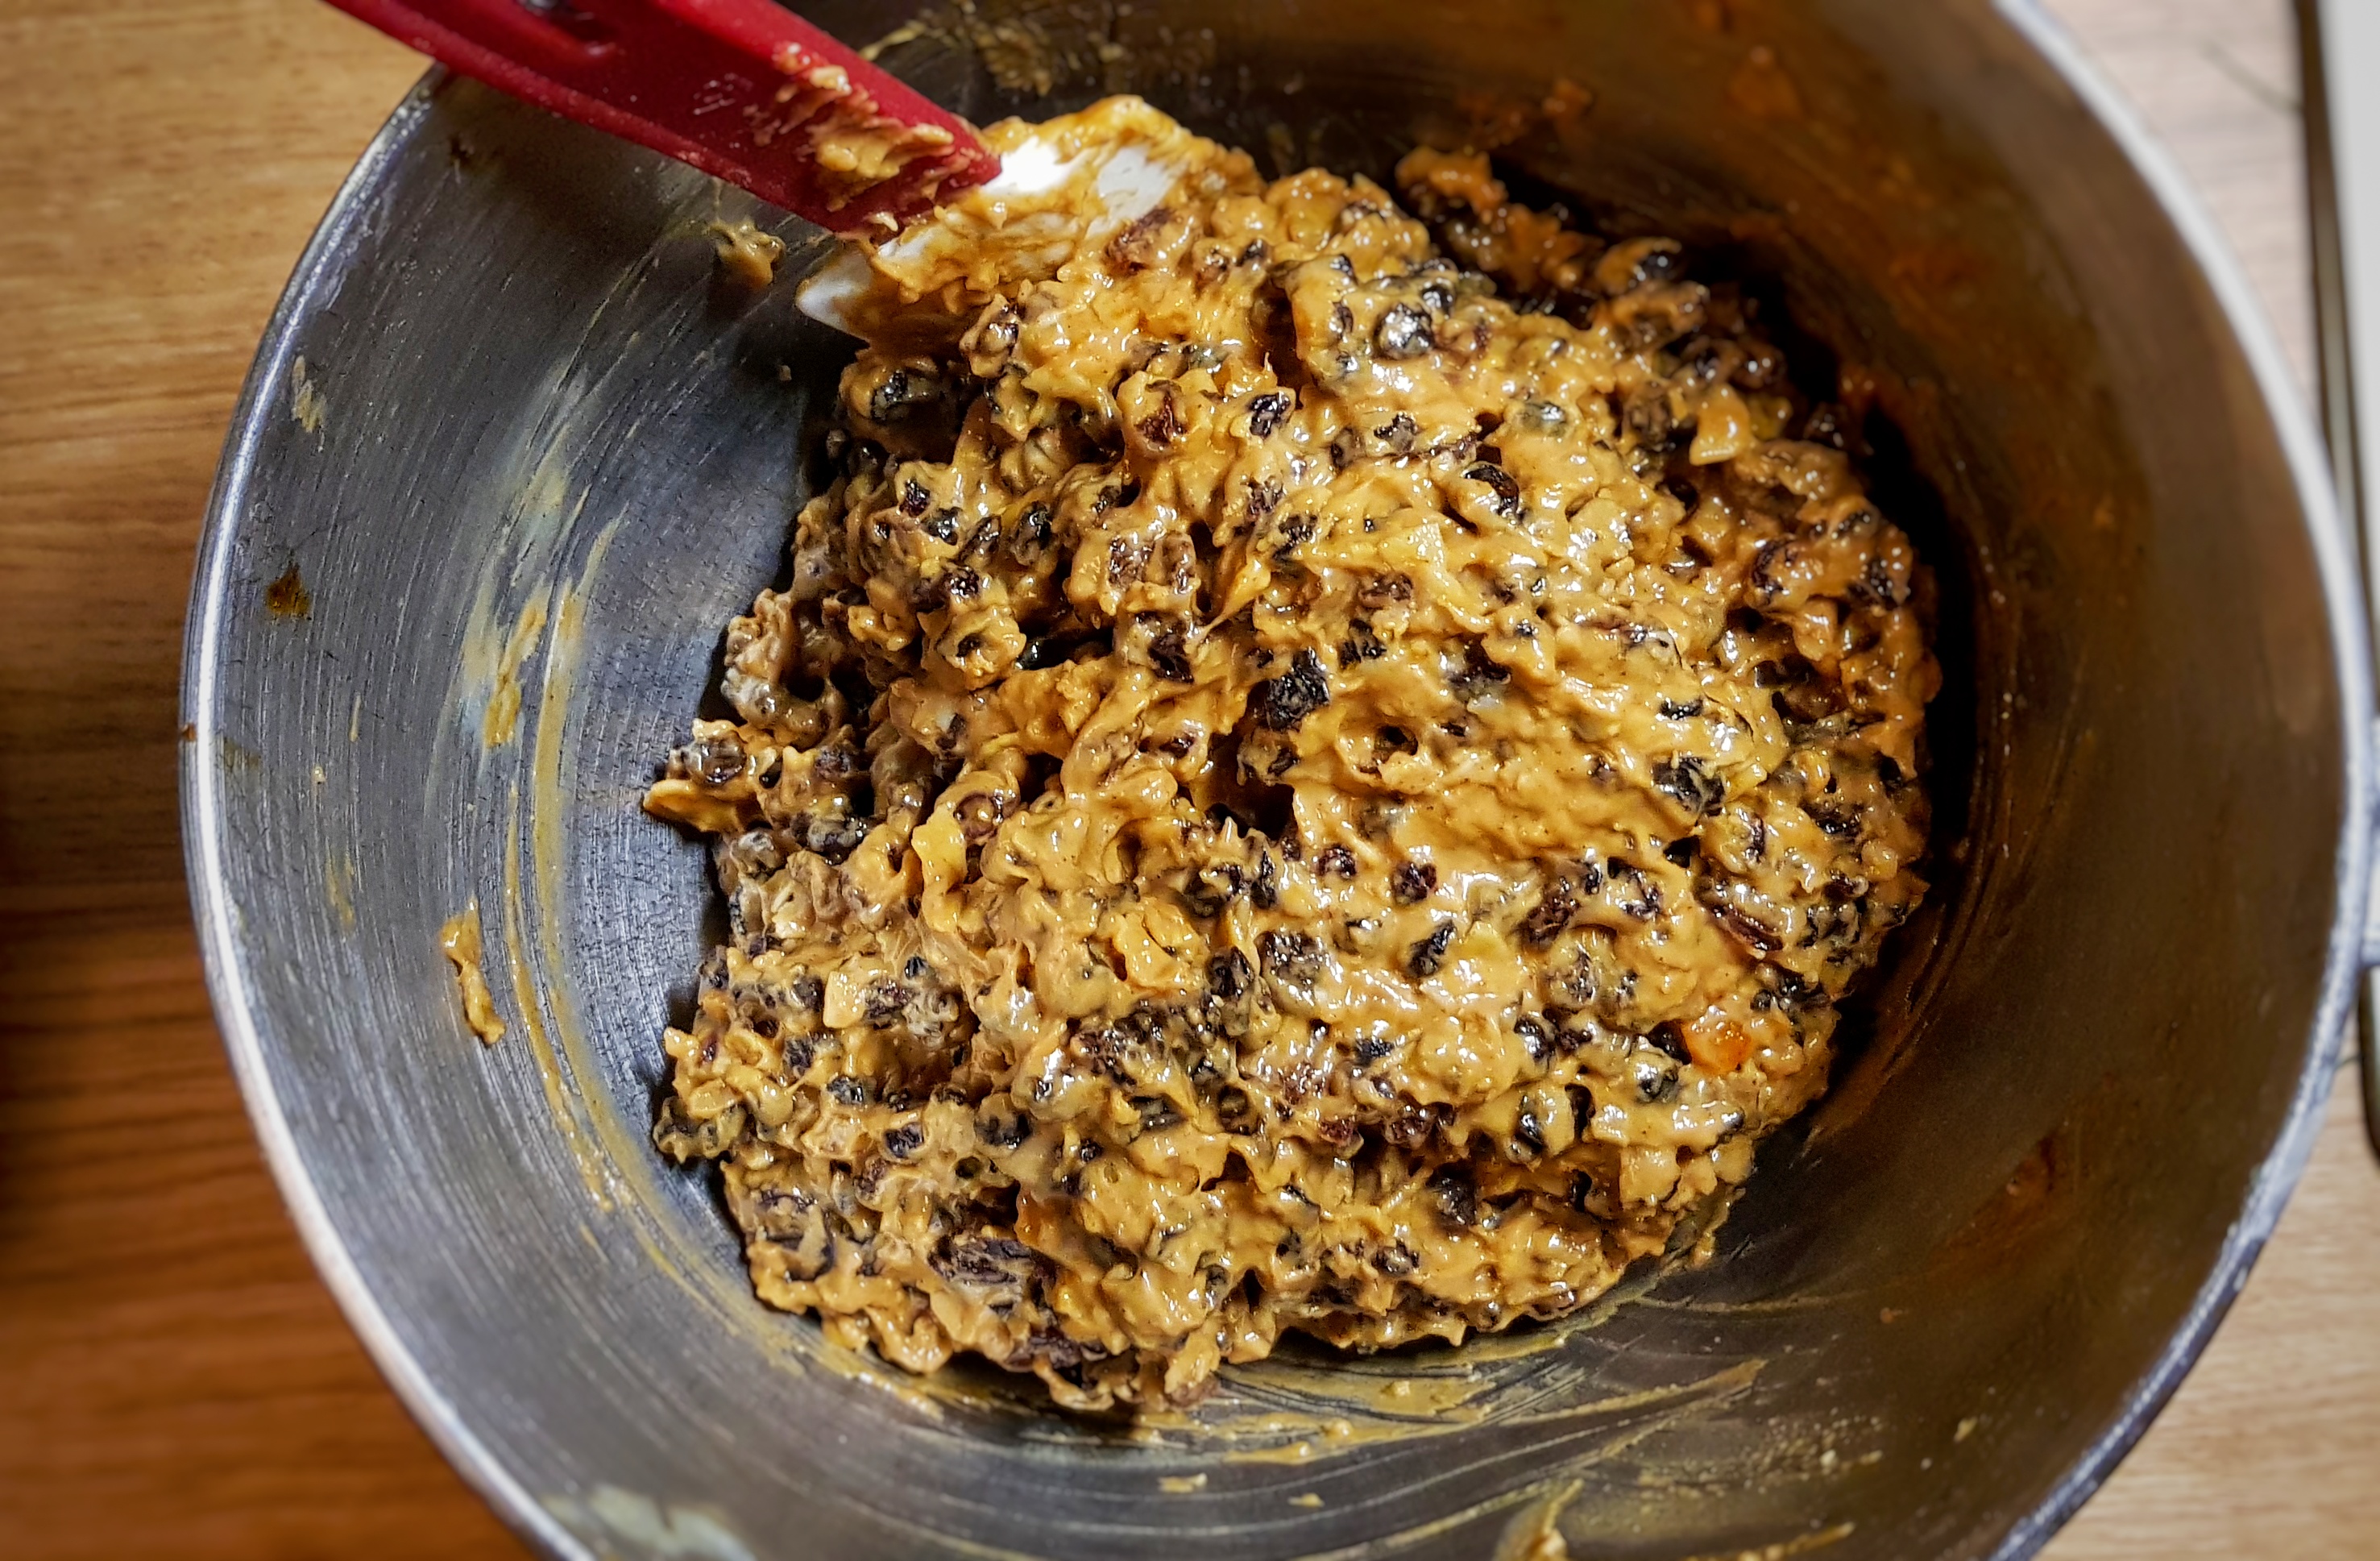
Knock back the dough and place 750 g of the dough in your food mixer, then add the treacle, dried fruits, candied peel, almonds, spices and eggs. Mix with a flat beater for a couple of minutes until everything looks smooth and like a Christmas cake batter. Set aside.
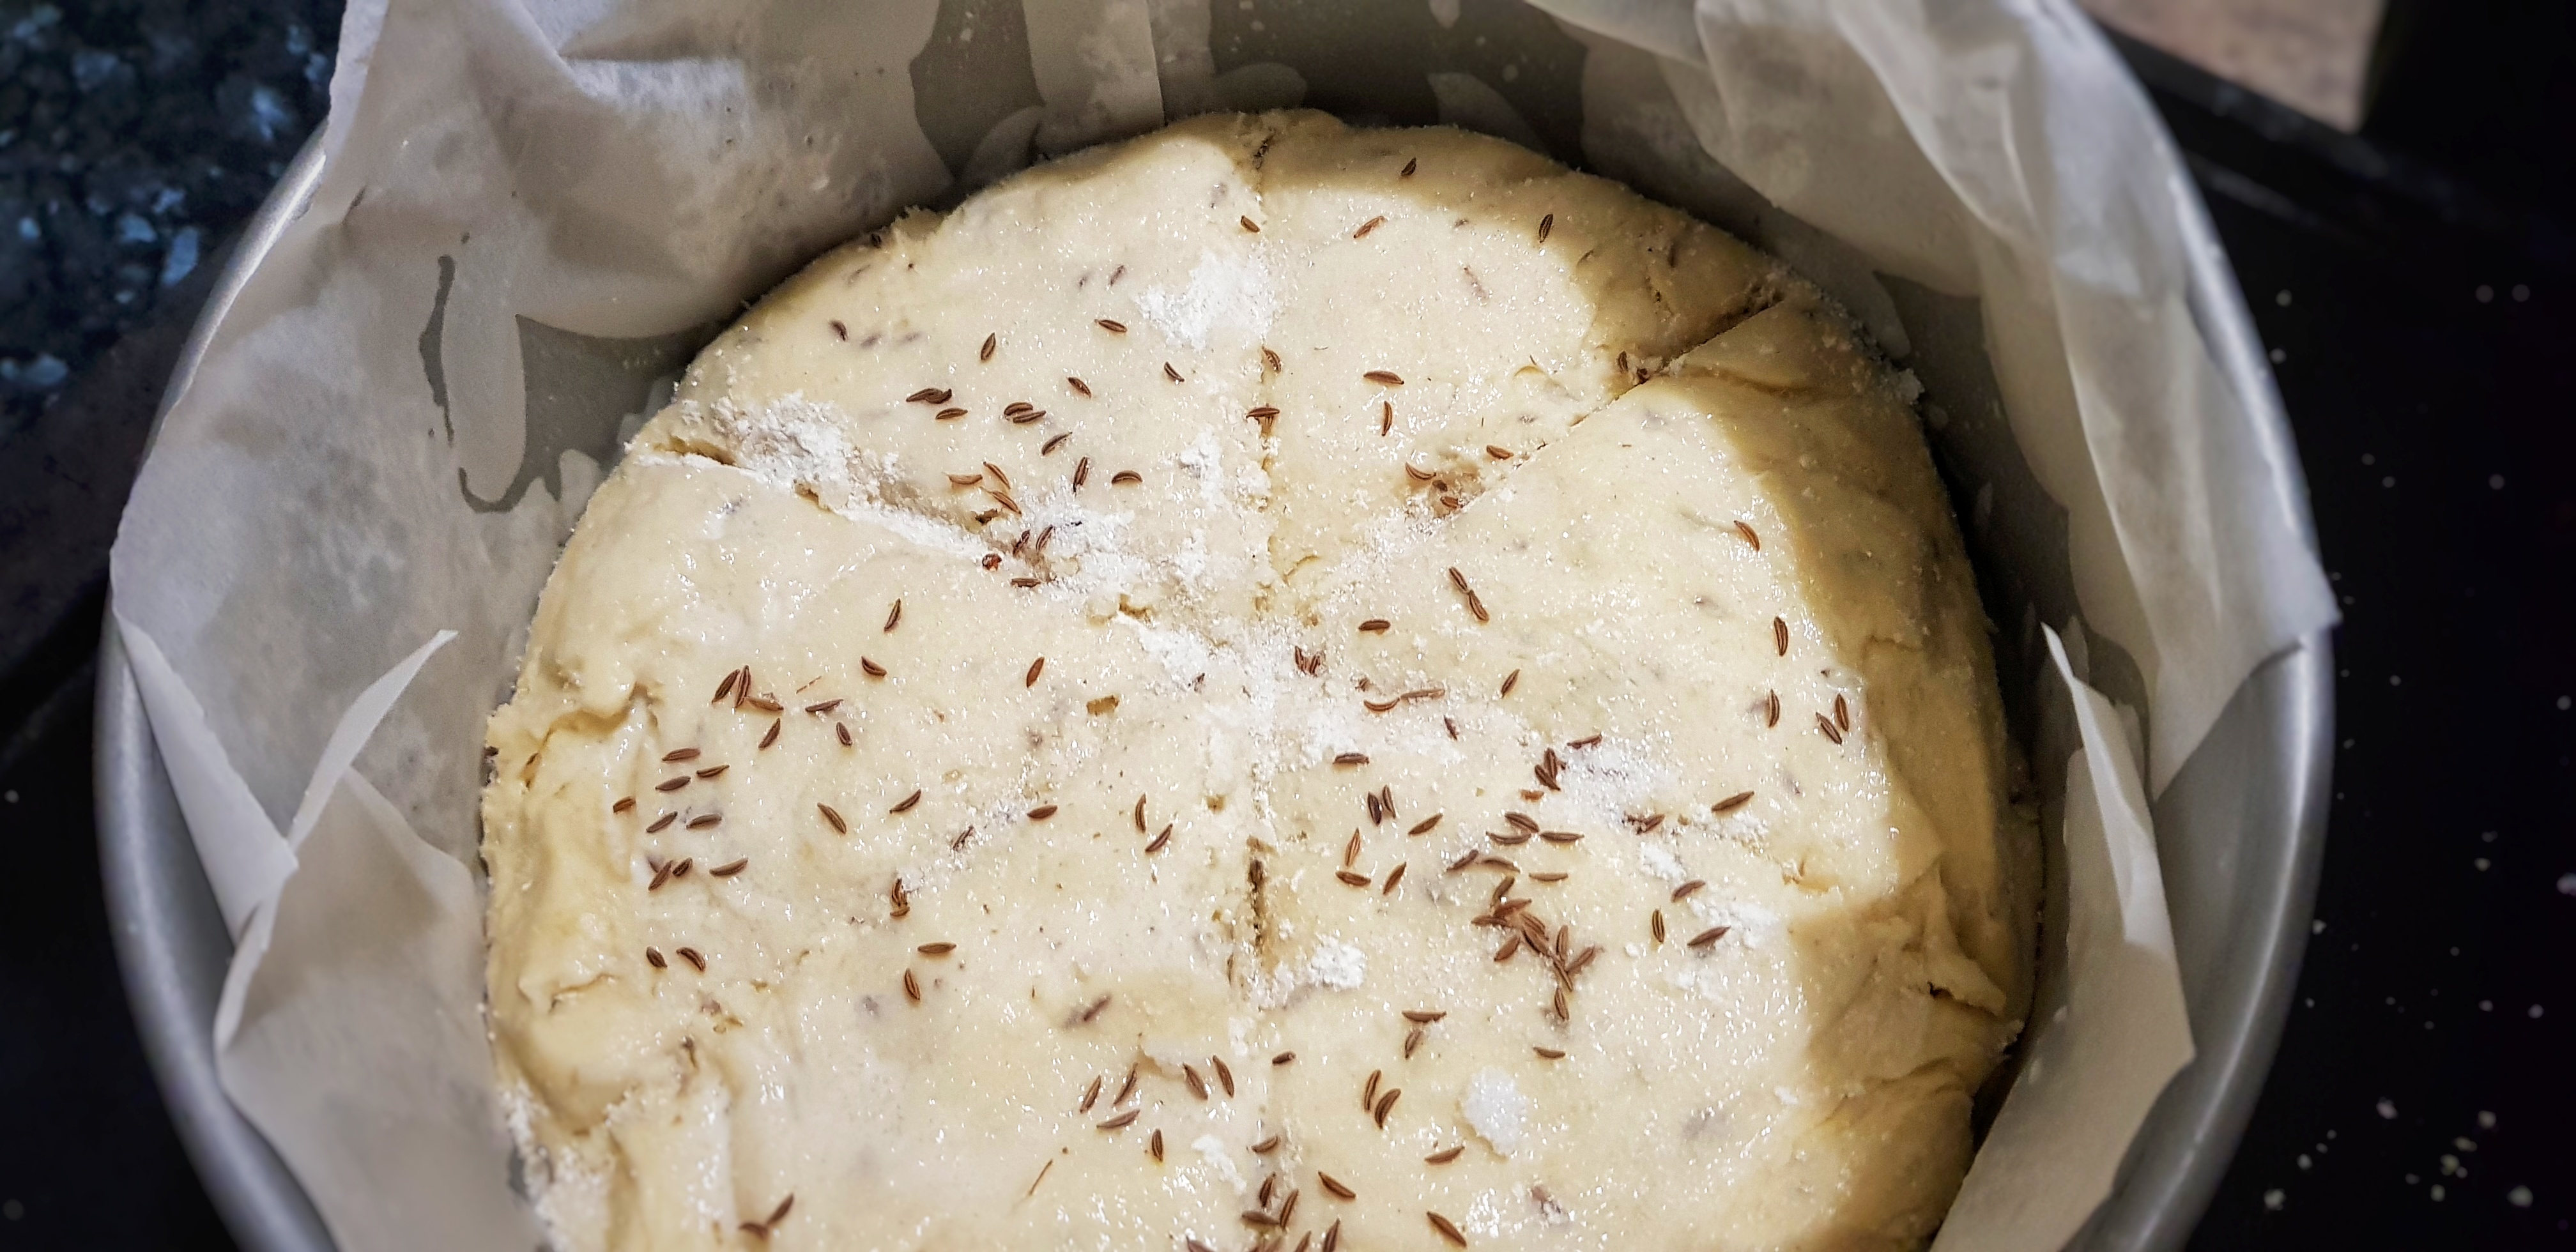
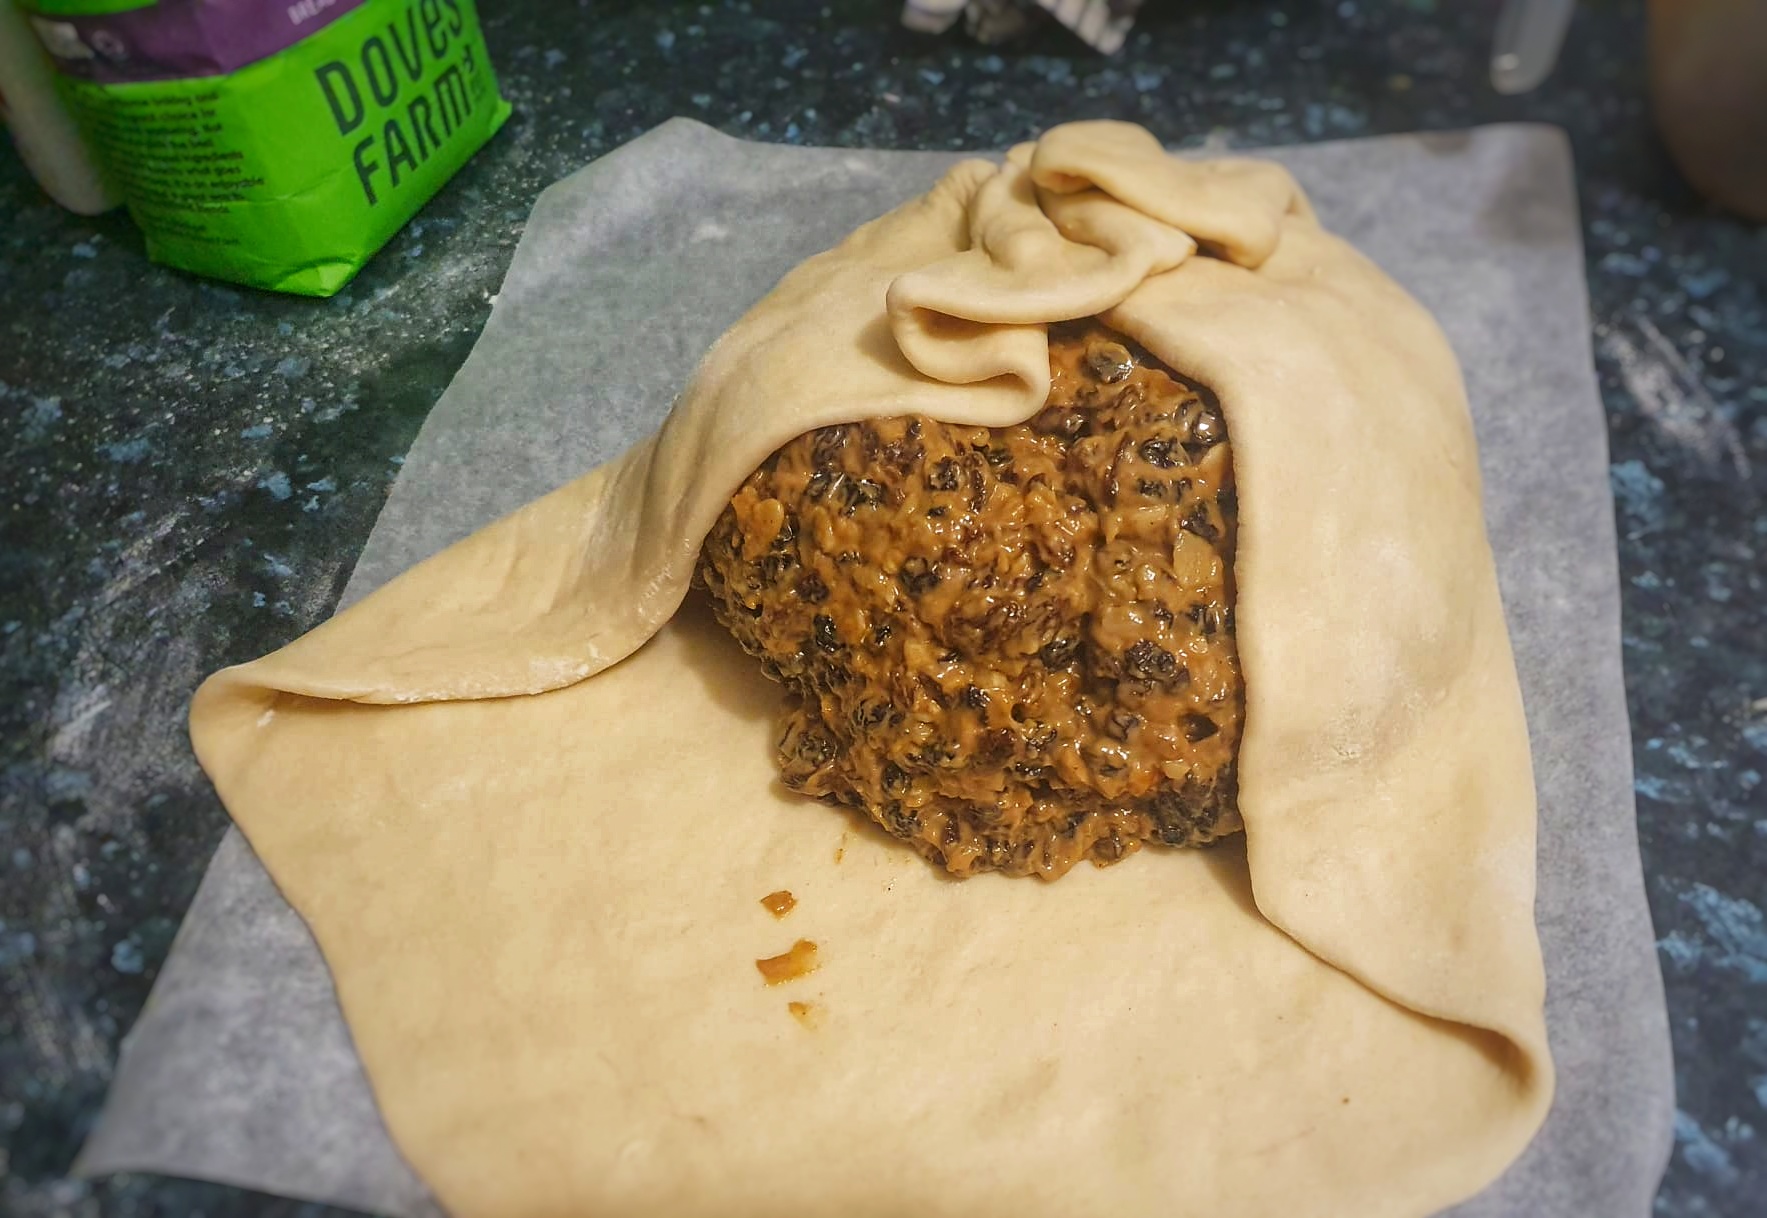
Take the remaining dough, form into a ball, place on a floured work surface and roll out into a large circle 32-35 cm in diameter. Make sure your pin is floured too; this will prevent sticking. With slightly wet hands, scoop the dark sticky dough and pop it in the centre of your circle. Now gather the dough so that the centre is completely covered – rather like a giant Eccles cake.
Cut away bits of the dough that have bunched up too much and glue any edges with a thin coat of beaten egg. Don’t worry if it looks a bit messy. Turn the bun over and flatten it with your hands, smoothing away any bulging bits to make a nice round shape.
Now liberally grease a 25 cm flan ring with butter and place on a baking sheet lined with greaseproof paper and then dusted with flour, and place the bun in the centre. Press the bun or lightly roll it with your rolling pin so that is just a centimetre off from touching the edge. Paint the top with egg and scatter over a little granulated sugar, then stab holes in the top with a thin, pointed knife right down to its base – this keeps it flat as it rises. Cover with a large plastic bag[1] and allow to prove until it has grown large enough to fill the ring. For me, this took 12 hours.
Preheat your oven to 175°C and place a heatproof tin on the bottom of the oven. When it’s time to bake the bun boil the kettle, then open the oven and slide your bun onto the middle shelf, gingerly slide the tin out enough so that you can pour in the hot water, slide it back in and close the door.
Bake at this temperature for an hour, then turn the heat down to 140°C and bake for a further 2½ hours. If the top is getting too brown, cover it with some kitchen foil.
Remove from the oven, and slide onto a cooling rack. Remove the ring when the bun is just warm.
The black bun will keep for weeks in an airtight box or tub. It is delicious eaten with sharp cheese.
Notes:
[1] I find a supermarket ‘bag for life’ is best for this task. I have one that I use only for proving things like this. Turn it over and turn up the edges, as you would your trousers to make it a sturdy shape and hey presto!
Before we begin: a big thank you to Scots chef and food writer Sue Lawrence for helping me out with the research for this post.
It has become a Christmas tradition of mine to ask my Twitter followers to select by Christmas post for me by way of a poll. I like to include both obvious and obscure options and was very pleased this year to see roast turkey receive no votes all (though I suppose I’ll have to write about it at some point!), and the most obscure on the list – the black bun – win out with 46% of the votes.[1]
The black bun – sometimes called a Scotch bun – is a Scottish speciality that has changed in shape and constitution through the years, but is today a type of fruit cake baked in a loaf tin lined with shortcrust pastry. It is then covered with more pastry, egg washed and baked. The cake was often made black with the addition of black treacle; Sue Lawrence says of these very rich black buns, ‘the malevolent appearance of the black inner of its shiny golden pastry case might be off-putting to some black bun virgins.’ It might come as no surprise that the bun ‘is almost invariably served with a dram of whiskey.’[2]
Black buns today are fruit cakes wrapped in pastry (pic: BBC)
It is traditional to eat black buns at Hogmanay, the Scots new year festival. Food writer and chef and Sue Lawrence writes evocatively of childhood experiences of the Hogmanay celebration:
‘As I grew up, Hogmanay…was always a time for friends and fun. Friends and neighbours would get together to have a drink and the traditional shortbread (often eaten with cheese), sultana cake, black bun and such delights as ginger and blackcurrant cordial.’[3]
For many Scots Hogmanay, was – and is – more important than Christmas Day is the Christmastide calendar. The black bun is actually the Scots’ Twelfth Cake, but the food and the party was, according to F. Marion McNeill, ‘transferred to Hogmanay after the banning of Christmas and its subsidiary festival, Uphaelieday or Twelfth Night, by the Reformers.’ Christmas Day saw a similar treatment, hence the importance of Hogmanay over other days.[4]
It’s worth mentioning that the black bun wasn’t eaten throughout Scotland: in the Highlands and islands the clootie dumpling was eaten instead.[5] I talk about the clootie dumpling and other Hogmanay foods and traditions with Ulster-Scots chef Paula McIntyre in a new episode of The British Food History Podcast published on 28 December 2022:
You may be wondering why it is called a bun. Well. If you look at older recipes, you’ll see that it was using an enriched white bread dough, a proportion of which is mixed with all of those ingredients one might expect in a Twelfth/Christmas cake: currants, raisins (sultanas are avoided because of their paler colour), candied peel, etc. The mixture was then wrapped in the remaining dough, proved and baked. They were huge and ‘graced many a festive table in the big houses of Scotland over the centuries’, one recipe, provided by Sue Lawrence, used 15 pounds (6.8 kilos) of flour!
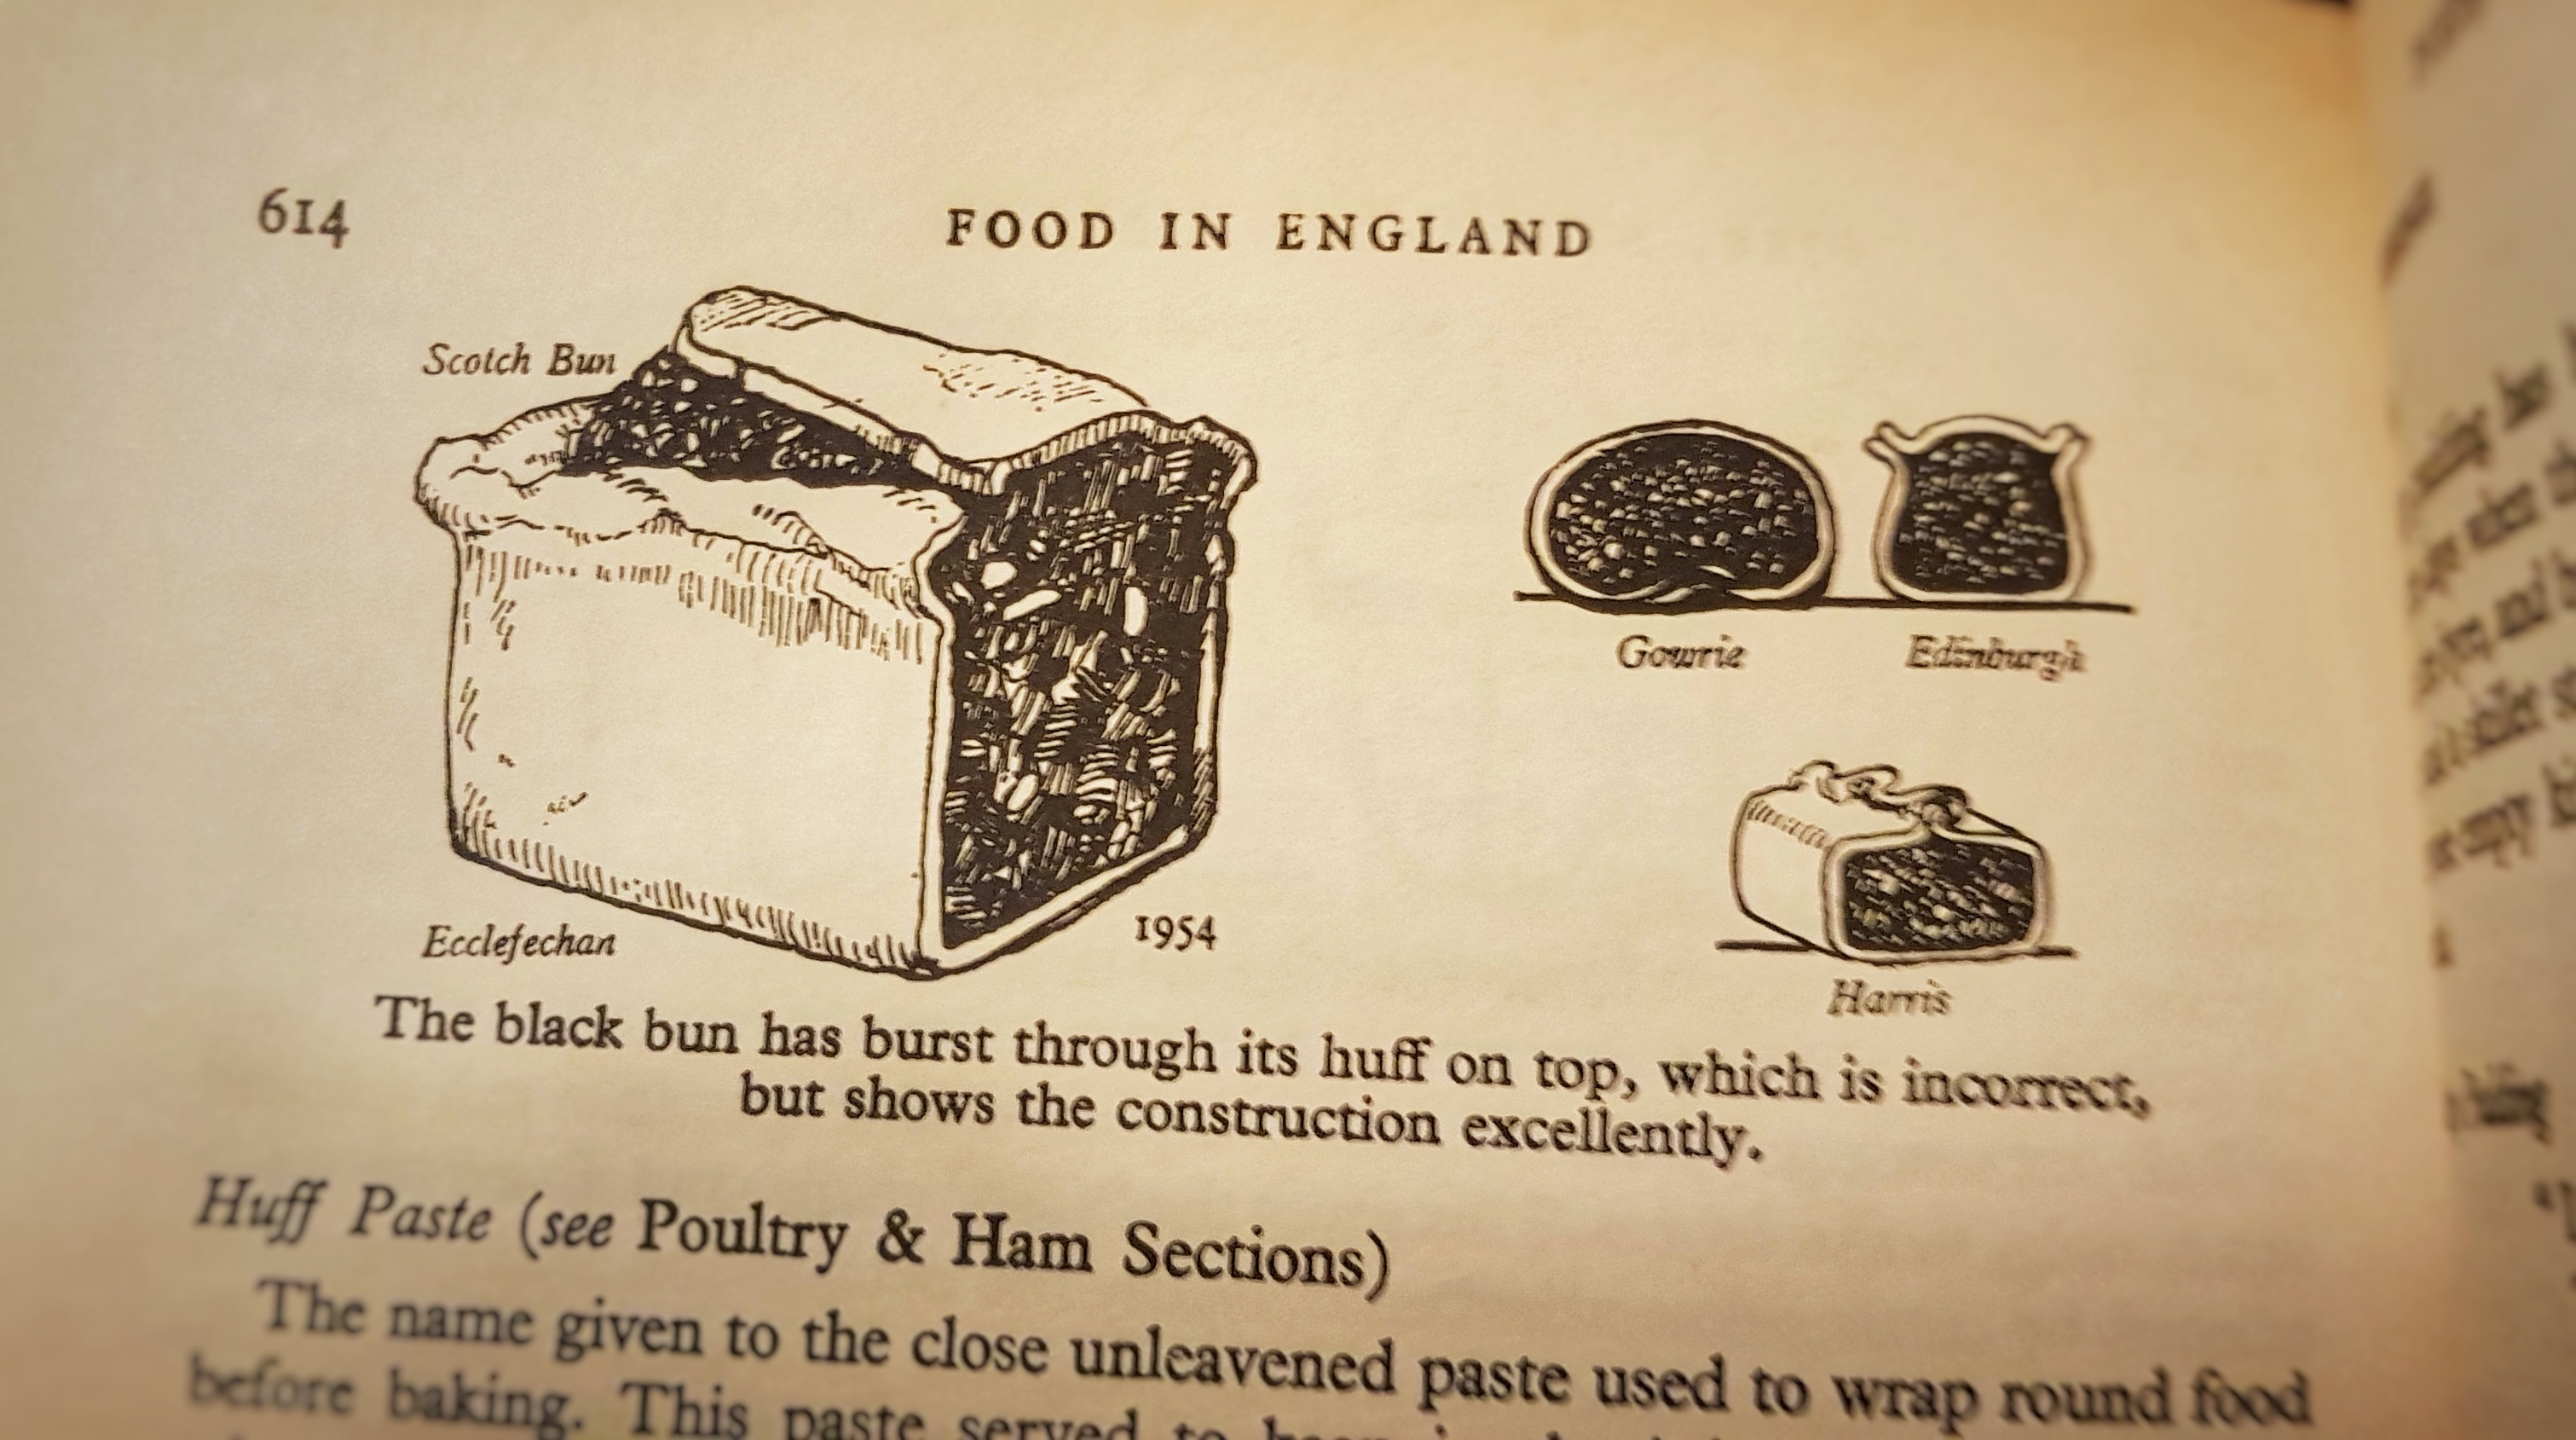
I first heard of the black bun, not in a Scottish cookery book as one might expect but in Elizabeth David’s English Bread and Yeast Cookery.[6] She described it as ‘a remarkable confection’, and it is one of the few British, but not English, recipes included in the volume. Indeed, as I found out whilst researching this post, black buns were sold by Edinburgh bakers and sent as gifts all across the British Isles; so it was, at a time, well-known outside of Scotland. Because her book is on yeast cookery, Elizabeth only includes older recipes that use yeast as a leavening agent. She provides several recipes from several sources, and it is interesting to see how the bun became richer and fruitier as time went on. Black buns grew to be so enriched that it became almost impossible to leaven them using yeast, luckily this happened around the same time chemical raising agents were commercially available. At first the chemically-leavened buns were made with bicarbonate of soda and buttermilk – just like a soda bread – but over time, it became more like a regular fruit cake.[7] The pastry initially used was a huff paste – a pastry somewhere between a hot water pastry and a shortcrust. At first it wasn’t eaten, the paste simply protecting the interior, however as time went on, the pastry was swapped for a richer, more buttery shortcrust.[8]
The black bun also gets a special mention in another classic book of English food, Dorothy Hartley’s Food in England,[9] where it is described as a pastry-lined cake. Interestingly, in this book, there is a rare illustration showing the variety of shapes in which the black buns were made:
There are many fantastic recipes for the cake/pastry sort of black bun; Sue Lawrence has one in her forthcoming Scottish Baking Book, and there is one is F. Marion McNeill’s wonderful The Scot’s Kitchen[10] too, so I thought I’d give the yeast-leavened one a go.
I read through a few recipes and based mine on a recipe by Florence Jack, provided by Ms. David in her book. What I liked about it was that it seemed very black: loads of currants and raisins as well as added treacle. I did tone some of the ingredients down because it seemed to me that it enriched it simply wouldn’t rise.
I’ll let you know how I got on in the next post….
If you like the blogs and podcast I produce and would to start a £3 monthly subscription, or would like to treat me to virtual coffee or pint: follow this link for more information.Thank you.
Notes:
[1] The other two options were Brussels sprouts and buche de Noel which attained 21% and 33% of the votes respectively.
[2] Mason, L. and Brown, C. (1999) The Taste of Britain. Devon: Harper Press.
[3] Lawrence, S. (2003) Sue Lawrence’s Scottish Kitchen. Headline.
[4] McNeill, F. M. (1968) The Scots Kitchen: Its Lore & Recipes. 2nd edn. Blackie & Son Limited.